• Skip to primary navigation
  • Skip to main content
  • Skip to primary sidebar
  • Home
  • About
  • Work With Me
  • Media
  • Recipes

Archives for May 2011

Spanish Almond Custard Torte

May 22, 2011


A few weeks ago I had the pleasure of going to a Tapeña® Wine and Tapas Party hosted by Katie from Katie’s Cucina. We had all sorts of goodies, including Tapeña® wine. The two wines we tasted were the Garnacha and the Tempranillo. Hopefully I will be able to try the other two Tapeña® wines, Verdejo and Rosé, which were unavailable at our local Total Wine & Beer store.


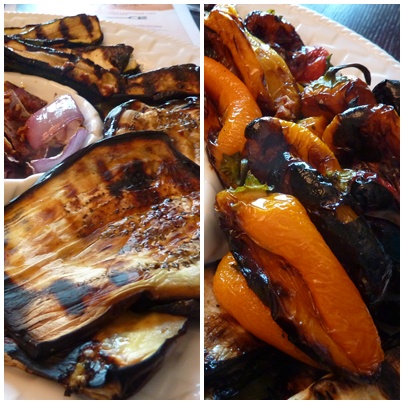
The tapas that Katie provided were delicious! She had Sweet and Savory Pumpkin Empanadas, Shrimp and Parsley Toasts, Mixed Grilled Vegetables, Barbeque Pork Pinchos and White Chocolate Raspberry Mousse Cups.


Being a pastry chef, I automatically volunteered to bring dessert. I had so many ideas and the internet is full of recipes, but I wanted something special and different, not just your average flan. I happened upon this Spanish Almond Custard Torte and decided it would be perfect.


I love baked custards more than almost anything. Baked pastry cream is divine! This is a basic pastry cream recipe with almond paste added. Almond paste has such a great, intense flavor – I love using it baked goods.


Spanish Almond Custard Torte
from Lisa & Tony Sierra, About.com

Spanish Almond Custard Torte Ingredients:
– Vegetable Shortening to coat pan
– 2 sheets Puff Pastry (1 package 17 ounce frozen puff pastry)
– 2 cups Milk
– 1 Cinnamon Stick
– 3 Egg, separated
– 2/3 cup granulated Sugar
– 1/4 cup Corn Starch
– 1/4 cup All-Purpose Flour
– 8 ounces Almond Paste

Spanish Almond Custard Torte Directions:
1. Remove Puff Pastry sheets from freezer and allow to thaw 10-15 minutes.
2. Using a paper towel, coat an 8-inch cake pan or springform pan with Vegetable Shortening
3. Line the cake pan with puff pastry, trimming edges to fit pan and pressing pastry where the bottom of the pan meets the sides.
4. Prick the bottom with a fork
5. Preheat oven to 350F
6. Pour all but 1/4 cup Milk into a medium-size, heavy bottom sauce pan and add the Cinnamon Stick. Bring milk just to the boiling point, then remove from heat and set aside to cool down.
7. In a large mixing bowl, beat the Egg Yolks and Sugar until the mixture turns light yellow and has a smooth texture. Add the Flour and Corn Starch to the egg mixture and beat with a hand mixer or stand mixer on medium-high speed. Add the reserved 1/4 cup milk and continue to mix until smooth and creamy
8. Remove cinnamon stick from warm milk. While stirring constantly, pour about 1/3 of the warm milk into the egg mixture. Once the milk is mixed in well, continue to stir while pouring in the rest of the milk.
9. Using a hand or stand mixer, add the Almond Paste and mix well
10. Transfer the mixture into the sauce pan and heat on medium, stirring constantly. Bring to a boil for just 30 seconds. Note: be careful while heating that lumps don’t form. If lumps do begin to form in the custard, try using a hand mixer on low to break up the lumps.
11. Remove from the stove and pour into the puff pastry crust.
12. To form the top crust, lay the other puff pastry sheet out on a clean cutting board and cut the sheet into strips and lay across the top.
13. Beat the Egg Whites in a small bowl. Brush beaten egg whites over the top of the crust.
14. Bake in middle rack of oven for 30-35 minutes. Remove and allow to cool for 20 minutes before serving. Refrigerate if the torte will not be eaten within an hour. Note: if using a springform pan, remove the sides and serve. Otherwise, cut and serve the torte from the cake pan

Until next time,
LOVE & CONFECTIONS!

Filed Under: Pies-Tarts-Crostatas, Uncategorized

Fudge Brownies – the best food for a road trip!

May 18, 2011


Yay roadtrips! I am even more excited because I will be trekking north to visit my parents. It isn’t that much of a road trip – only 8-10 hours – but still, what would that be without some great road food.

My sister and I will hopefully leave early enough so we will be home before dark. Even though my husband and I have our own apartment and my sister has hers, wherever our parents are, is where we call Home. I am also extremely excited to meet the newest addition to our family – an adopted 6 month old little boy Yorkie – Hercules!

My mom used to always have amazing food for us when we took family trips. We would have a cooler packed with drinks and a bag of homemade goodies. Most of the time they were her brownies. She didn’t usually make from scratch brownies – but with that one box mix that is our family’s go-to, who would?

I decided to try my hand at some homemade brownies. Lucky for me, brownies freeze well, because I made these about a week ago, a few days before my hand surgery. My hand is doing okay. I can’t do a lot of things, like grip anything, but I’ll get that back.

Baking is on the list of things I will have to work up to, but I am excited to get back to it. Mom even said that while I’m there, we can do some baking – basically I’ll direct and she’ll do all the work, but it will be baking nonetheless.

These brownies were relatively easy to make – just a few more steps than the normal tear open a box and measure out some liquid. They’re thick and rich, chewy and cakey, and extremely chocolate-y all at once. You’ll probably want a giant cold glass of milk alongside these dark beauties.


Fudge Brownies
from King Arthur Flour

Brownie Ingredients:
– 2 sticks unsalted Butter
– 15 3/4 ounces granulated Sugar
– 4 large Eggs
– 3 3/4 ounces Dutch-Process Cocoa
– 1 teaspoon Salt
– 1 teaspoon Baking Powder
– 1 teaspoon Espresso Powder
– 1 tablespoon Vanilla Extract
– 6 1/4 ounces All-Purpose Flour
– 12 ounces Chocolate Chips

Brownie Directions:
1. Preheat the oven to 350F. Lightly grease a 9″ x 13″ pan.
2. In a saucepan set over low heat, melt the Butter, then add the Sugar and stir to combine. Return the mixture to the heat briefly, just until it’s hot (about 110F to 120F) but not bubbling. It will become shiny looking as you stir it. Heating this mixture a second time will dissolve more of the sugar, which will yield a shiny top crust on your brownies.
3. While the sugar heats a second time, crack the 4 Eggs into a bowl – or your stand mixing bowl, and beat them with the Cocoa Powder, Salt, Baking Powder, Espresso Powder and Vanilla Extract until smooth.
4. Add the hot butter/sugar mixture, stirring until smooth.
5. Add the Flour and Chocolate Chips, again stirring until smooth. Note: if you want the chips to remain intact in the baked brownies, rather than melting in, let the batter cool in the bowl for about 20 minutes before stirring in the chips
6. Spoon the batter into the lightly greased pan
7. Bake the brownies for 30 minutes, until a cake tester inserted into the center comes out clean, or with just a few moist crumbs clinging to it. The brownies should feel set on the edges, and the center should look very moist, but not uncooked. Remove them from the oven and cool on a rack before cutting and serving.

Until next time,
LOVE & CONFECTIONS!

Filed Under: Brownies & Bars, Uncategorized

Lemon Brown Sugar Meringue Tart for Mother’s Day

May 8, 2011


Door to door, my Mom lives 615 miles away. I get to visit her a few times a year, and she also gets to come her a few times a year, but it is difficult living that far away. I want to be near her and want her around for certain things. Like this past week while I have been sick – no matter how many times I make it, my chicken soup never tastes as good as hers. I think her secret ingredient is Mom’s Love.

Mother’s Day is always a difficult holiday when loved ones are not there. My Mom lives in another state. My paternal Grandmother lives a few hours away in another city. My maternal Grandmother is in Heaven. It’s even more difficult when there are specific things you miss and can will never be able to have again. I miss my Grandmother’s roasted chicken. There was just something about the way she cooked it. We would gather around the table, my Grandfather and I would grab the dark meat while everyone else had white meat, and we would enjoy a great family meal and each others company.


My Mom’s favorite dessert is Lemon Meringue Pie. She requests it whenever it’s her birthday or for any occasion that needs a special dessert. My Grandmother made the best Lemon Meringue Pie. There was none like it. Lemon Meringue Pie and Eggplant Parmesan are what my Mom misses most from my Grandmother’s cooking. I think Grandma had some of that Mother’s Love secret ingredient too!


I know it doesn’t come close to her Lemon Meringue Pie, but I wanted to make something special for my Mom on Mother’s Day – even though I won’t get to see her for a couple of weeks – it’s the thought that counts. I can’t put Mother’s Love in it, but I hope Daughter’s Love will do.

Next mission – to attempt Grandma’s Eggplant Parmesan. Maybe I’ll come close enough to Grandma’s recipe and be able to make Mom smile.

Happy Mother’s Day, Mom! I love you and can’t wait to see you soon <3
p.s. Mom, this tart was pretty good! 🙂

Is there any special dish your Mom makes that you absolutely love? Share it in the comments!

Lemon Brown Sugar Meringue Tart
Lemon Curd – Joyofbaking.com
Brown Sugar Meringue – Me

Tart Crust:
– I used a pre-made pie shell, but you can use whatever recipe you like best.

Tart Crust Directions:
1. Preheat oven to 400F
2. haw Pie Crust by following directions on package
3. Unroll and gently place over tart pan with removable base
4. Gently push the dough into place, without stretching the dough. (It will shrink during baking if you stretch it)
5. Trim any excess dough and dock pie dough with a fork along the bottom
6. Place a piece of parchment paper on the tart – big enough to fit over the whole tart and sides – and then fill with either pie weights or dry beans (re-usable and used only for baking weights).
7. Bake tart for 20-25 minutes
8. Remove parchment paper with beans and save beans for later use

Lemon Curd Ingredients: (I doubled it to have extra)
– 3 large Eggs
– 3/4 cup Granulated Sugar
– 1/3 cup fresh Lemon Juice – do not use the bottled juice
– 4 tablespoons unsalted Butter, room temperature
– 1 tablespoon finely shredded Lemon Zest – zest lemons before squeezing for juice

Lemon Curd Directions:
1. Turn oven down to 350F
2. In stainless steel bowl over a pot of simmering water, whisk together Eggs, Sugar and Lemon Juice until blended.
3. Cook, stirring constantly (to prevent it from curdling), until the mixture becomes thick (like sour cream or a hollandaise sauce). Approximately 160F if you have a thermometer. This will take about 10 minutes.
4. Remove from heat and immediately pour through a fine strainer to remove any lumps.
5. Cut the Butter into small pieces and whisk into the mixture until the butter has melted.
6. Add the Lemon Zest, stir, and let cool. The Lemon Curd will continue to thicken as it cools
7. Cover immediately (so a skin doesn’t form) and it can be refrigerated for up to a week.
8. Place Lemon Curd in pie crust and bake at 350F for 10 minutes. Do not let it brown – just cook until set, but still wobbly in the center.

Brown Sugar Meringue Ingredients:
– 6 Egg Whites, room temperature
– 2 cups Brown Sugar
– pinch of Salt

Brown Sugar Meringue Directions:
– For those of you familiar with types of meringue, this is a Swiss Meringue recipe, but unlike regular Swiss Meringue, the Brown Sugar automatically dissolves in the Egg Whites, so you just need to warm it like a regular Swiss Meringue – not having to worry if the sugar is dissolved or not.
1. In a bowl of your stand mixer, add the Egg Whites, Brown Sugar and a pinch of Salt
2. Whisk together while it is placed over a pot of simmering water – same pot used to make the Lemon Curd – while being careful the water does not touch the bottom of the bowl!
3. Continue to whisk until the egg and brown sugar mixture are warm. You can use your fingers to tell the temperature, while making sure you don’t cook the egg whites too much. It should be warmer than room temperature.
4. Place bowl on stand mixer, attach whip and whip it on high.
5. Place a piece of foil completely around the bowl and your mixer. The warmer the egg whites are, the better they whip. The foil keeps them warm.
6. Remove the foil after the whites are whipped perfectly.
7. Spoon or pipe meringue onto Lemon Curd Tart carefully, making sure to cover the entire surface of the curd. Using a palette knife or spatula, create whatever design you prefer for the top of the meringue tart
8. You can either use a torch – like I did – or place it in the oven for a few minutes, to brown the meringue

Until next time,
LOVE & CONFECTIONS!

Filed Under: Pies-Tarts-Crostatas, Trifles-Parfaits-Mousses-Curds, Uncategorized

Primary Sidebar

Meet Terri
founder & pastry chef

Subscribe to Love and Confections

Popular Posts

Pumpkin Pecan Cupcakes with Cinnamon Cream Cheese Frosting
Pumpkin Spice Cinnamon Roll Cake
Oatmeal Cream Pie Layer Cake - oatmeal brown sugar layer cake, marshmallow frosting filling, and vanilla bean buttercream with oatmeal cream pie garnish
Easy Piña Colada Poke Cake - pineapple cake, coconut cream pudding, whipped topping, pineapple chunks and maraschino cherries
Mermaid layer cake
PIneapple cake with pineapple curd, teal frosting and tropical sprinkle mix
Irish Cream chocolate cupcakes topped with white and green buttercream piping and shamrock sprinkle mix

AMAZON AFFILIATE

Love and Confections is a participant in the Amazon Services LLC Associates Program, an affiliate advertising program designed to provide a means for sites to earn advertising fees by advertising and linking to amazon.com.

Copyright © 2018 Love and Confections · Log in