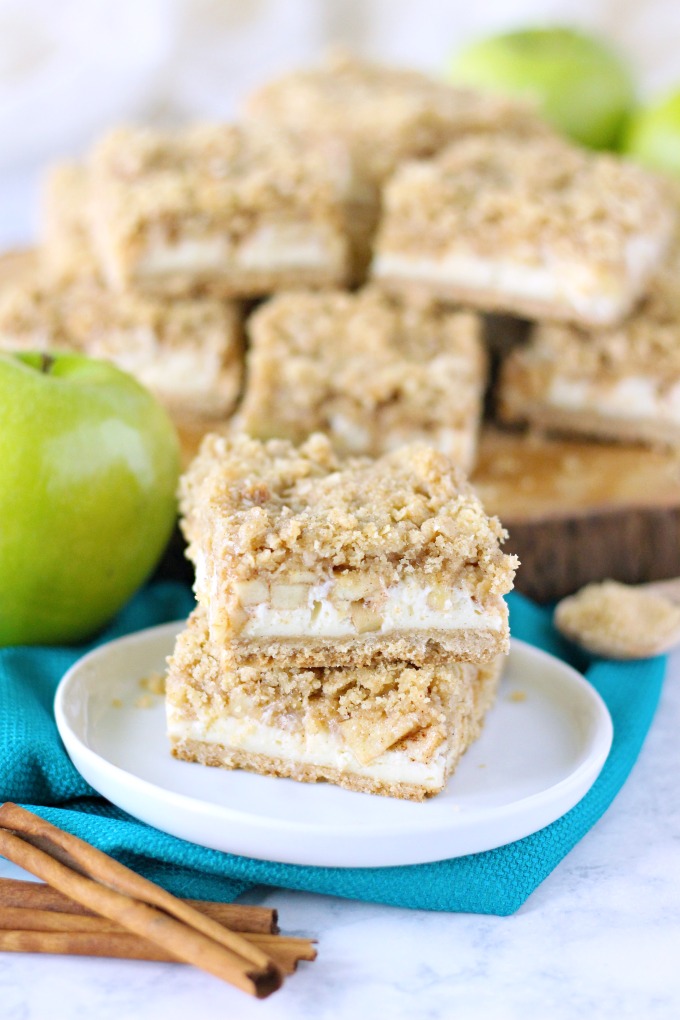
Dutch apple pie meets cheesecake bars in a delicious and easy Fall-inspired treat – Apple Cheesecake Streusel Bars.
I received product samples from sponsor companies to aid in the creation of the #FallFlavors recipes. All opinions are mine alone.
…

Dutch apple pie meets cheesecake bars in a delicious and easy Fall-inspired treat – Apple Cheesecake Streusel Bars.
I received product samples from sponsor companies to aid in the creation of the #FallFlavors recipes. All opinions are mine alone.
…
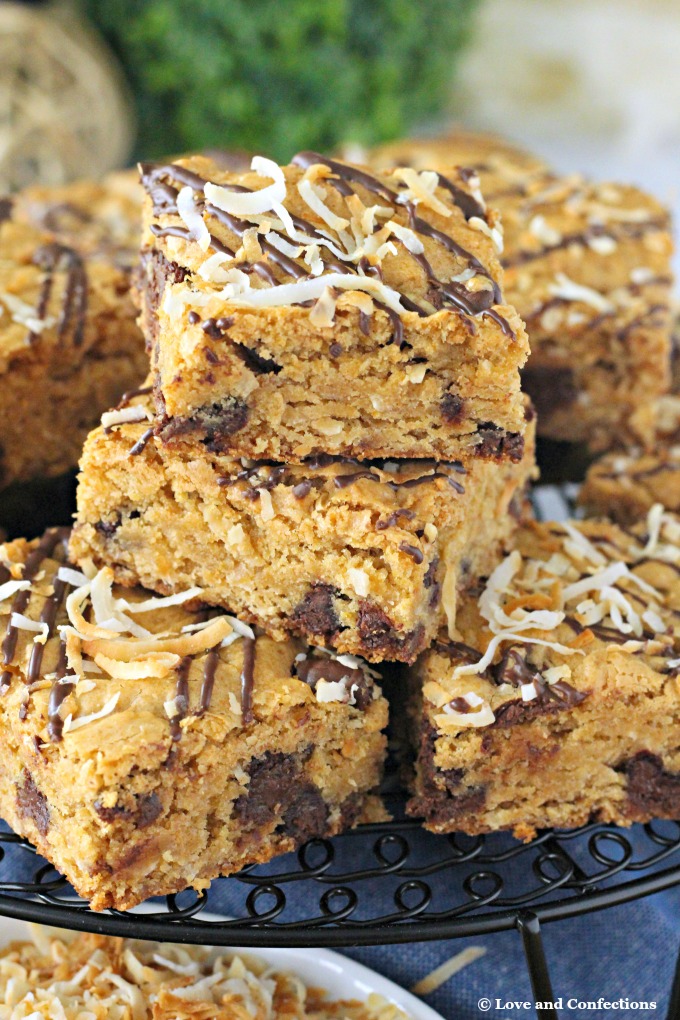
I gave my family’s recipe for Congo Squares a Summer upgrade and added shredded coconut, for a delicious spin on the classic chocolate chip cookie bars! You won’t be able to stop eating these Chocolate Coconut Congo Squares!
I received product samples from sponsor companies to aid in the creation of the #SummerDessertWeek recipes. All opinions are mine alone.
…
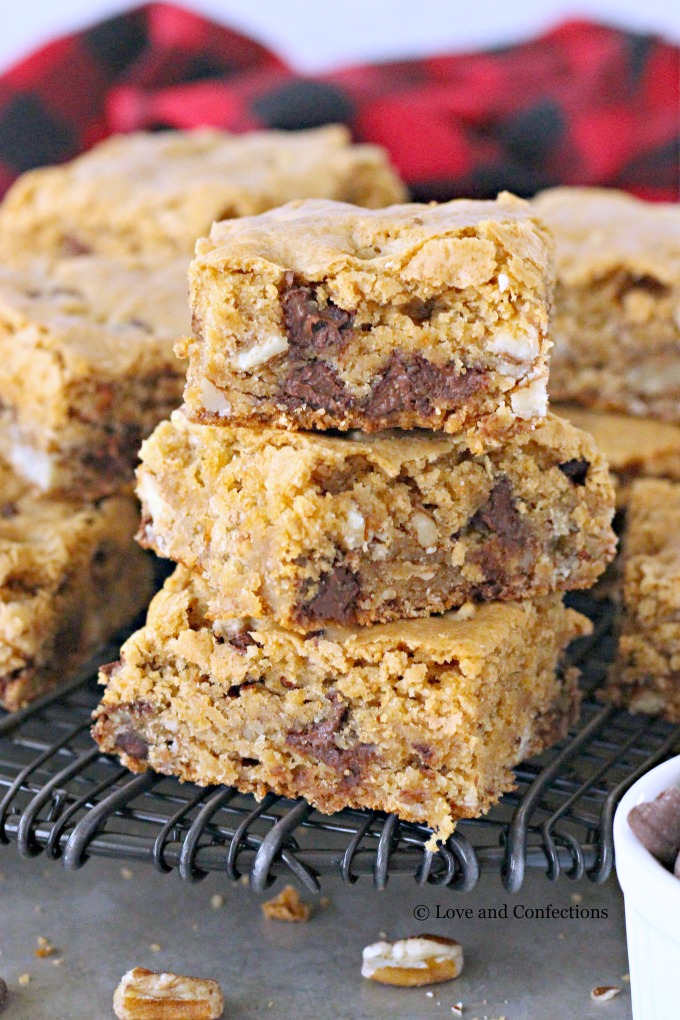
Chocolate Pecan Congo Squares are a thick, blondie-like cookie bar with crisp edges and a chewy center. It’s the perfect dessert square for a crowd.
This post is sponsored in conjunction with #BrunchWeek. I received product samples from sponsor companies to aid in the creation of the #Brunchweek recipes. All opinions are mine alone.
…

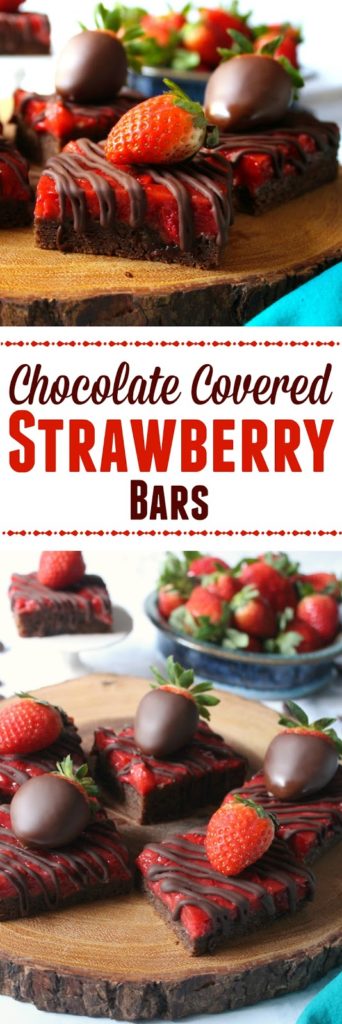
Strawberry season in Florida yields sweet, delicious red fruit, and aside from eating it straight off the bushes, I love baking with strawberries. Strawberry Fraisier and Strawberry Freezer Jam are a must, and I also love making Strawberry Lemonade Spritzers when the weather starts to warm up.


I first learned how to make German Chocolate Cake in culinary school. We baked and layered a delicious chocolate cake, made the coconut pecan frosting, frosted, then added some chocolate decorations. I wasn’t a big fan of coconut back then, so I had a bite and moved on.

Fast forward a few years and I decided to start baking with coconut more. Both my dad and Mr. L&C love coconut everything – especially when it’s paired with chocolate. Instead of the normal layer cake, I created some delicious, and easy German Chocolate Cookie Bars.

These bars use a cake mix as the base, which speeds things up, and some chocolate pudding to make it super moist. I also added chopped German Chocolate pieces for some extra chocolate gooeyness. The traditional coconut pecan frosting is jazzed up with an extra drizzle of chocolate on top.

Trust me when I say, these are so good, they will disappear faster than you can say German Chocolate Cookie Bars. Everyone loved them! I hope you try this easy and delicious recipe.

Until next time,
LOVE & CONFECTIONS!

I have an ongoing relationship with Dixie Crystals as a recipe developer and brand ambassador. I receive product, coupons and/or compensation for posts featuring their products. Thank you for supporting the brands that make Love and Confections possible. As always, all opinions are my own.
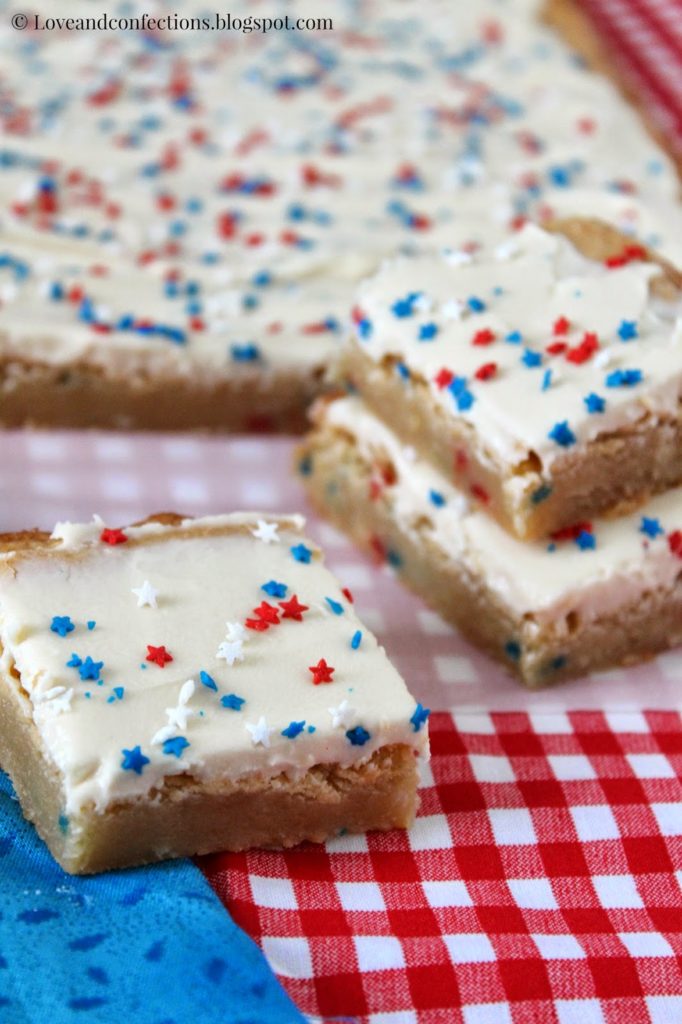
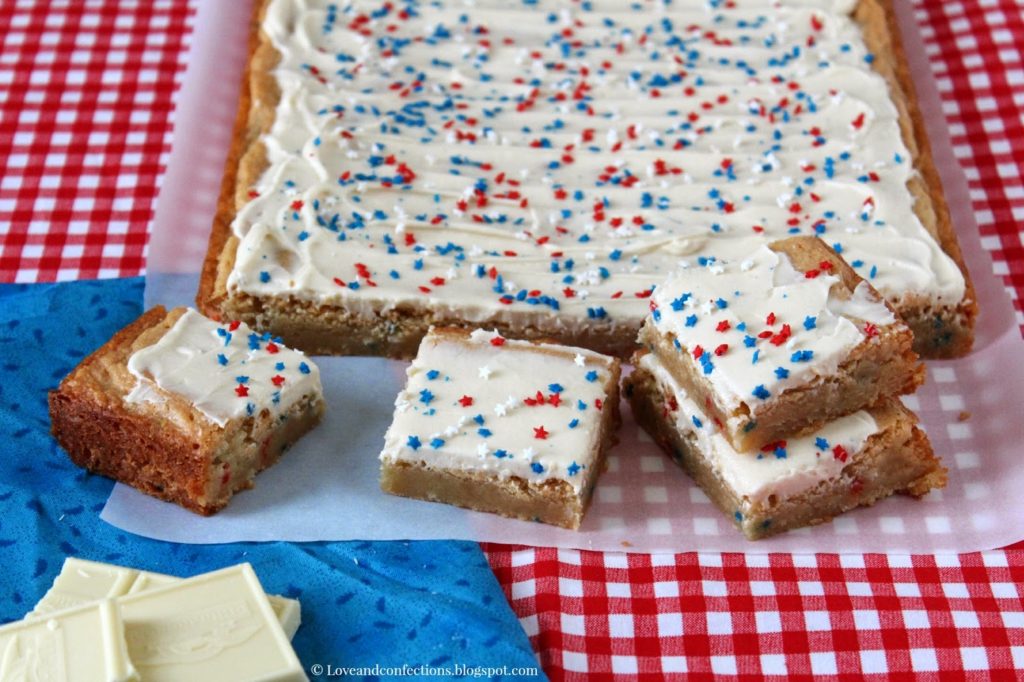

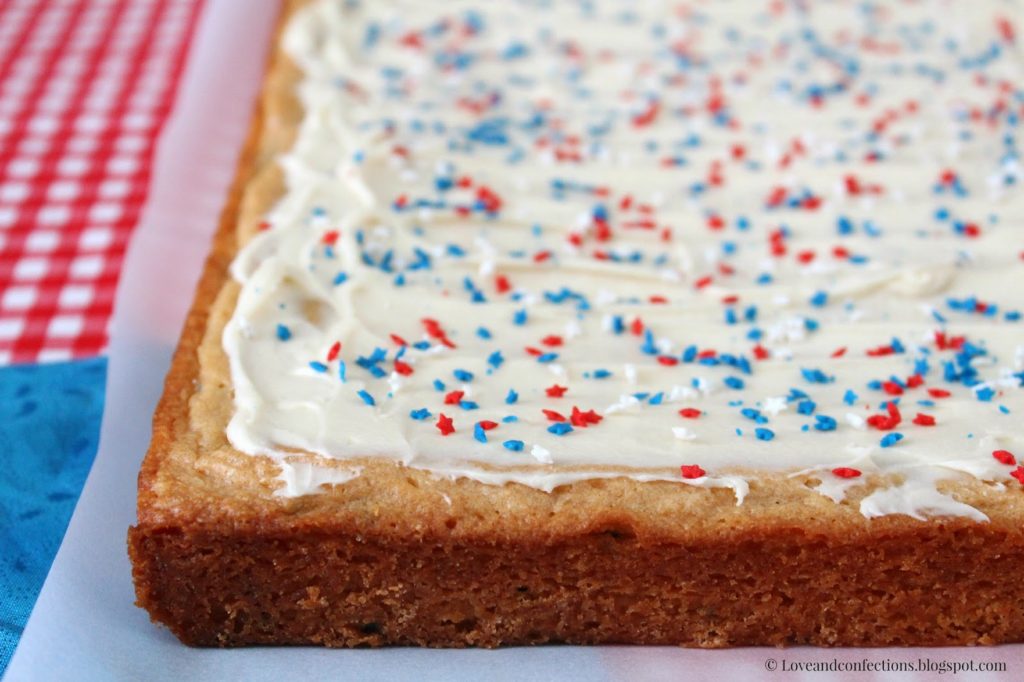
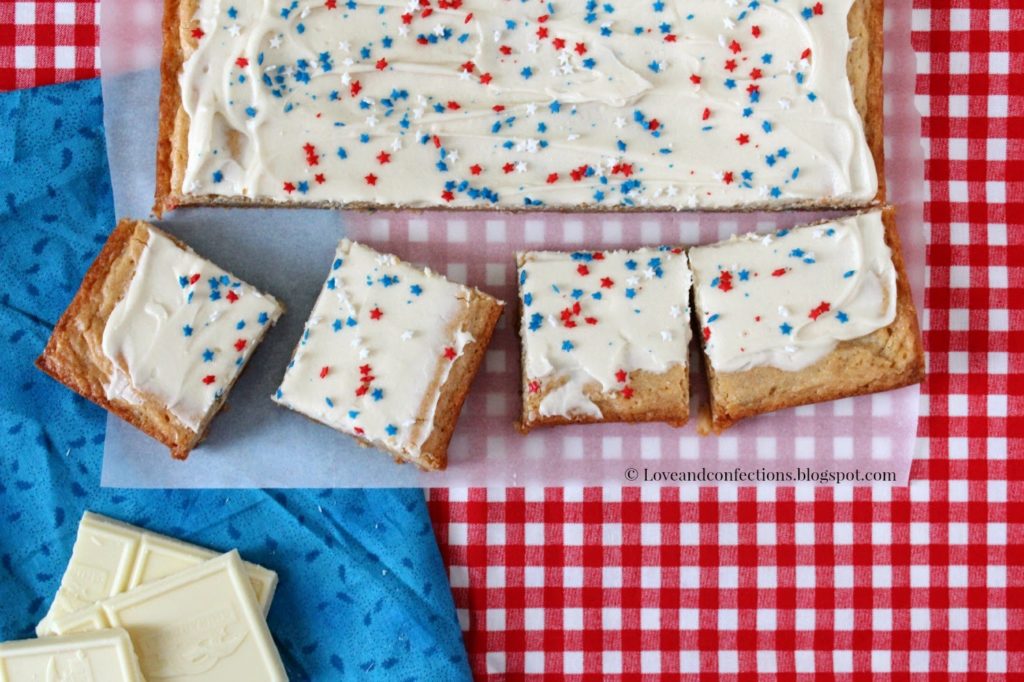
White Chocolate Blondies with White Chocolate Frosting
a Love and Confection original
Click here for the printable recipe
White Chocolate Blondie Ingredients:
– 2 sticks Unsalted Butter, room temperature
– 6 ounces White Baking Chocolate
– 1 cup Brown Sugar
– 1 cup Granulated Sugar
– 2 large Eggs
– 2 teaspoons Vanilla Extract
– 1 teaspoon Salt
– 2 cups All-Purpose Flour
– 1/4 cup Milk
– 2 tablespoons Sprinkles (optional)
White Chocolate Blondie Directions:
1. Heat the oven to 350°F. Prepare a 9×13 baking pan with parchment paper and baking spray (leaving an overhand so you can get the blondies out easily).
2. In a small saucepan, melt the Butter and White Baking Chocolate until there are no lumps, stirring frequently so it doesn’t burn.
3. In the bowl of your stand mixer or a medium bowl with a hand mixer, add the Butter/Chocolate mixture, Brown Sugar, Granulated Sugar, Eggs, Vanilla Extract and Salt. Blend until combined.
4. Add in the Flour, one cup at a time and the Milk. Mix to combine.
5. Add the Sprinkles and mix by hand with a spatula. Pour into pan and bake for 30-35 minutes, or until a toothpick inserted in the center comes out clean.
6. Cool in pan for 10 minutes, then using the parchment paper, remove from pan and cool on wire rack. Frost when cool (optional).
White Chocolate Frosting Ingredients:
– 2 ounces White Baking Chocolate
– 3 tablespoons Unsalted Butter, room temperature
– 1 teaspoon Vanilla Extract*
– Pinch of Salt
– 1 cup Powdered Sugar
– 2 tablespoons Heavy Cream
– Sprinkles (optional)
White Chocolate Frosting Directions:
1. Melt White Baking Chocolate in a microwave-safe bowl for 20 second intervals, stirring after each round in the microwave.
2. In a small bowl, mix the White Chocolate, Butter, Vanilla Extract and Salt until combined.
3. Add in the Powdered Sugar, one half cup and a time and mix together – I used a hand mixer for the frosting. Add in Heavy Cream and blend
4. Frost on cool blondies with an offset spatula. Decorate with
* for a whiter frosting, use clear vanilla extract – although it will not be completely white because of the color of butter and white chocolate.
Until next time,
LOVE & CONFECTIONS!
Disclaimer: post contains affiliate links.
This is my entry for the Food and Wine Conference Dixie Crystal Brownie Dessert Contest. You can get more information about the conference in my Food and Wine Conference blog post as well as a promotional code for a discounted ticket!
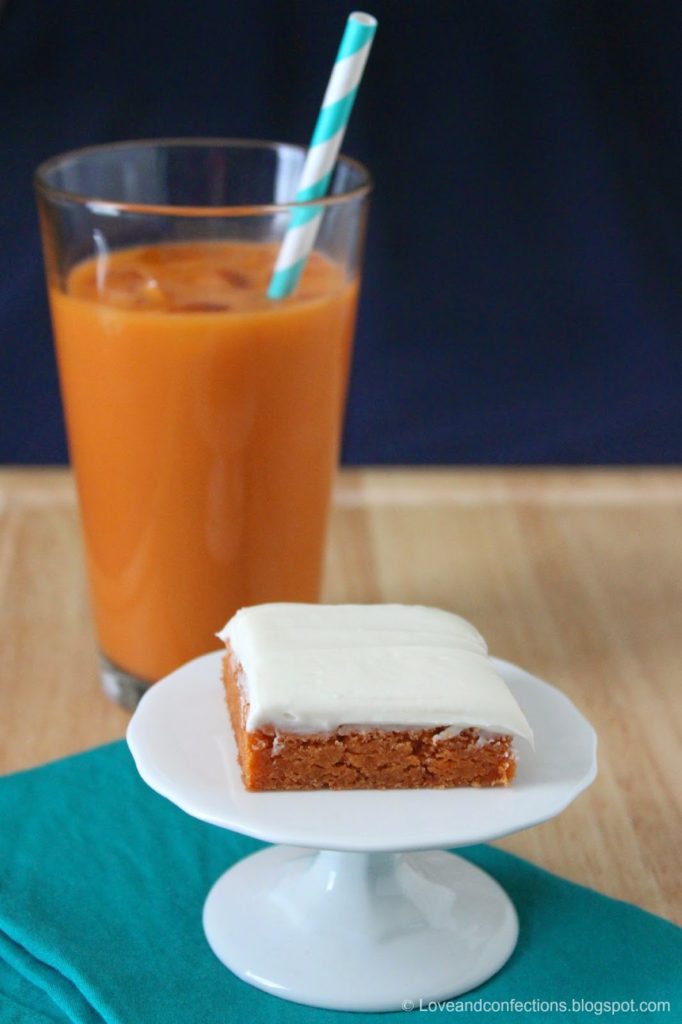
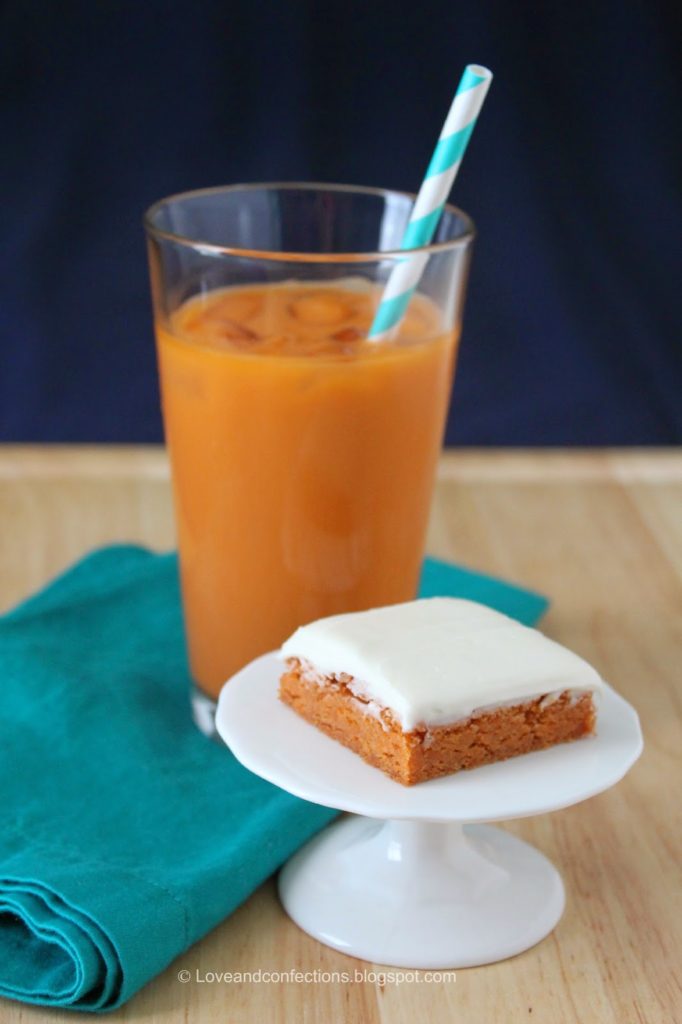
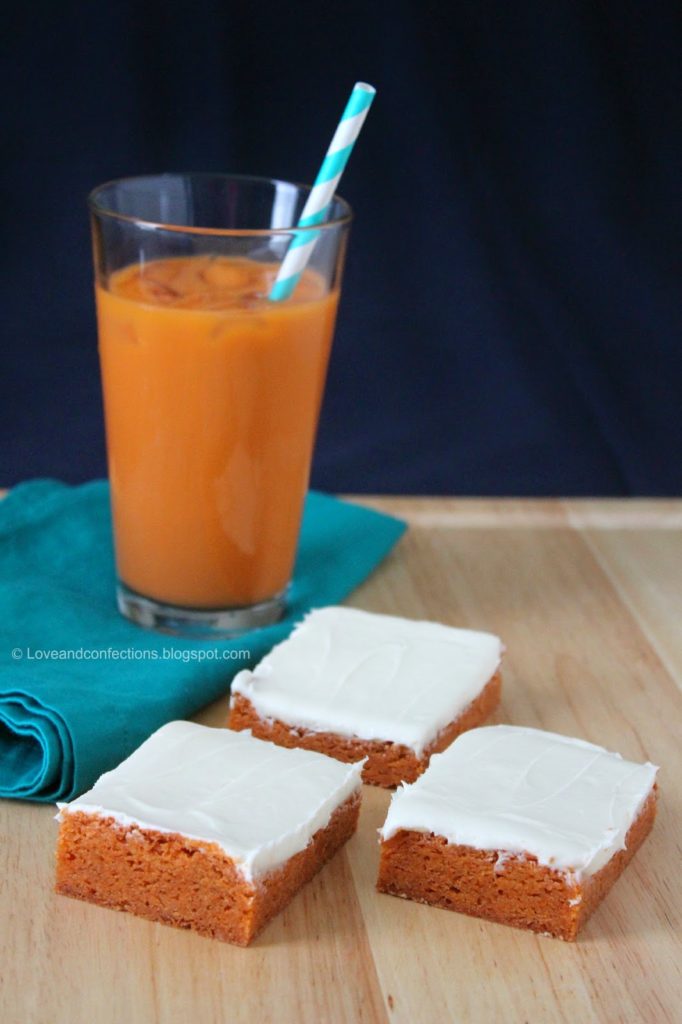
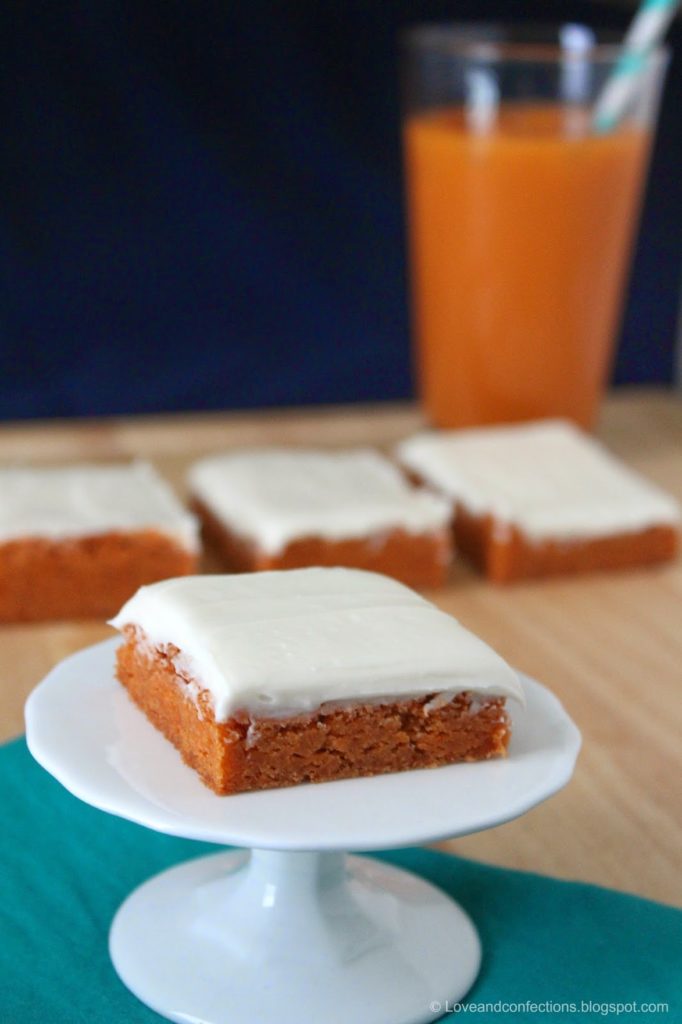
Thai Tea Blondies with Sweetened Condensed Milk Frosting
a Love and Confections original recipe
Makes 24 squares
Click here for printable recipe
Thai Tea Blondie Ingredients:
– 2 sticks Unsalted Butter, melted and cooled slightly
– 1 cup Dixie Crystals Light Brown Sugar
– 2 large Eggs, room temperature
– 2 teaspoons Vanilla Extract
– 2 cups All-Purpose flour
– 1 teaspoon Salt
– 4 packet of Instant Thai Tea
Thai Tea Blondie Directions:
1. Heat oven to 350°F. Line a 9×13 baking pan with parchment (leaving some overhang so you can get the blondies out of the pan easily) then spray with baking spray.
2. In either your stand mixer or in a medium bowl with a hand mixer, blend together the melted Butter and Light Brown Sugar.
3. Add in the Eggs one at a time, followed by the Vanilla Extract. Scrape the sides of the bowl to insure everything is mixed.
4. In a small bowl, mix the Flour, Salt and Instant Thai Tea together with a whisk.
5. While the butter mixture is beating on low, add in the flour mixture a 1/2 cup at a time. Once all combined, use a spatula and scrape the sides to make sure everything is combined.
6. Pour into prepared pan and bake for 25-30 minutes, rotating halfway, or until a toothpick stuck into the center comes out clean.
7. Let it cool in the pan for 10 minutes, then using the parchment, lift the blondies out and cool completely on a wire rack before frosting.
Sweetened Condensed Milk Frosting Ingredients:
– 3 tablespoons Unsalted Butter, room temperature
– 1 & 1/2 cups Dixie Crystals Powdered Sugar
– 2-3 ounces Sweetened Condensed Milk
– a pinch of Salt
Sweetened Condensed Milk Frosting Directions:
– This frosting makes a thin, sweet layer on top of the blondies. You can increase the powdered sugar to your liking to create a thicker frosting.
1. In a small bowl, with a hand blender, cream the Butter and Powdered Sugar together on a low speed.
2. Add in the Sweetened Condensed Milk. If you use more than 2 ounces, you will have to increase your powdered sugar so it will not be too runny.
3. Add in the Salt and mix until blended. Frost the Blondies with an offset spatula and enjoy!
Follow Dixie Crystals on Twitter, Facebook, Pinterest, and Instagram.
Until next time,
LOVE & CONFECTIONS!
Disclaimer: post contains affiliate links

It’s almost September and Halloween stores are opening and pumpkin recipes are up on the internet. Summer is still in full effect here in Florida. These past few days have been hot and humid and I cannot wait for cooler weather and Fall baking. Until then, I decided to go with a bright and summery dessert bar for you.

I am not the biggest raspberry fan. I love the flavor, but I just can’t get past all the seeds. It tastes great, but if I had a choice between raspberries, blueberries or strawberries, I’d choose the last two.

I decided to use the raspberries I had to make some more room in freezer. This is the perfect way to use frozen raspberries, because they don’t always hold their shape once thawed.

Raspberry Crumb Bars
adapted from allrecipes.com
Raspberry Crumb Bar Ingredients:
200 grams Granulated Sugar (1 cup)
3 grams Baking Powder (1 tsp)
375 grams All Purpose Flour (3 cups)
2 grams Salt (1/4 tsp)
Zest from one medium Lemon (1 tbsp)
226 grams cold unsalted Butter (2 sticks)
100 grams Eggs (2)
400 grams frozen Raspberries, thawed and strained of any extra juice (2 cups)
100 grams Granulated Sugar (1/2 cup)
18 grams Corn Starch (2 tbsp)
Raspberry Crumb Bar Directions:
– Heat oven to 350F. Grease and flour, or use baking spray, on a 9 x 13 non-stick pan.
– In a medium bowl, combine the first measure of Granulated Sugar, Baking Powder, All Purpose Flour, Salt and Lemon Zest. Using a pastry blender or fork and knives, cut the cold Butter into the dry ingredients, until pea-sized shapes are formed. Add in the 2 Eggs and continue to cut to combine.
– Using 1/2 to 2/3 of the mixture, press it into the bottom of the pan.
– In a separate bowl, combine the thawed Raspberries, second measure of Granulated Sugar and Corn Starch. Scoop the Raspberry mixture evenly over the bottom crust. Sprinkle the remaining dry mixture evenly over the top.
– Bake for 45 minutes, or until golden brown. Cool completely before cutting.
Until next time,
LOVE & CONFECTIONS!

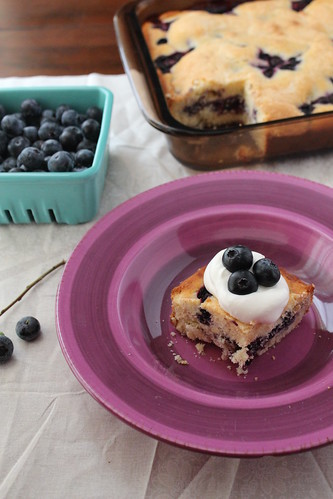
Wednesday, I blogged about my tour of Lake Catherine Blueberries. I had so many ideas of what to make with my fresh blueberries. I decided to share a recipe that my family has been making for nearly 4 generations.
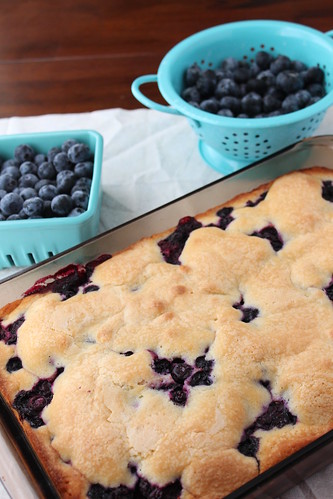
Somewhere along the line, my Great-Grandmother and her sisters started baking this fruit square recipe. It is a very hearty and dense recipe that isn’t too sweet, but just sweet enough. I actually eat it the day after it is baked, because I like the flavor better. This is also great served warm with some vanilla bean ice cream. This recipe works well with basically any fresh fruit. You can even use canned pie fillings if you’re in a pinch.
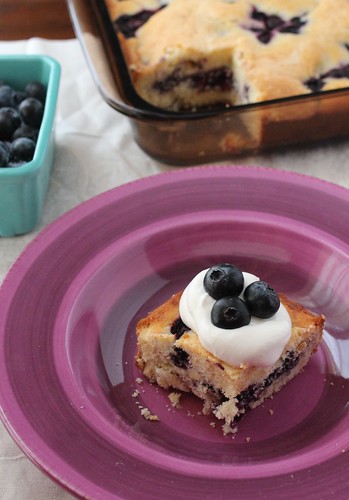
Blueberry Squares
a Love and Confections Family recipe
This recipe was adapted from my Great-Grandmother. It’s a very hearty and dense cake-like treat, that isn’t too sweet. You can make it in a 9×13 cake pan or a 12×16 cookie sheet with sides – your choice.
Blueberry Squares Ingredients:
– 1/2 cup Granulated Sugar (100g)
– 4 cups fresh Blueberries
– 1 teaspoon Lemon Zest
– 1 teaspoon Lemon Juice
– 2 sticks Butter
– 1 & 1/2 cups Granulated Sugar (300g)
– 1 teaspoon Vanilla Extract
– 1/2 teaspoon Almond Extract
– 4 large Eggs (200g)
– 3 cups All-Purpose Flour (375g)
– 1/2 teaspoon Baking Powder
– 3 tablespoons Heavy Cream
Blueberry Squares Directions:
– Preheat oven to 350F. Grease and flour your baking dish (9×13 or 12×16). Make sure all your ingredients are at room temperature and that your Blueberries are clean.
– In a small bowl, add in the first measurement of Granulated Sugar, Blueberries, Lemon Zest and Lemon Juice. Toss to combine and set aside.
– In the bowl of your stand mixer, cream the Butter and Sugar until light and fluffy. Add in the Vanilla and Almond Extracts. Scrape down the sides of the bowl.
– Add one egg at a time and mix until fully incorporated before adding another. Scrape the sides of the bowl after each egg is mixed in.
– Sift together the Flour and Baking Powder. Slowly add it into the batter, stopping to scrape the sides halfway through. Gradually add in the Heavy Cream, one tablespoon at a time.
– Spread 3/4 of the mixture in the bottom of your baking dish. Evenly distribute the Blueberry mixture over the batter. Randomly drop the remaining batter, by the spoonful, over the Blueberries, and bake for 25-30 minutes – depending on your oven – or until a cake tester comes out clean after inserted into the middle of the squares.
– Serve with whipped cream or ice cream and enjoy!
Until next time,
LOVE & CONFECTIONS!

Yay roadtrips! I am even more excited because I will be trekking north to visit my parents. It isn’t that much of a road trip – only 8-10 hours – but still, what would that be without some great road food.
My sister and I will hopefully leave early enough so we will be home before dark. Even though my husband and I have our own apartment and my sister has hers, wherever our parents are, is where we call Home. I am also extremely excited to meet the newest addition to our family – an adopted 6 month old little boy Yorkie – Hercules!

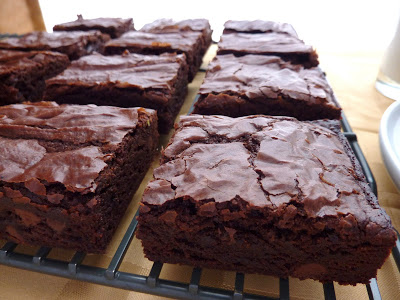
I decided to try my hand at some homemade brownies. Lucky for me, brownies freeze well, because I made these about a week ago, a few days before my hand surgery. My hand is doing okay. I can’t do a lot of things, like grip anything, but I’ll get that back.
Baking is on the list of things I will have to work up to, but I am excited to get back to it. Mom even said that while I’m there, we can do some baking – basically I’ll direct and she’ll do all the work, but it will be baking nonetheless.
These brownies were relatively easy to make – just a few more steps than the normal tear open a box and measure out some liquid. They’re thick and rich, chewy and cakey, and extremely chocolate-y all at once. You’ll probably want a giant cold glass of milk alongside these dark beauties.
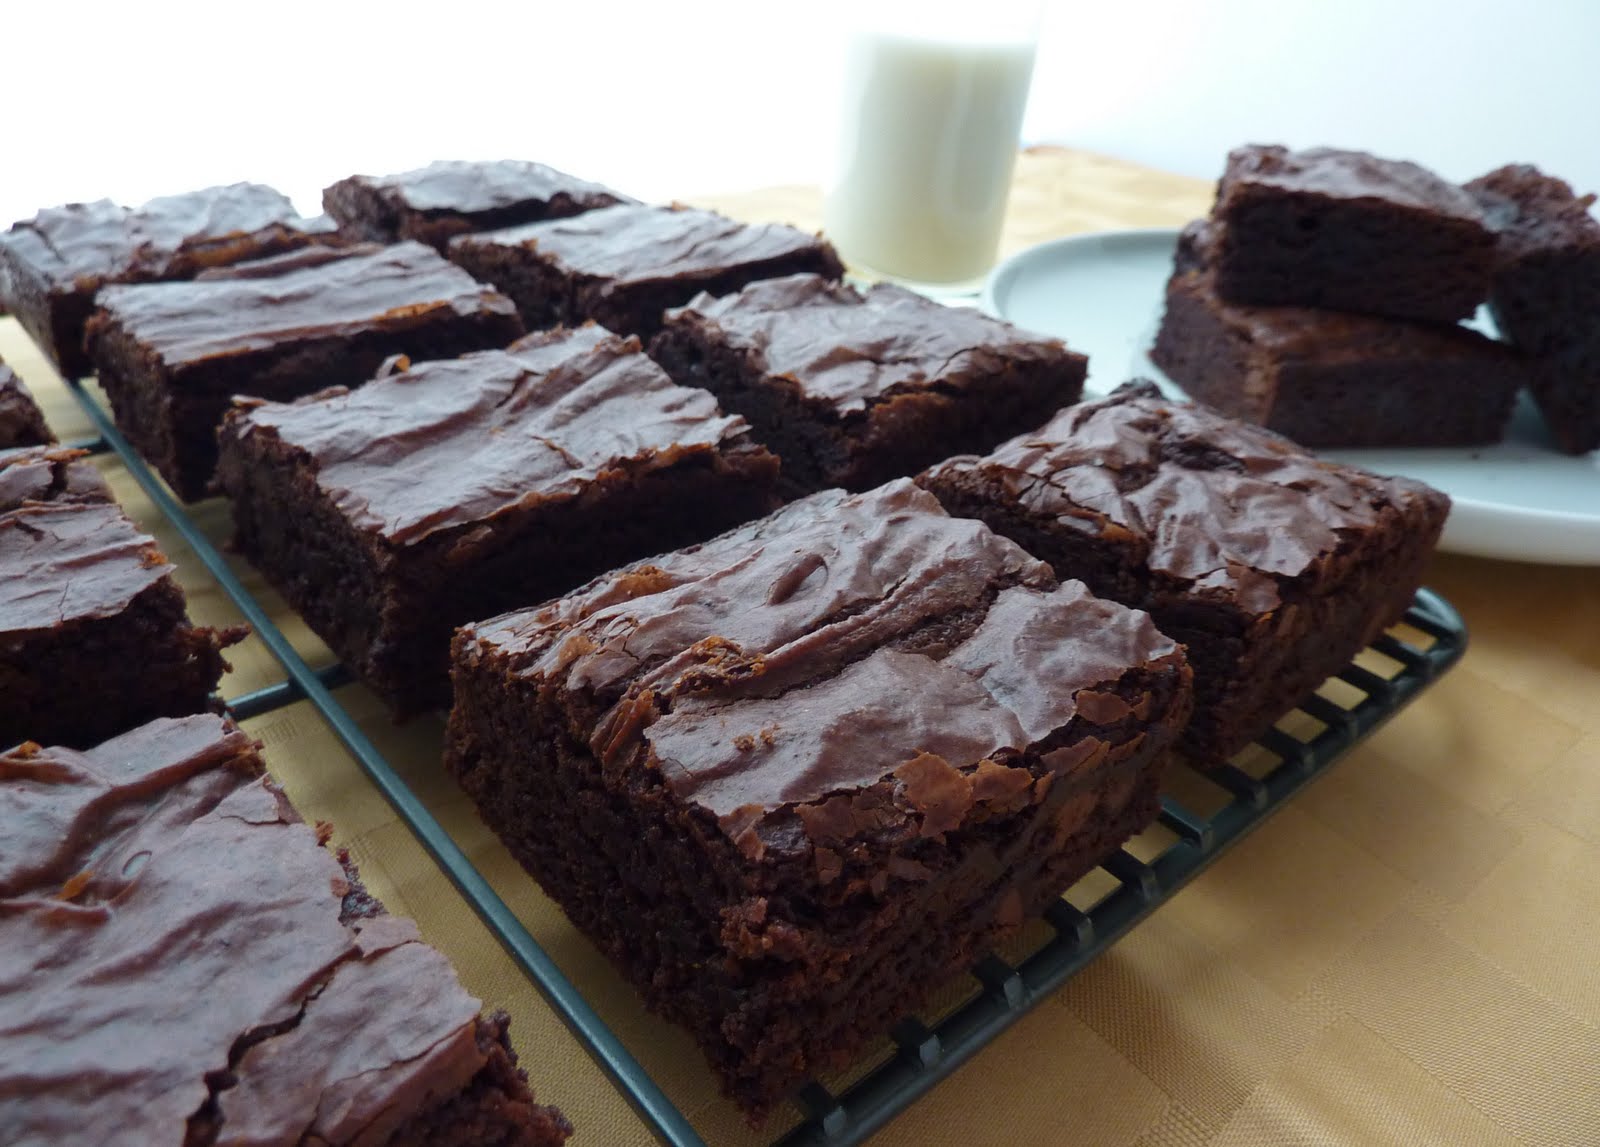
Fudge Brownies
from King Arthur Flour
Brownie Ingredients:
– 2 sticks unsalted Butter
– 15 3/4 ounces granulated Sugar
– 4 large Eggs
– 3 3/4 ounces Dutch-Process Cocoa
– 1 teaspoon Salt
– 1 teaspoon Baking Powder
– 1 teaspoon Espresso Powder
– 1 tablespoon Vanilla Extract
– 6 1/4 ounces All-Purpose Flour
– 12 ounces Chocolate Chips
Brownie Directions:
1. Preheat the oven to 350F. Lightly grease a 9″ x 13″ pan.
2. In a saucepan set over low heat, melt the Butter, then add the Sugar and stir to combine. Return the mixture to the heat briefly, just until it’s hot (about 110F to 120F) but not bubbling. It will become shiny looking as you stir it. Heating this mixture a second time will dissolve more of the sugar, which will yield a shiny top crust on your brownies.
3. While the sugar heats a second time, crack the 4 Eggs into a bowl – or your stand mixing bowl, and beat them with the Cocoa Powder, Salt, Baking Powder, Espresso Powder and Vanilla Extract until smooth.
4. Add the hot butter/sugar mixture, stirring until smooth.
5. Add the Flour and Chocolate Chips, again stirring until smooth. Note: if you want the chips to remain intact in the baked brownies, rather than melting in, let the batter cool in the bowl for about 20 minutes before stirring in the chips
6. Spoon the batter into the lightly greased pan
7. Bake the brownies for 30 minutes, until a cake tester inserted into the center comes out clean, or with just a few moist crumbs clinging to it. The brownies should feel set on the edges, and the center should look very moist, but not uncooked. Remove them from the oven and cool on a rack before cutting and serving.
Until next time,
LOVE & CONFECTIONS!
