• Skip to primary navigation
  • Skip to main content
  • Skip to primary sidebar
  • Home
  • About
  • Work With Me
  • Media
  • Recipes

Crafts & DIY

Easy Toddler Fairy Garden #SnackSnapShare #SnackStories

July 3, 2017

This shop has been compensated by Collective Bias, Inc. and its advertiser. All opinions are mine alone. #SnackSnapShare #SnackStories #CollectiveBias

Fairy Gardens are an easy and interactive DIY to get your toddler outdoors this Summer and help ignite their imagination.

Easy Toddler Fairy Garden from LoveandConfections.com #SnackSnapShare #SnackStories


Even before having my little one, I have loved the idea of fairy gardens. They can come in all shapes and sizes. Whether you prefer rustic, traditional, or anything in between, there is a fairy garden for everyone – including toddlers. When we play outside, I always remember to bring extra water and have snacks handy, like Cape Cod® Potato Chips and Snack Factory® Pretzel Crips®.

Easy Toddler Fairy Garden from LoveandConfections.com #SnackSnapShare #SnackStories

Fairy gardens are the perfect Summer project for little hands. With parental help, a fairy garden can be created very easily and supply endless hours of fun. I decided on getting a few pre-made fairy elements and mixing with live plants for our outdoor garden. Nowadays you can find almost anything in craft stores or online for fairy gardens.

Easy Toddler Fairy Garden from LoveandConfections.com #SnackSnapShare #SnackStories

We went to the local craft store and local hardware store for our supplies. I already had potting soil on hand from my herb garden, but if you don’t, you will need to purchase some of that as well. My daughter had fun picking out some small plants and flowers for her garden. The fairy house was a surprise and I added it while she napped, telling her that a fairy moved in while she was sleeping.

Easy Toddler Fairy Garden from LoveandConfections.com #SnackSnapShare #SnackStories

I will eventually drill a small hole in the house and get an LED candle or small light strand for nighttime. When it gets dark, my daughter can watch for when the fairy comes home and the lights turn on. She hasn’t met her fairy yet, but every day we talk about what she might look like, and what her name is. It is great for little imaginations. We are also practicing our math skills by counting the teeny mushrooms and stone walkway. I am definitely going to continue adding to the garden, maybe even make another one for a second fairy soon and enjoy more family time outside, playing in the dirt and using our imaginations.

Easy Toddler Fairy Garden from LoveandConfections.com #SnackSnapShare #SnackStories

Easy Toddler Fairy Garden
Supplies:
1 wide pot with drainage holes, if using live plants
potting soil
gloves and trowel
greenery & flowers
fairy house
vase filler or stepping stones
mini mushrooms
optional additional accessories and lights
Fairy Garden Assembly
Gather all your supplies and prepare a work space.

Fill pots halfway with potting soil. Read directions regarding sunlight and spacing for your plants and plant them accordingly. Fill in remaining area with soil.
Place pot where you’d like the garden to stay and water briefly so soil compacts a bit.
Decide where you’d like the fairy house placed so it will not get in the way of plant growth.

Arrange vase filler, or stepping stones, to create a path for the fairy.
Accessorize with miniature mushrooms on florist wire, or other miniature furniture and lights.

Enjoy your very own fairy garden!

I can’t remember how long ago I was introduced to Cape Cod® Potato Chips by my dad, but they have been a family favorite for a long while. I didn’t even realize how many flavors there are now. Original and Sea Salt & Cracked Pepper are my favorites, and I want to try the Waffle Cut varieties, Infused Mediterranean, and limited editions like Roasted Black Garlic. With so many variations for snacking with Cape Cod® Potato Chips, there really is a flavor for everyone and every occasion – from sharing together during family time to parties, barbecues and cookouts all Summer long. My toddler is learning to “share” but it is sometimes a back and forth struggle. She has no problem sharing snacks though.

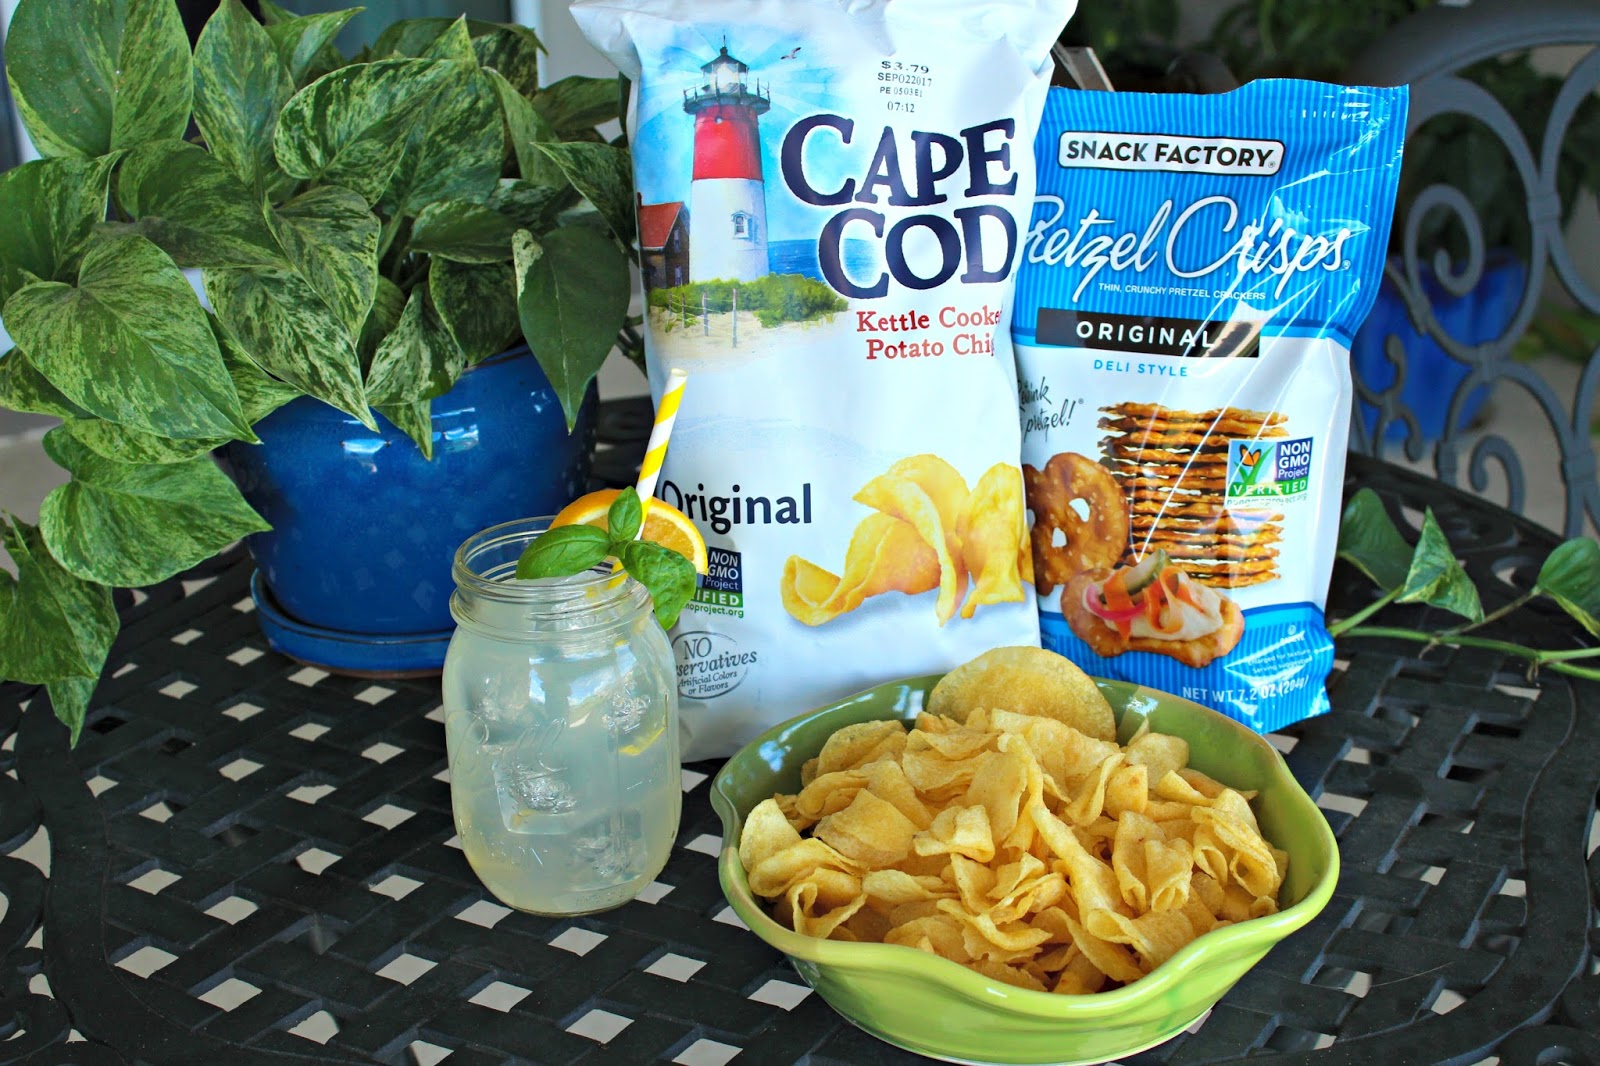
If I were to enter, I’d definitely use this photo of some of my favorite Summer snacks – Cape Cod® Potato Chips, Snack Factory® Pretzel Crips® and ice cold lemonade!

Snack Better Together Sweepstakes

#SnackSnapShare #Sweepstakes (5/30 to 7/25)

Enter the sweepstakes by sharing snack stories and submitting photos of you, your family or friends in snacking moment using hashtag #SnackSnapShare
(1) Grand prize- $10,000 cash prize for a family vacation of the winner’s choosing.
(8) Weekly Winners- One weekly winner will win a year’s worth of snacks so they can continue to share the love all year long.
(57) Daily Winners- winners will receive a $50 prepaid Visa gift card to stock up on snacks at their favorite retailer

I hope you have an enjoyable Summer outside with family and friends, playing, building fairy gardens and sharing delicious snacks together! Don’t forget to enter the sweepstakes above!


Until next time,
LOVE & CONFECTIONS!

Easy Toddler Fairy Garden from LoveandConfections.com #SnackSnapShare #SnackStories

Filed Under: Crafts & DIY, Uncategorized

DIY Glitter Wine Glasses and Flatbread Pizzas for “Ghouls Night In” #BeenBooed #HalloWINE #CollectiveBias

October 12, 2015

This shop has been compensated by Collective Bias, Inc. and its advertiser. All opinions are mine alone. #BeenBooed #HalloWINE #CollectiveBias The following content is intended for readers who are 21 or older.

DIY glitter wine glasses, delicious Mushroom and Kale Flatbread Pizzas, and a bottle of Robert Mondavi Private Selection Chardonnay along with some treats for my girlfriends, create a Happy “Hallo-WINE” Ghouls Night In.
 

DIY Glitter Wine Glasses and Mushroom Kale Flatbread Pizzas from LoveandConfections.com #BeenBooed #HalloWINE

I absolutely love Halloween, but for my girlfriends and I it is usually geared towards our little ones. We try to have a girls’ day every couple of months for us to hang out and spend time together. Sometimes we get so busy with our everyday lives and work that we need to schedule a day just for us.

DIY Glitter Wine Glasses and Mushroom Kale Flatbread Pizzas from LoveandConfections.com #BeenBooed #HalloWINE

With the help of Robert Mondavi Private Selection Chardonnay, I planned a Halloween “Ghouls Night In”… get it? 😉 A chance for my girlfriends and I to relax and enjoy some good food and good wine. I made a cute little basket to display our treats – there can’t be a girls’ day without some dark chocolate – and created some delicious flatbread pizzas that pair perfectly with the Robert Mondavi Private Selection Chardonnay.

DIY Glitter Wine Glasses and Mushroom Kale Flatbread Pizzas from LoveandConfections.com #BeenBooed #HalloWINE

My basket is based off the traditional “You’ve Been Boo’d” chain letter game played around Halloween. Friends, neighbors or co-workers anonymously leave a note and treat for someone and they in turn have to “boo it forward” to two more people. The chain keeps going so everyone in the neighborhood or office has been boo’d by Halloween.

DIY Glitter Wine Glasses and Mushroom Kale Flatbread Pizzas from LoveandConfections.com #BeenBooed #HalloWINE

Robert Mondavi Private Selection Chardonnay is also a great idea for a host/hostess gift. Some bottles in stores have a hang tag with Mummy’s Mulled Wine recipe and message “You’ve Been Hallo-wined“. How cute is that?! Even better is the instant redeemable coupons and mail in rebates that are valid 10/1-11/30.

DIY Glitter Wine Glasses and Mushroom Kale Flatbread Pizzas from LoveandConfections.com #BeenBooed #HalloWINE

Now, you can’t drink wine without cute wine glasses. I love getting crafty and decided to make each of my girlfriends their very own glittered wine glass. I chose orange, which is perfect for our “Hallo-wine” party and any day during the Fall season. It is easy to do (I created mine while the toddler took a nap) and a swanky idea for any Autumn-themed tablescape.

DIY Glitter Wine Glasses and Mushroom Kale Flatbread Pizzas from LoveandConfections.com #BeenBooed #HalloWINE

Make sure the wine glasses are clean and the outside is wiped with rubbing alcohol. Gather all the supplies you need: paper plates, paintbrush, foil or newspaper, dishwasher-safe Mod Podge, ultra-fine glitter, and a small bowl. You can also use painters’ tape to create a very clean line. I free-handed mine and they turned out perfect.

 Place foil or newspaper on your work surface. Add Mod Podge into your small bowl. Using the paintbrush, paint a thin layer of Mod Podge according to whatever design you would like, and over a paper plate, sprinkle the glitter so it covers the glue completely. Gently shake it off and place the glass upside down to dry. Repeat with the other glasses and let them dry for 1-2 hours. While they are drying, rinse off the paintbrush and replace the excess glitter back into its container.

Once the glasses are dry, gently repeat with another layer of Mod Podge and glitter. Let the second layer dry on all the glasses for 2 hours. Clean the paintbrush and replace and clean up the glitter. After 2 hours, paint a final layer of Mod Podge all over the glitter to seal it. Let it dry for a minimum overnight, but make sure to read the package directions for specific curing times.

Be sure to follow Robert Mondavi on Facebook, Instagram and Twitter. I shared my “Hallo-WINE Ghouls Night In; how you will “Boo it forward”? 
Mushroom and Kale Flatbread Pizzas
A Love and Confections original recipe
Click here for a printable recipe
Mushroom and Kale Flatbread Pizza Directions:
– 1/2 tablespoon Extra Virgin Olive Oil
– 1/2 tablespoon unsalted Butter
– 1 small onion, diced
– 2 cups chopped Baby Bella Mushrooms
– 4 stalks of Kale, rinsed and leaves pulled off, discard stalk
– 3 prepared Flatbreads
– 3/4 cup prepared Tomato Sauce
– 8 ounces fresh Mozzarella Cheese
– 1/3 cup shredded Parmesan cheese
Mushroom and Kale Flatbread Pizza Ingredients:
1. Heat oven to 375F. Place a silicone mat or parchment paper onto a half-sheet jellyroll pan and set aside.
2. In a medium-large skillet, heat the Olive Oil and Butter and saute the Onion until translucent, about 5 minutes. Ad in the chopped Mushrooms and cook another 5 minutes. Add in the Kale and cook another 5 minutes until it has wilted and cooked through. Set aside.
3. Bake the plain Flatbreads, per the package instructions, for 2 minutes, before adding toppings. Add 1/4 cup Tomato Sauce per flatbread and spread evenly. Top with mushroom and kale mixture. Break apart the Fresh Mozzarella and sprinkle it over the flatbreads. Evenly distribute the Parmesan Cheese on top.
4. Bake for 6-10 minutes, or until the cheese is fully melted to your liking. Remove pizzas from the pan onto a cutting board and slice. Serve with a glass of Robert Mondavi Private Selection Chardonnay and enjoy!

Until next time,
LOVE & CONFECTIONS!

Filed Under: Crafts & DIY, Sandwiches-Paninis-Flatbreads-Pizzas, Uncategorized

Frozen Party and Royal Icing Snowflakes Tutorial

May 14, 2015

Royal Icing Snowflakes are an easy and beautiful decoration on cakes and cupcakes for any Frozen or Winter-themed party!

Frozen Party and Royal Icing Snowflakes from LoveandConfections.com


For the past year and a half, little girls all everywhere have been in love with Frozen. Clothes, toys, dolls, birthday parties, you name it, Frozen is everywhere. I like the movie and thought it was cute, but I am still a classic Disney girl at heart. I recently had an opportunity to help make a little girl’s Frozen-themed birthday party spectacular.

Frozen Party and Royal Icing Snowflakes from LoveandConfections.com

If you are a pastry chef or baker, then you most likely get asked to help make goodies for family and friends – holidays and birthday, being the most popular occasions. So, when one of my friends asked me to make her daughter’s Frozen birthday cake, I got right to work.

Frozen Party and Royal Icing Snowflakes from LoveandConfections.com

You can find anything and everything online nowadays and there are so many ideas for Frozen birthday parties. I combined a few of my favorite and added some of my own flair to come up with this adorable Frozen-themed cake and cupcakes.

Frozen Party and Royal Icing Snowflakes from LoveandConfections.com

There are so many different snowflake ideas out there. Most of them are fondant, gumpaste and white chocolate. I decided to make mine from royal icing because it’s very easy to make and dries hard.

Frozen Party and Royal Icing Snowflakes from LoveandConfections.com

A little sparkling sugar and luster dust made the cake and snowflakes pop. The color was spot on, and I used a little toy the birthday girl owned as a cake topper. I got the idea for rock candy from BuzzFeed. The cake turned out perfect and everyone had a great time at the party, especially the birthday girl!


Royal Icing Snowflakes
Recipe adapted from Wilton
Click here for printable snowflake template

Royal Icing Snowflake Ingredients:
– 1 & 1/2 tablespoons Meringue Powder
– 2 cups sifted Confectioners’ Sugar
– 3 tablespoons warm Water
– Piping Bags
– Piping Tips – size 2 & 3
– Cookie Sheets
– Wax Paper
– Sanding Sugar (optional)
– Luster/Disco Dust (optional)

Royal Icing Snowflake Directions:
1. Place templates onto a flat cookie sheet and tape down. Tape Wax Paper on top of the templates.
2. Make sure the bowl and whip from your stand mixer is completely clean and grease-free. If necessary, wipe down with a paper towel and lemon juice.
3. Place the Meringue Powder, Confectioners’ Sugar and Water in the bowl of your stand mixer and whip on low until incorporated. Raise the speed to medium-low for 7-10 minutes until stiff peaks form.
4. Scoop Royal Icing into a prepared piping bag with tips. Use size 3 for the large snowflakes and size 2 for small snowflakes.
5. Pipe snowflakes onto the wax paper. You can sprinkle Sanding Sugar or Luster Dust onto the snowflakes for a little sparkle. Let them air dry overnight. Gently remove from the wax paper using a small offset spatula or pairing knife. Store in an airtight container until use. Do not store in the refrigerator. Place onto the frosting just before serving.

Until next time
LOVE & CONFECTIONS!

Filed Under: Cakes & Frostings, Crafts & DIY, Cupcakes, Uncategorized

Primary Sidebar

Meet Terri
founder & pastry chef

Subscribe to Love and Confections

Popular Posts

Pumpkin Pecan Cupcakes with Cinnamon Cream Cheese Frosting
Pumpkin Spice Cinnamon Roll Cake
Oatmeal Cream Pie Layer Cake - oatmeal brown sugar layer cake, marshmallow frosting filling, and vanilla bean buttercream with oatmeal cream pie garnish
Easy Piña Colada Poke Cake - pineapple cake, coconut cream pudding, whipped topping, pineapple chunks and maraschino cherries
Mermaid layer cake
PIneapple cake with pineapple curd, teal frosting and tropical sprinkle mix
Irish Cream chocolate cupcakes topped with white and green buttercream piping and shamrock sprinkle mix

AMAZON AFFILIATE

Love and Confections is a participant in the Amazon Services LLC Associates Program, an affiliate advertising program designed to provide a means for sites to earn advertising fees by advertising and linking to amazon.com.

Copyright © 2018 Love and Confections · Log in