• Skip to primary navigation
  • Skip to main content
  • Skip to primary sidebar
  • Home
  • About
  • Work With Me
  • Media
  • Recipes

Cupcakes

BABY L&C IS HERE and Pink Vanilla Bean Cupcakes

December 19, 2013

I am so excited to publish this post. Baby Grace has decided to make her appearance! Mr. L&C and I could not be happier with our little princess. If you follow my Instagram feed, there will be many more pictures to come! Thanks to everyone for all the well-wishes and following my progress through this experience. We are doing well and can’t wait to start this new journey with our little one.

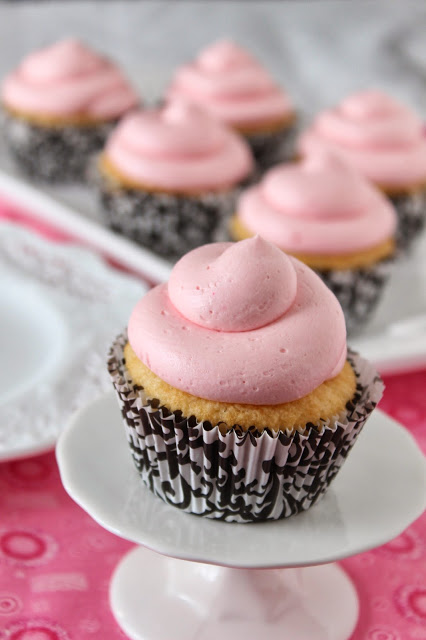
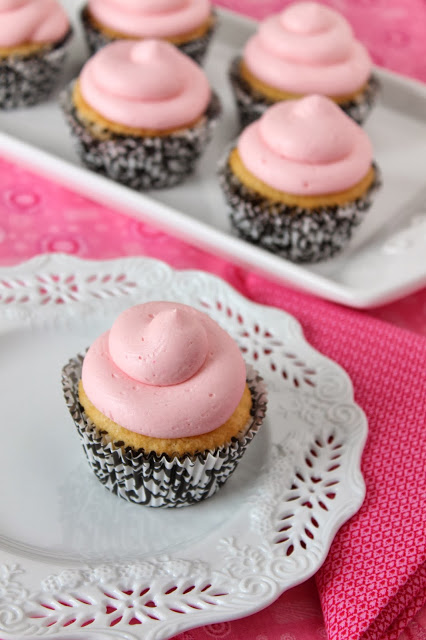
To celebrate our new arrival I thought I’d share a go-to cake recipe of mine. Everything around here has been pink lately – even the cupcakes! This is a great recipe to whip up for any occasion. The cake flour makes it so light and I love the little flecks of vanilla seeds from the Vanilla Bean Paste.


Vanilla Bean Cupcakes
adapted from Swans Down Cake Flour

Vanilla Bean Cupcake Ingredients:
 – 2 sticks unsalted Butter, room temperature
 – 2 cups granulated Sugar
 – 2 teaspoons Vanilla Bean Paste*
 – 4 Eggs, room temperature
 – 3 cups Cake Flour
 – 1 tablespoon Baking Powder
 – 1/2 teaspoon Salt
 – 1 cup Milk

Vanilla Bean Cupcake Directions:
 – Heat oven to 350F. Line a cupcake tin with cupcake wrappers.
 – In the bowl of a stand mixer with the paddle attachment, cream together the Butter and Sugar. Scrape the sides of the bowl. Add in the Vanilla Bean Paste and mix to combine.
 – Add in Eggs, one at a time, mixing well after each addition. Scrape down sides before adding flour.
 – In a separate bowl, sift together the Cake Flour, Baking Powder and Salt. Add Flour mixture and Milk, alternating by starting and ending with the Flour. Be careful not to overmix. Only mix until just combined to prevent a dense, dry cake.
 – Using a cookie scoop, evenly distribute in the cupcake tin and bake for 10-12 minutes for mini cupcakes or 15-18 for standard size cupcakes, or until the cupcakes are just done and a cake tester or toothpick comes out clean.
 – Cool for a few minutes in the tin, then transfer to a wire rack to cool completely before frosting.

Whipped Vanilla Frosting from Sweetapolita – I tinted it light pink

*If you don’t have Vanilla Bean Paste, you can use Vanilla Extract instead.

Until next time,
LOVE & CONFECTIONS!

Filed Under: Cakes & Frostings, Cupcakes, Family & Festivities, Uncategorized

Almond Cupcakes for a Wedding

November 24, 2012

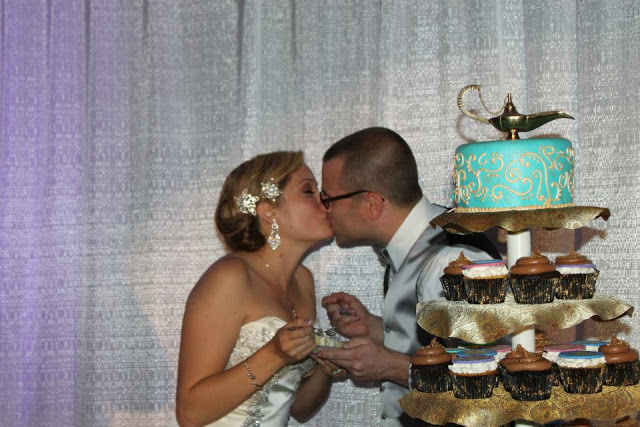
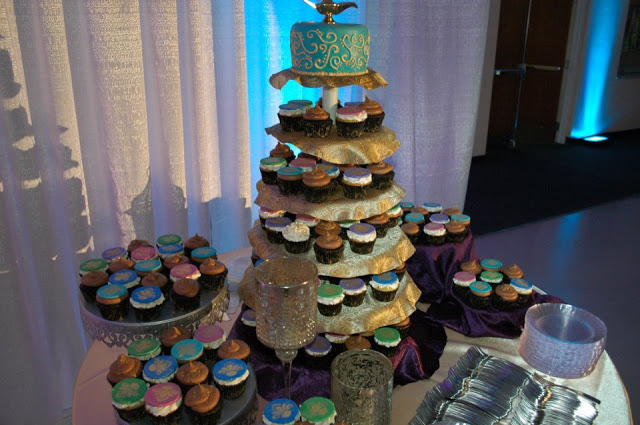
Last weekend, two very important events happened. The first is that one of my best friends, MC got engaged! We have a very long friendship – 23 years! The second important event was a friend’s wedding and the Bride and Groom asked me to be their Pastry Chef and make the wedding cake! Such an important job for a special day. I was so excited and couldn’t wait to help Charlotte & Sean celebrate their special day.

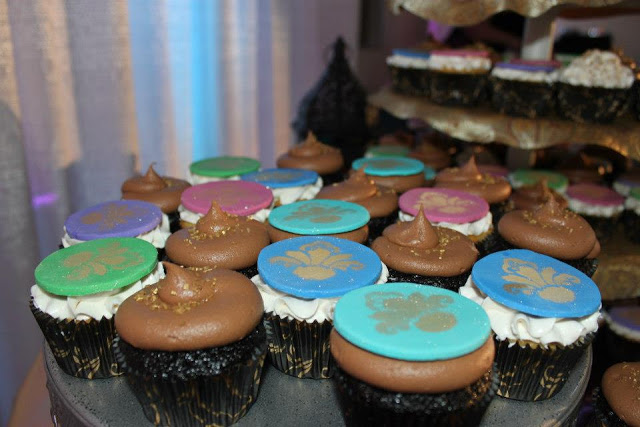
Charlotte was specific with what she wanted… cupcakes! She wanted a mixture of 150 white almond cupcakes and some sort of chocolate cupcake. We had a tasting and they chose a White Almond Cupcake with Vanilla Bean Buttercream and a Mocha Cupcake with an Espresso Frosting.

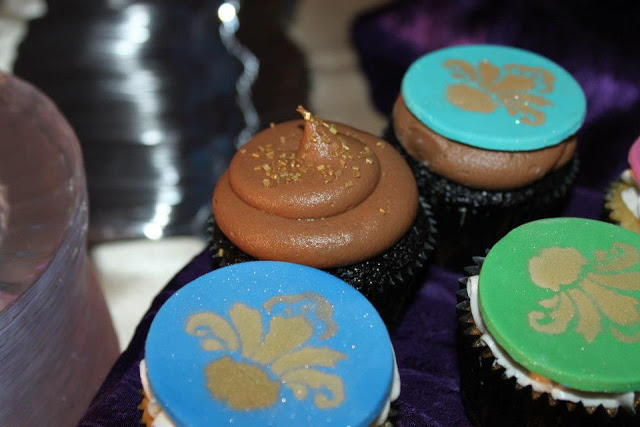
I had come up with a few ideas for a design and she said she trusted me with whatever I chose. We decided that bright Moroccan colors would be great, so I made about 100 fondant disks in all different colors. The disks dried for two days, so they would be sturdy enough to sit on top of the cupcakes.

After some time at the local craft store, I began making my own stencil with a stencil burning kit. I used Edible Gold Spray with the stencil and loved the way it turned out. I will definitely be making more of my own stencils for future projects!

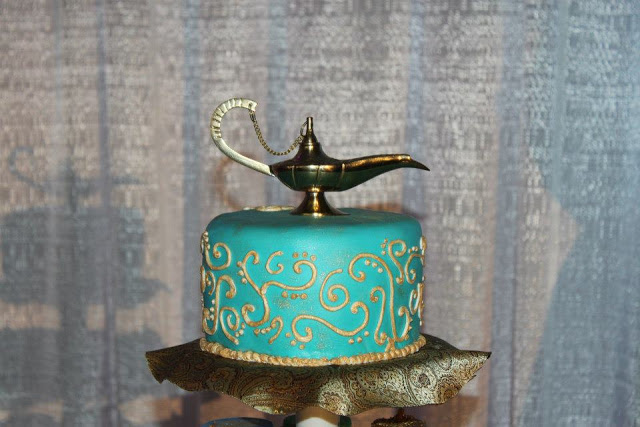
The top tier was Almond Cake with Vanilla Bean Buttercream, covered in teal fondant and piped with royal icing. I painted gold luster dust, with a few drops of Vodka, onto the royal icing. Charlotte found a simple and perfect cake topper – a gold lamp. The day was beautiful and everyone enjoyed the cupcakes. Most people had one of each flavor!

Almond Cupcakes with Vanilla Bean Buttercream
Love & Confection original cupcake recipe
Buttercream Recipe adapted from Chef Steven Rujak at Sweet and Savory Seasons

Almond Cupcake Ingredients:
 – 175 grams Cake Flour (1 & 1/2 cups)
 – 1 & 1/2 teaspoons Baking Powder
 – 1/2 teaspoon Baking Soda
 – 1/2 teaspoon Salt
 – 113 grams Unsalted Butter, softened (1 stick)
 – 225 grams granulated Sugar (a little more than 1 cup)
 – 2 Eggs
 – 1/2 teaspoon Vanilla Extract
 – 1 tablespoon Almond Extract
 – 60 grams Sour Cream (about 1/4 cup)
 – 175 grams Milk (about 3/4 cup)

Almond Cupcake Directions:
 – Preheat oven to 350 degrees. Make sure your ingredients are room temperature.
 – Sift the Flour, Baking Powder, Baking Soda and Salt into a mixing bowl, or your stand mixer bowl.
 – Add the Butter and mix with the paddle attachment until combined. Scrape the sides and bottom of the bowl with a spatula to ensure everything is mixed properly
 – Add in the Sugar, and mix until combined. Scrape the sides and bottom.
 – Add in the Eggs and mix until combined. Scrape the sides and bottom.
 – Add in the Vanilla Extract, Almond Extract  and Sour Cream. Scrape down the sides and bottom of the mixing bowl.
 – Add in the Milk and mix to incorporate and create a smooth batter.
 – Portion into cupcake tins lined with cupcake wrappers. I use a 2 ounce ice cream scoop, to ensure that my cupcakes are even and uniform. Batter makes about 18 cupcakes
 – Bake for 15-18 minutes, or until light golden brown and a toothpick comes out clean when inserted into the middle of a cupcake.

Vanilla Bean Buttercream Ingredients:
 – 100 grams Egg Whites (about 3 egg whites)
 – 200 grams granulated Sugar
 – 226 grams Unsalted Butter (2 sticks)
 – 226 grams Powdered Sugar
 – 1-2 teaspoons Vanilla Bean Powder

Vanilla Bean Buttercream Directions:
 – Buttercream can be made a day in advance and kept in the refrigerator. I also keep mine in an airtight container on the counter if it will be used the next day. Make sure all the ingredients are at room temperature before starting.
 – Create a double boiler on the stove by warming a small pot of water on medium until little bubbles form.  Make sure the bottom of your stand mixing bowl cannot touch the water.
 – Place Eggs and granulated Sugar in the bowl of your stand mixer and put on top of the pot. Turn the temperature down to medium-low and whisk continuously until the sugar completely dissolves and the eggs are warm.
 – Once warm, immediately place the bowl on your stand mixer, fitted with the whisk attachment, and whip on high until white, glossy and doubled in size. (I place aluminum foil around my mixer to keep the heat in.
warm eggs whip better. Remove the foil once the eggs are ready.)
 – Continue whipping the eggs on medium-high until they are room temperature
 – Add the Butter into the whipped egg whites and whip until incorporated. Scrape the sides and bottom of the mixing bowl
 – While on low speed, gradually add in the Powdered Sugar. (not all at once, or both you and your kitchen will be covered in white!)
 – Add in Vanilla Bean Powder

Assembly:
 – Once the cupcakes are cool, frost using a piping bag and large star tip

Until next time,
LOVE & CONFECTIONS!

Filed Under: Cakes & Frostings, Cupcakes, Events & Travel, Family & Festivities, Uncategorized

Key Lime Confessions…

July 24, 2012

I L-O-V-E Key Lime Pie. I’m a Florida girl, what can I say? Growing up in Miami, it was always on restaurant dessert menus and with the Florida Keys – especially Key West – so close, who can’t help but to love this little, inconspicuous, intensely flavored lime! It goes without saying, that if I am ever out at a restaurant and decide to have dessert, if Key Lime Pie is on the menu, most probably my decision has already been made for me – with the exception of Chocolate Souffle… a great Chocolate Souffle trumps Key Lime Pie any day… mmm Chocolate Souffle… we’ll leave the souffle day-dreaming for another day and another post.

On to the Key Limes…

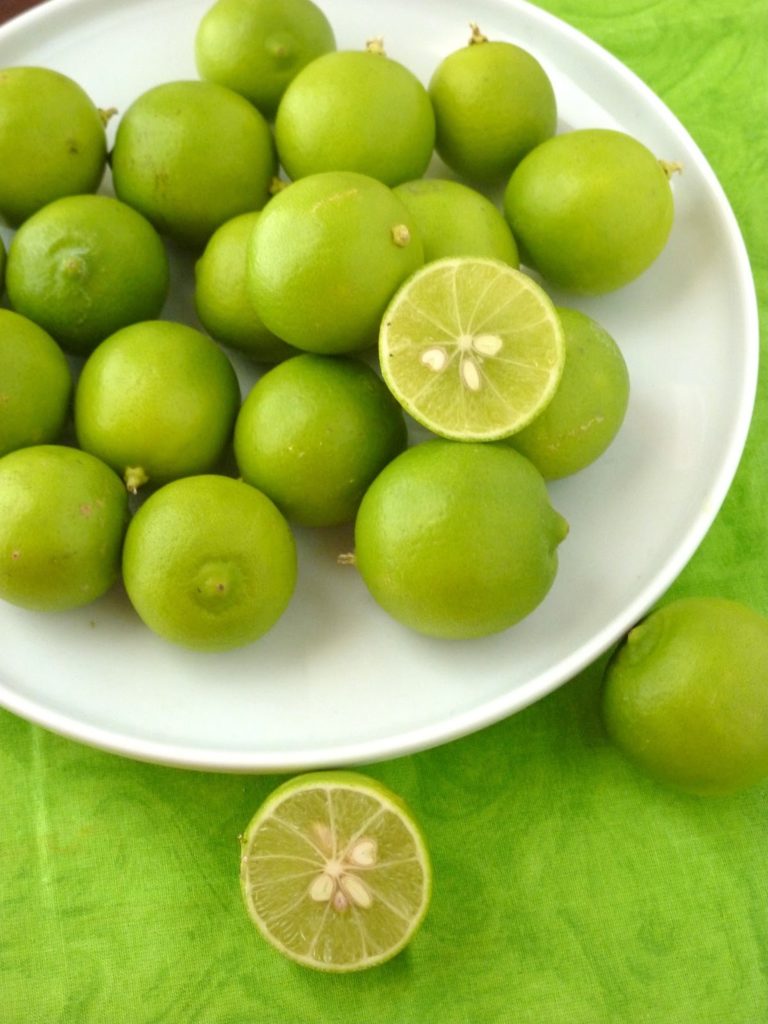
Key Limes are indigenous to the Florida Keys. They are smaller and rounder than standard limes and are more yellow than green, having a yellow rind and yellowish-green fruit. Key Limes have more seeds, a higher acidity, stronger aroma, a thinner rind and are much more tart than common Persian Limes.

I am lucky enough to have some great local blogging friends. Orlando Foodie (Lenore) gave me some Key Limes from her tree. Little did I know that I would get 20 glorious, green, tart beautiful Key Limes! I was so grateful. Now, what to make? What to make? Like I said, I love Key Lime Pie, but I wanted to do something a little different with these babies. Cupcakes! Curd! Buttercream! Lightbulb! And the little cartoon light bulb above my head lit up. What?! Doesn’t everyone have a little cartoon light bulb above their head?


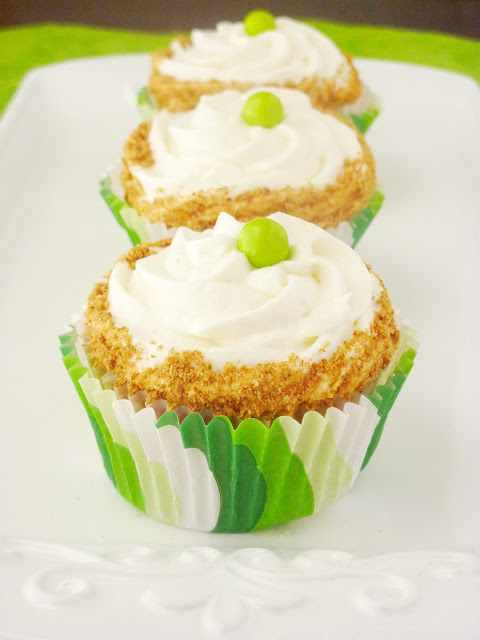
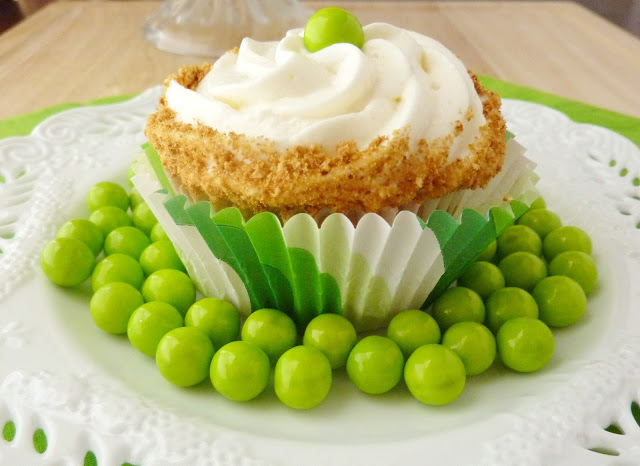
Key Lime Cupcakes with Key Lime Buttercream
Love & Confection original cupcake recipe
Buttercream Recipe adapted from a culinary school recipe

Key Lime Cupcake Ingredients:
 – 175 grams Cake Flour (1 & 1/2 cups)
 – 1 & 1/2 teaspoons Baking Powder
 – 1/2 teaspoon Baking Soda
 – 1/2 teaspoon Salt
 – 113 grams Unsalted Butter, softened (1 stick)
 – 225 grams granulated Sugar (a little more than 1 cup)
 – 2 Eggs
 – 1/2 teaspoon Vanilla Extract
 – 1 teaspoon Key Lime Extract
 – 60 grams Sour Cream (about 1/4 cup)

 – 175 grams Milk (about 3/4 cup)
 – 1 tablespoon Key Lime Zest (or regular lime zest)

 – 1 cup prepared Key Lime Curd for filling
 – 1 batch Key Lime Buttercream (recipe follows)
 – 1 cup toasted Graham Cracker Crumbs for decoration
 – Green Sixlets or Sprinkles for decoration

Key Lime Cupcake Directions:
 – Preheat oven to 350 degrees. Make sure your ingredients are room temperature.
 – Sift the Flour, Baking Powder, Baking Soda and Salt into a mixing bowl, or your stand mixer bowl.
 – Add the Butter and mix with the paddle attachment until combined. Scrape the sides and bottom of the bowl with a spatula to ensure everything is mixed properly
 – Add in the Sugar, and mix until combined. Scrape the sides and bottom.
 – Add in the Eggs and mix until combined. Scrape the sides and bottom.
 – Add in the Vanilla Extract, Key Lime Extract, Zest and Sour Cream. Scrape down the sides and bottom of the mixing bowl.
 – Add in the Milk and mix to incorporate and create a smooth batter.
 – Portion into cupcake tins lined with cupcake wrappers. I use a 2 ounce ice cream scoop, to ensure that my cupcakes are even and uniform. Batter makes about 18 cupcakes
 – Bake for 15-18 minutes, or until light golden brown and a toothpick comes out clean when inserted into the middle of a cupcake.

Key Lime Buttercream Ingredients:
 – 100 grams Egg Whites (about 3 egg whites)
 – 200 grams granulated Sugar
 – 226 grams Unsalted Butter (2 sticks)
 – 226 grams Powdered Sugar
 – 1-2 teaspoons Key Lime Extract

Key Lime Buttercream Directions:
 – Buttercream can be made a day in advance and kept in the refrigerator. I also keep mine in an airtight container on the counter if it will be used the next day. Make sure all the ingredients are at room temperature before starting.
 – Create a double boiler on the stove by warming a small pot of water on medium until little bubbles form.  Make sure the bottom of your stand mixing bowl cannot touch the water.
 – Place Eggs and granulated Sugar in the bowl of your stand mixer and put on top of the pot. Turn the temperature down to medium-low and whisk continuously until the sugar completely dissolves and the eggs are warm.
 – Once warm, immediately place the bowl on your stand mixer, fitted with the whisk attachment, and whip on high until white, glossy and doubled in size. (I place aluminum foil around my mixer to keep the heat in.
warm eggs whip better. Remove the foil once the eggs are ready.)
 – Continue whipping the eggs on medium-high until they are room temperature
 – Add the Butter into the whipped egg whites and whip until incorporated. Scrape the sides and bottom of the mixing bowl
 – While on low speed, gradually add in the Powdered Sugar. (not all at once, or both you and your kitchen will be covered in white!)
 – Add the Key Lime Extract and mix to incorporate.

Assembly:
 – Once the cupcakes are cool, either with a paring knife or apple corer, take out the middle of the cupcakes.
 – Fill each hole by piping in the Key Lime Curd.
 – Using a piping tip (I used a star tip) and bag, pipe the Key Lime Buttercream onto the cupcakes.
 – Use the Graham Crackers for decoration and crunch along the sides of the buttercream and green candy of your choice. (I used green sixlets. You can use sprinkles or gummy lime slices also)

Until next time,
LOVE & CONFECTIONS!
var _gaq = _gaq || [];
_gaq.push([‘_setAccount’, ‘UA-33655660-1’]);
_gaq.push([‘_trackPageview’]);

(function() {
var ga = document.createElement(‘script’); ga.type = ‘text/javascript’; ga.async = true;
ga.src = (‘https:’ == document.location.protocol ? ‘https://ssl’ : ‘http://www’) + ‘.google-analytics.com/ga.js’;
var s = document.getElementsByTagName(‘script’)[0]; s.parentNode.insertBefore(ga, s);
})();

Filed Under: Cakes & Frostings, Cupcakes, Uncategorized

Chocolate Chip Angel Food Cupcakes

October 19, 2011


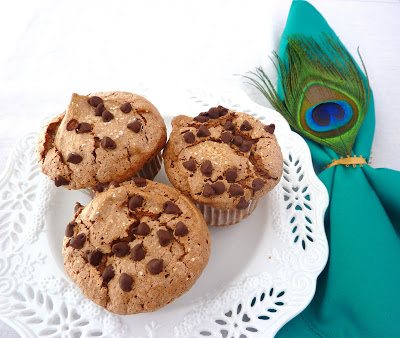
I decided to make these delicious Chocolate Chocolate Chip Angel Food Cupcakes. I love angel food cake. It’s so light and airy and pillowy. The crunchy sugar crusted top gives way to a tender cake center. It is perfect by itself – eating a piece of cake straight from your hand is one of the ways we enjoyed it as children – or add fresh whipped cream and berries – Heavenly! Must be why it is called Angel Food Cake.

This recipe adds some chocolate flavor the the already great angel food cake. Some people don’t like making angel food cake because it only uses egg whites, and you have a ton of yolks leftover. Don’t worry. You’ll get a recipe for those leftover yolks later. I like to use fresh egg whites for my angel food cake. The store-bought egg white only cartons are do-able in a pinch, but fresh egg whites are preferable.

This Chocolate Angel Food Cupcake recipe was easy to make and even easier to make them disappear. I hope you enjoy them. I doubled the recipe, but you can easily scale it down to the original measurements.

Chocolate Chocolate Chip Angel Food Cake
adapted from The Galley Gourmet

Angel Food Cake Ingredients:
– 1/2 cup plus 2 tablespoons Cake Flour
– 1/2 cup Dutch-Processed Cocoa Powder
– 1 teaspoon Espresso Powder
– 1 & 1/2 cups granulated Sugar, divided
– 12 large Egg Whites, at room temperature
– pinch of Salt
– 1 & 1/2 teaspoons Cream of Tartar
– 2 teaspoons Vanilla Extract
– Confectioners Sugar for dusting
– Mini Semi-Sweet Chocolate Chips for garnish

Angel Food Cake Directions:
1. Preheat the oven to 350F, spray the tops of 2 cupcake tins and trays with 16 liners (evenly spaced out because you will have empty spots).
2. Separate Egg Whites and Yolks. Be careful to not get any yolk in the whites, or the whites will not whip properly. The best way is to crack the egg over a separate small bowl and then transfer the white to your mixing bowl and the yolk to another bowl. It creates more dirty dishes, but prevents any yolks from getting into your whites.
3. Sift the Cake Flour, Cocoa Powder, Espresso Powder and 1/2 cup plus 4 tablespoons Sugar into a medium bowl and set aside.
4. In the bowl of your stand mixer, with the whip attachment, whip the Egg Whites, Salt, Cream of Tartar and Vanilla on high, until soft peaks form. While the mixer is still on high, gradually add in the remaining Sugar, a little at a time, and whip until stiff, glossy peaks form (2-3 minutes).
5. Gently fold the dry ingredients into the egg whites in three additions, making sure not to deflate the egg whites too much.
6. Fill each cupcake liner high with batter – two ice cream scoops full.
7. Dust each cupcake with Confectioners Sugar and sprinkle the tops with a few mini Chocolate Chips.
8. Bake for 20-30 minutes – depending on your oven – until the tops are puffed and dry.
9. Keep the cupcakes in the tin for an hour to cool and ensure they keep their shape. After one hour, gently remove the cupcakes and enjoy! They can be stored in an airtight container for up to 2 days – although I don’t think they will last that long, they are too delicious!

Until next time,
LOVE & CONFECTIONS!
Filed Under: Cupcakes, Uncategorized

Cupcake Overload!

March 25, 2010

It has been a while… Sorry it has been so long since the last post – lots of things have happened/are happening. I was really sick for a few weeks and my husband and I are in the process of moving. Long story short, the neighborhood has gotten worse and we want to live someplace we actually like… so I will try to post more, but packing and moving is obviously priority.

Here are some pictures of cupcakes I made for my husband’s birthday. He wanted some for a dinner with friends – I made beef wellington, roasted potatoes and green beans, yum! – and some for people at the two places he works. I miscalculated the amount made and ended up with a lot more than planned. These aren’t from scratch, but I added to them. *Disclaimer – I never said I was going to bake everything on my blog from scratch – time constraints and funds are to blame. When I have the available time and funds, I will gladly make everything from scratch, well, almost from scratch. “If you want to make an apple pie from scratch, you must first create the universe,” -Carl Sagan.

Some people might cringe or criticize and say, “You used a box mix? You call yourself a baker?” To answer, yes I used a box mix. Duncan Hines “Devil’s Food”, “French Vanilla,” and “Yellow Cake, ” to be exact. They’re the best and only cake mixes I use. Even one of my professors in culinary school, who is an Executive Pastry Chef at a Hyatt hotel said he uses Duncan Hines at home, “because when you make things from scratch, the last thing you want to do is go home and make more cakes, and besides, it’s the best.”

I have actually always used Duncan Hines my entire life. So back to the actual cupcakes – I miscalculated because I normally get 25 cupcakes out of the box mixes, but the husband requested mini cupcakes, so people could try all the varieties and not have to eat whole, big ones. I was perfectly fine with that, except for the fact that instead of 2 mini cupcakes per one regular, it ended up being 3 mini cupcakes per regular, and with only 1 mini cupcake tin of 24 cups, it took a while. (I searched at a place I thought would have another tin, but they didn’t, and didn’t have enough time to actually find one).

So, 200 mini cupcakes later – and a few bigger cupcakes because I only had 200 mini wrappers – I had 3 different flavor cupcakes and was ready to decorate.

The Devil’s Food cupcake was made into a S’more cupcake. The first picture is what I originally did for the S’more cupcakes – crushed graham cracker crumbs on the bottom, followed by the Devil’s Food batter, then a mini marshmallow in the center. I had decided against hollowing the cupcake out and filling it with melted marshmallow, and experimented this way.

Needless to say, thank goodness for the experiment, because they did not turn out how I would have liked them.

The second time around I decided to ditch the graham crackers on the bottom – they got lost and you couldn’t taste them – and the marshmallows in the middle – they kind of melted into the batter and you couldn’t taste it either. Instead I melted the marshmallows with a little bit of milk, in a pot on the stove, and once cooled, mixed into the French Buttercream I had been planning on using. It turned out delicious, and I sprinkled graham cracker crumbs on top.

The next are the Boston Cream cupcakes. I hollowed out the center of the French Vanilla cupcakes and used Jell-O pudding – yes, Jell-O pudding. Like the aforementioned disclaimer said, no time to make pastry cream, especially when I had a whole dinner to put together as well. Then I topped it with the French Buttercream and chocolate sauce. As far as the chocolate sauce goes, I didn’t want to use it but had little time in between dinner and dessert to temper chocolate. I’ll leave the discussion about tempering chocolate for another day.

The last were the Key Lime cupcakes. I used the yellow cake cupcakes and hollowed them out as well. I used some vanilla Jell-O pudding mixed with a little bit of Nellie & Joe’s Key Lime Juice and lime zest for the filling. The French Buttercream also got some lime zest and was topped with lime slice jelly candy. The individual Key Lime cupcake picture didn’t turn out well, but you can still see them in the picture below. The Boston Cream cupcakes turned out to be the biggest hit.

French Buttercream (the “from scratch” element)
from About Professional Baking by Gail Sokol

200 grams Granulated Sugar
60 milliliters Light Corn Syrup (4 tablespoons or 1/4 cup)
60 milliliters Water (2 fluid ouces or 1/4 cup)
114 grams Egg Yolk
450 grams Unsalted Butter – very soft, but not melted
10 milliliters Vanilla Extract (2 teaspoons)

In saucepan, combine sugar, corn syrup and water and bring mixture to a rolling boil, stirring just until sugar dissolves.*

While sugar syrup is cooking, beat the egg yolks on high speed in the bowl of an electric mixer using the whip attachment, until the color lightens to a pale yellow.

On high speed, slowly add the hot syrup tot he egg yolks, pouring it down the sides of the mixing bowl and not directly onto the whip. Keep beating until the bowl feels cool to the touch.

Gradually add the softened butter**, a few tablespoons at a time, until it is all incorporated, blending in each addition of butter thoroughly. The buttercream may appear curdled until all the butter has been incorporated. Add the vanilla extract and blend well.

* cook to 250°F – firm ball stage
** Can use colder butter if sugar is slightly warmer – balances out temperature

Until next time,

Love & Confections!

Filed Under: Cakes & Frostings, Cupcakes, Uncategorized

  • « Go to Previous Page
  • Page 1
  • Page 2

Primary Sidebar

Meet Terri
founder & pastry chef

Subscribe to Love and Confections

Popular Posts

Pumpkin Pecan Cupcakes with Cinnamon Cream Cheese Frosting
Pumpkin Spice Cinnamon Roll Cake
Oatmeal Cream Pie Layer Cake - oatmeal brown sugar layer cake, marshmallow frosting filling, and vanilla bean buttercream with oatmeal cream pie garnish
Easy Piña Colada Poke Cake - pineapple cake, coconut cream pudding, whipped topping, pineapple chunks and maraschino cherries
Mermaid layer cake
PIneapple cake with pineapple curd, teal frosting and tropical sprinkle mix
Irish Cream chocolate cupcakes topped with white and green buttercream piping and shamrock sprinkle mix

AMAZON AFFILIATE

Love and Confections is a participant in the Amazon Services LLC Associates Program, an affiliate advertising program designed to provide a means for sites to earn advertising fees by advertising and linking to amazon.com.

Copyright © 2018 Love and Confections · Log in