• Skip to primary navigation
  • Skip to main content
  • Skip to primary sidebar
  • Home
  • About
  • Work With Me
  • Media
  • Recipes

Pies-Tarts-Crostatas

Peach Crostata for a Long Distance Birthday Wish

February 25, 2012


Tomorrow is one of my oldest friend’s birthday. We have known each other for 22 years!
MC and I went to the same elementary school and that is where we met. We became friends after I joined the Girl Scout troop her mom was the leader of. Twenty-two years is a long time. We have not only stayed friends, but have become like family.

When you call your friend’s grandparents by the nicknames she gave them, when building forts together on the patio and swimming in the pool are your number one priority, when you have summer sleepovers and can’t remember the last time you actually went home, when you have the absolute best stories from family vacations, when you make plans on how to scare your younger sisters’ troop while camping, when you help each other get ready for your proms and graduations, when, as adults, you and your friend make vacation plans together, when you hug each other after a grandparent has passed, when your friend helps you get ready on your wedding day… those are only a few of the memories from our friendship, the memories of twenty-two years, the memories of good friends.

One such memory:
Our families took an Easter trip to Georgia many years ago. We stayed on MC’s grandparents’ farm… with an orchard and a golf cart. Yes, the golf cart is very important. We could drive it, as long as we stayed on the property. That was a big thing to a little girl. We had such a blast – roamed the property, played outside, and drove the golf cart as fast as we could over all the little “hills and valleys”. One night, our families had a traditional fish-fry, right out of the back of a pick-up truck. The food was delicious and the company was great.
I remember waking up early one morning, before dawn, and looking out the window at the orchard. It was eerie and beautiful all at the same time. The fog enveloped the trees and I could tell the sun would rise soon. We just sat there and watched the fog for a while, before falling back asleep on Easter morning.
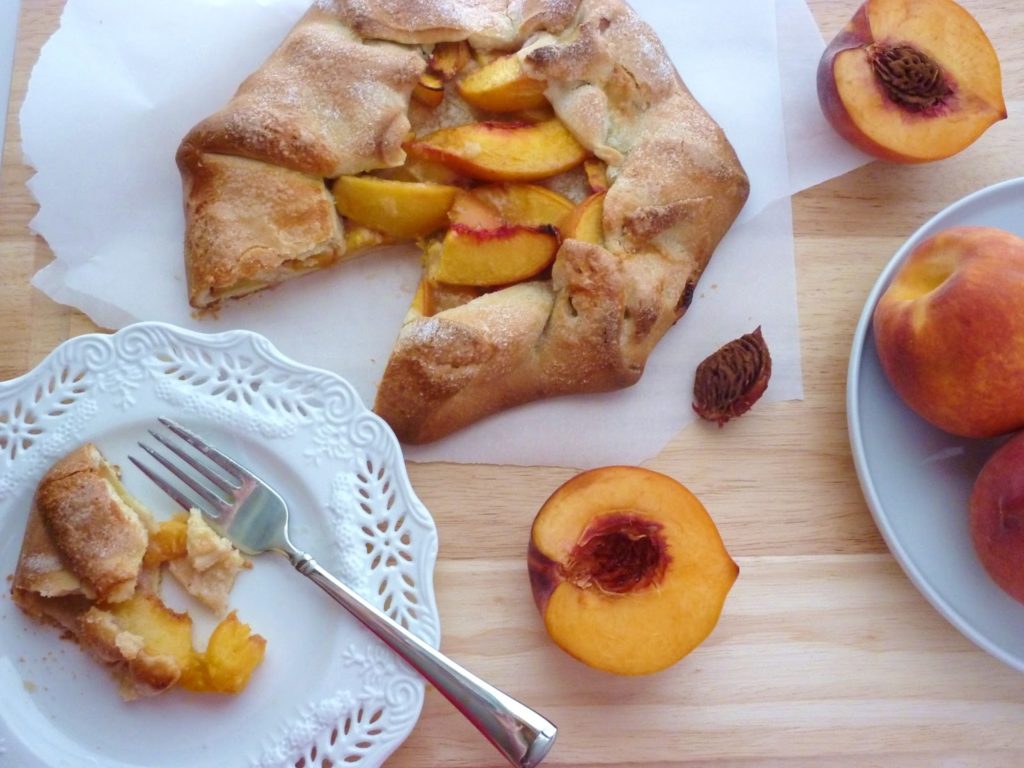
We don’t live in the same city and we don’t see each other often. I have countless more stories with MC, and will continue to make great memories, wherever life takes us. Hopefully we can see each other again soon! MC loves peaches, so I decided to make a Peach Crostata in honor of her birthday.

Happy Birthday MC! All my love!!!

Peach Crostata
Love & Confections original recipe
Peach Crostata Ingredients:
– 375-400 grams Sugar Dough
– 2 ripe Peaches
– 1 tablespoon Sugar, plus more for sprinkling
– 1 tablespoon Lemon Juice
– 1/4 cup Almond Meal/Flour
– 1 tablespoon Butter, cut in small cubes
– 1 Egg for egg wash
Peach Crostata Directions:
– Preheat oven to 375F.
– Keep dough cold until ready to use. Cut peaches in half, and each half in 6 pieces. Place Peach slices in a bowl and sprinkle with 1 tablespoon Sugar and 1 tablespoon Lemon Juice. Mix by hand, making sure each piece is coated.
– Roll out dough, on a floured surface, to about a 1/4 to 1/8 inch thick round.
– Sprinkle the middle of the dough with the Almond Meal, leaving about 2 inches around.
– Place the Peach slices on the Almond Meal. Place the cubed butter on the peaches. Brush the uncovered 2 inches of dough with the egg.
– Fold up the sides of the dough, making sure you press it together, so the dough sticks. It’s a rustic tart, so it doesn’t have to look perfect – and I am anything but perfect. Brush the top of the dough with more egg wash and sprinkle the top of the entire tart with sugar.
– Bake for 25 – 30 minutes, or until the dough is cooked and golden brown. I baked mine on stoneware, but if you don’t have any, you can use parchment on a baking sheet.
Until next time,
LOVE & CONFECTIONS!

Filed Under: Pies-Tarts-Crostatas, Uncategorized

Blueberry-Strawberry Tart for my 2nd Blogiversary

February 6, 2012

Happy Birthday to Love & Confections!

I can’t believe I started this blog 2 years ago. I started it on a whim, because I wanted to share recipes and techniques, was interested in food photography, and to continue learning, exploring, photographing and tasting all things baking and pastry. Over my two years of blogging, I have had ups and downs in life and in the blog world, but as Walt Disney said, “Keep moving forward,” and that is just what I have done.

I am trying to blog on a more regular basis and continually striving to improve my photography skills. I have been fortunate enough to have family and friends let me use their dslrs whenever they can, as opposed to my point-and-shoot that I use on a regular basis – thank you Aunt W & Susan! I am also experimenting in the kitchen more – hoping to bring you lots of original recipes in the coming year.

I thought a tart would be a nice blogiversary treat, instead of the normal birthday cake. Whatever dough and frangipane you do not use, can be frozen for later use. Just remember to wrap the dough very well. The frangipane can be put in a freezer ziploc. Let it freeze flat, then you can move it on its side, or wherever else you need to put it in the freezer. Remember to label them properly – name and date – so you always know what you have. Whenever you’re ready to use them again, just thaw for a day in the refrigerator.

Blueberry-Strawberry Tart
Love & Confections original recipe

Tart Dough Ingredients:
– 280 grams Pastry Flour
– 280 grams All Purpose Flour
– 225 grams Butter, cold and cut in small cubes
– 225 grams Confectioner’s Sugar
– 5 grams Salt
– 158 grams Eggs (roughly 3 large eggs)

Tart Dough Directions:
– Preheat oven to 350F
– Combine first 5 ingredients into the bowl of a stand mixer. Using the paddle attachment, on a low speed, mix the ingredients until the Butter becomes pea-sized and the mixture feels somewhat like sand.
– Add the Eggs, half at a time, and mix until combined. This is a very sticky dough.
– Once mixed, enclose the dough on plastic wrap, shaping it into a rough circle, and let it rest in the refrigerator for at least 2 hours.
– After the dough has chilled and rested, roll the dough out on a floured work surface. Gently place the dough in the tart pan without stretching it. Press it to the bottom, in the corners, and up the sides. Dock the dough, line it with a piece of parchment on it and pie weights or beans, and par bake it for 10 minutes. Remove the parchment and beans and let cool. The tart shell can me made ahead and frozen.

Frangipane Ingredients:
– 16 ounces Almond Paste
– 100 grams Sugar
– 195 grams Butter, room temperature
– 30 grams Almond Meal/Flour
– 250 grams Eggs (5 large eggs)
– 115 grams Flour, sifted

Frangipane Directions:
– This can be made while the dough is resting.
– Combine Almond Paste, Sugar, Butter and Almond Flour in the bowl of a stand mixer with the paddle attachment. Mix the ingredients on medium, stopping and scraping down the sides of the bowl every few minutes.
– While on low, add in the Eggs one at a time, making sure the Egg is thoroughly mixed in before adding the next. Scrape the sides of the bowl to ensure that everything is mixed properly
– Add in the Flour and mix on low until incorporated.
– Refrigerate mixture until ready to use, or divide into freezer bags as stated above.

Other Ingredients:
– 1 pint Strawberries, hulled and halved
– 6 ounces Blueberries
– Apricot Jelly

Tart Assembly:
– Measure 300 grams of the Frangipane into the tart shell. Using an offset spatula, spread and level the Frangipane. Bake for 25-30 minutes, or until the top is golden brown and springs back slightly when you tough it. Let it cool completely in the tart pan before going to the next step.
– Remove the tart from the pan and place on a cardboard cake round. Arrange the Strawberries around the edge of the tart. Place the Blueberries in the center of the tart.
– Warm the Apricot Jelly in a saucepan until liquid. You will need to add a few tablespoons of water, one at a time, to the jelly, so it doesn’t burn or darken too much.
– Using a pastry brush, brush the tops of the strawberries and blueberries with the Apricot glaze. This is best done right before serving. Keep refrigerated.
– Enjoy!

Until next time,
LOVE & CONFECTIONS!

Filed Under: Pies-Tarts-Crostatas, Uncategorized

Spanish Almond Custard Torte

May 22, 2011


A few weeks ago I had the pleasure of going to a Tapeña® Wine and Tapas Party hosted by Katie from Katie’s Cucina. We had all sorts of goodies, including Tapeña® wine. The two wines we tasted were the Garnacha and the Tempranillo. Hopefully I will be able to try the other two Tapeña® wines, Verdejo and Rosé, which were unavailable at our local Total Wine & Beer store.


The tapas that Katie provided were delicious! She had Sweet and Savory Pumpkin Empanadas, Shrimp and Parsley Toasts, Mixed Grilled Vegetables, Barbeque Pork Pinchos and White Chocolate Raspberry Mousse Cups.


Being a pastry chef, I automatically volunteered to bring dessert. I had so many ideas and the internet is full of recipes, but I wanted something special and different, not just your average flan. I happened upon this Spanish Almond Custard Torte and decided it would be perfect.


I love baked custards more than almost anything. Baked pastry cream is divine! This is a basic pastry cream recipe with almond paste added. Almond paste has such a great, intense flavor – I love using it baked goods.


Spanish Almond Custard Torte
from Lisa & Tony Sierra, About.com

Spanish Almond Custard Torte Ingredients:
– Vegetable Shortening to coat pan
– 2 sheets Puff Pastry (1 package 17 ounce frozen puff pastry)
– 2 cups Milk
– 1 Cinnamon Stick
– 3 Egg, separated
– 2/3 cup granulated Sugar
– 1/4 cup Corn Starch
– 1/4 cup All-Purpose Flour
– 8 ounces Almond Paste

Spanish Almond Custard Torte Directions:
1. Remove Puff Pastry sheets from freezer and allow to thaw 10-15 minutes.
2. Using a paper towel, coat an 8-inch cake pan or springform pan with Vegetable Shortening
3. Line the cake pan with puff pastry, trimming edges to fit pan and pressing pastry where the bottom of the pan meets the sides.
4. Prick the bottom with a fork
5. Preheat oven to 350F
6. Pour all but 1/4 cup Milk into a medium-size, heavy bottom sauce pan and add the Cinnamon Stick. Bring milk just to the boiling point, then remove from heat and set aside to cool down.
7. In a large mixing bowl, beat the Egg Yolks and Sugar until the mixture turns light yellow and has a smooth texture. Add the Flour and Corn Starch to the egg mixture and beat with a hand mixer or stand mixer on medium-high speed. Add the reserved 1/4 cup milk and continue to mix until smooth and creamy
8. Remove cinnamon stick from warm milk. While stirring constantly, pour about 1/3 of the warm milk into the egg mixture. Once the milk is mixed in well, continue to stir while pouring in the rest of the milk.
9. Using a hand or stand mixer, add the Almond Paste and mix well
10. Transfer the mixture into the sauce pan and heat on medium, stirring constantly. Bring to a boil for just 30 seconds. Note: be careful while heating that lumps don’t form. If lumps do begin to form in the custard, try using a hand mixer on low to break up the lumps.
11. Remove from the stove and pour into the puff pastry crust.
12. To form the top crust, lay the other puff pastry sheet out on a clean cutting board and cut the sheet into strips and lay across the top.
13. Beat the Egg Whites in a small bowl. Brush beaten egg whites over the top of the crust.
14. Bake in middle rack of oven for 30-35 minutes. Remove and allow to cool for 20 minutes before serving. Refrigerate if the torte will not be eaten within an hour. Note: if using a springform pan, remove the sides and serve. Otherwise, cut and serve the torte from the cake pan

Until next time,
LOVE & CONFECTIONS!

Filed Under: Pies-Tarts-Crostatas, Uncategorized

Lemon Brown Sugar Meringue Tart for Mother’s Day

May 8, 2011


Door to door, my Mom lives 615 miles away. I get to visit her a few times a year, and she also gets to come her a few times a year, but it is difficult living that far away. I want to be near her and want her around for certain things. Like this past week while I have been sick – no matter how many times I make it, my chicken soup never tastes as good as hers. I think her secret ingredient is Mom’s Love.

Mother’s Day is always a difficult holiday when loved ones are not there. My Mom lives in another state. My paternal Grandmother lives a few hours away in another city. My maternal Grandmother is in Heaven. It’s even more difficult when there are specific things you miss and can will never be able to have again. I miss my Grandmother’s roasted chicken. There was just something about the way she cooked it. We would gather around the table, my Grandfather and I would grab the dark meat while everyone else had white meat, and we would enjoy a great family meal and each others company.


My Mom’s favorite dessert is Lemon Meringue Pie. She requests it whenever it’s her birthday or for any occasion that needs a special dessert. My Grandmother made the best Lemon Meringue Pie. There was none like it. Lemon Meringue Pie and Eggplant Parmesan are what my Mom misses most from my Grandmother’s cooking. I think Grandma had some of that Mother’s Love secret ingredient too!


I know it doesn’t come close to her Lemon Meringue Pie, but I wanted to make something special for my Mom on Mother’s Day – even though I won’t get to see her for a couple of weeks – it’s the thought that counts. I can’t put Mother’s Love in it, but I hope Daughter’s Love will do.

Next mission – to attempt Grandma’s Eggplant Parmesan. Maybe I’ll come close enough to Grandma’s recipe and be able to make Mom smile.

Happy Mother’s Day, Mom! I love you and can’t wait to see you soon <3
p.s. Mom, this tart was pretty good! 🙂

Is there any special dish your Mom makes that you absolutely love? Share it in the comments!

Lemon Brown Sugar Meringue Tart
Lemon Curd – Joyofbaking.com
Brown Sugar Meringue – Me

Tart Crust:
– I used a pre-made pie shell, but you can use whatever recipe you like best.

Tart Crust Directions:
1. Preheat oven to 400F
2. haw Pie Crust by following directions on package
3. Unroll and gently place over tart pan with removable base
4. Gently push the dough into place, without stretching the dough. (It will shrink during baking if you stretch it)
5. Trim any excess dough and dock pie dough with a fork along the bottom
6. Place a piece of parchment paper on the tart – big enough to fit over the whole tart and sides – and then fill with either pie weights or dry beans (re-usable and used only for baking weights).
7. Bake tart for 20-25 minutes
8. Remove parchment paper with beans and save beans for later use

Lemon Curd Ingredients: (I doubled it to have extra)
– 3 large Eggs
– 3/4 cup Granulated Sugar
– 1/3 cup fresh Lemon Juice – do not use the bottled juice
– 4 tablespoons unsalted Butter, room temperature
– 1 tablespoon finely shredded Lemon Zest – zest lemons before squeezing for juice

Lemon Curd Directions:
1. Turn oven down to 350F
2. In stainless steel bowl over a pot of simmering water, whisk together Eggs, Sugar and Lemon Juice until blended.
3. Cook, stirring constantly (to prevent it from curdling), until the mixture becomes thick (like sour cream or a hollandaise sauce). Approximately 160F if you have a thermometer. This will take about 10 minutes.
4. Remove from heat and immediately pour through a fine strainer to remove any lumps.
5. Cut the Butter into small pieces and whisk into the mixture until the butter has melted.
6. Add the Lemon Zest, stir, and let cool. The Lemon Curd will continue to thicken as it cools
7. Cover immediately (so a skin doesn’t form) and it can be refrigerated for up to a week.
8. Place Lemon Curd in pie crust and bake at 350F for 10 minutes. Do not let it brown – just cook until set, but still wobbly in the center.

Brown Sugar Meringue Ingredients:
– 6 Egg Whites, room temperature
– 2 cups Brown Sugar
– pinch of Salt

Brown Sugar Meringue Directions:
– For those of you familiar with types of meringue, this is a Swiss Meringue recipe, but unlike regular Swiss Meringue, the Brown Sugar automatically dissolves in the Egg Whites, so you just need to warm it like a regular Swiss Meringue – not having to worry if the sugar is dissolved or not.
1. In a bowl of your stand mixer, add the Egg Whites, Brown Sugar and a pinch of Salt
2. Whisk together while it is placed over a pot of simmering water – same pot used to make the Lemon Curd – while being careful the water does not touch the bottom of the bowl!
3. Continue to whisk until the egg and brown sugar mixture are warm. You can use your fingers to tell the temperature, while making sure you don’t cook the egg whites too much. It should be warmer than room temperature.
4. Place bowl on stand mixer, attach whip and whip it on high.
5. Place a piece of foil completely around the bowl and your mixer. The warmer the egg whites are, the better they whip. The foil keeps them warm.
6. Remove the foil after the whites are whipped perfectly.
7. Spoon or pipe meringue onto Lemon Curd Tart carefully, making sure to cover the entire surface of the curd. Using a palette knife or spatula, create whatever design you prefer for the top of the meringue tart
8. You can either use a torch – like I did – or place it in the oven for a few minutes, to brown the meringue

Until next time,
LOVE & CONFECTIONS!

Filed Under: Pies-Tarts-Crostatas, Trifles-Parfaits-Mousses-Curds, Uncategorized

A Taste of Summer – Cherry Clafoutis

July 18, 2010

One of the best summer fruits are cherries! I remember sitting on the steps of our pool, as a kid, with a bowl full of cherries on the tile deck, and a bowl full of cherry pits right next to it. The sweet, and sometimes tart, fruit was always a welcomed treat. That was the life – a lazy summer day in the pool, a bowl full of cherries and lots of sunshine!

Unfortunately, when I recently purchased my cherries, they were not as good as I had hoped – and only discovered this at home. I had to use them rather quickly and decided to create a dish I had been thinking about for quite some time. I have never made a clafoutis and have always wanted to try one – it seemed so simple.

Clafoutis, or sometimes spelled Clafouti, is a baked French dessert with black cherries arranged in a buttered dish and covered with a thick, flan-like batter, dusted with powdered sugar and served warm. Clafoutis comes from the Limousin region of France. Black cherries are the traditional ingredient, but other variations include: red cherries, plums, peaches, pears, apples and blackberries – when other types of fruit are used instead of cherries, the dish is called a Flaugnarde.

The traditional Limousin Clafoutis contains the pits of the cherries. Some bakers say, “the pits release a wonderful flavor when the dish is cooked. If the pits are removed prior to baking, the Clafoutis will be milder in flavor.” I prefer to pit my cherries before baking, just in case. Many people opt for a cherry pitter, but I just did it by hand – with latex gloves on, of course – cherry-stained fingertips are not attractive.

Cherry Clafoutis
adapted from Joy of Baking

Cherry Clafoutis Ingredients:
– 65 grams All-Purpose Flour
– 1/4 teaspoon Salt
– 2 large Eggs
– 25 grams granulated Sugar
– 180 milliliters Milk
– 1/2 teaspoon pure Vanilla Extract
– 1 pound or 340-454 grams sweet Cherries, pitted
– 13 grams unsalted Butter
– 25 grams granulated Sugar
– Butter or Non-stick Cooking Spray
– Confectioner’s Sugar for dusting

Cherry Clafoutis Directions:
1. Preheat the oven to 425F and place the rack in the center of the oven.
2. Prepare baking dish(es) by coating the bottom and sides with either Butter or Non-stick Cooking Spray
3. Wash the Cherries, remove the stems and pits
4. In your food processor or blender, place the Flour, Salt, Eggs, first measure of Sugar, Milk and Vanilla Extract.
5. Process for about 45-60 seconds, scraping down the sides of the bowl as needed. Once the batter is completely smooth, let it rest while you prepare the fruit.
6. In a medium saucepan, melt the butter over medium heat.
7. When the butter is bubbling, add the pitted Cherries and cook until they have softened a bit and are coated with butter (2-3 minutes).
8. Sprinkle the Cherries with the second measure of Sugar and cook until the Sugar dissolves and turns into a syrup (1-2 minutes).
9. Evenly divide the Cherries into the baking dish(es).
10. Pour the batter over the Cherries and bake for 20 minutes, or until the Clafoutis is puffed, set and golden brown around the edges. Do not open the oven door until the end of the baking time or it may collapse.
11. Serve immediately with a dusting of Confectioner’s Sugar.

Until next time,
LOVE & CONFECTIONS!

Filed Under: Pies-Tarts-Crostatas, Uncategorized

  • « Go to Previous Page
  • Page 1
  • Page 2

Primary Sidebar

Meet Terri
founder & pastry chef

Subscribe to Love and Confections

Popular Posts

Pumpkin Pecan Cupcakes with Cinnamon Cream Cheese Frosting
Pumpkin Spice Cinnamon Roll Cake
Oatmeal Cream Pie Layer Cake - oatmeal brown sugar layer cake, marshmallow frosting filling, and vanilla bean buttercream with oatmeal cream pie garnish
Easy Piña Colada Poke Cake - pineapple cake, coconut cream pudding, whipped topping, pineapple chunks and maraschino cherries
Mermaid layer cake
PIneapple cake with pineapple curd, teal frosting and tropical sprinkle mix
Irish Cream chocolate cupcakes topped with white and green buttercream piping and shamrock sprinkle mix

AMAZON AFFILIATE

Love and Confections is a participant in the Amazon Services LLC Associates Program, an affiliate advertising program designed to provide a means for sites to earn advertising fees by advertising and linking to amazon.com.

Copyright © 2018 Love and Confections · Log in