• Skip to primary navigation
  • Skip to main content
  • Skip to primary sidebar
  • Home
  • About
  • Work With Me
  • Media
  • Recipes

Cakes & Frostings

Cupcake Overload!

March 25, 2010

It has been a while… Sorry it has been so long since the last post – lots of things have happened/are happening. I was really sick for a few weeks and my husband and I are in the process of moving. Long story short, the neighborhood has gotten worse and we want to live someplace we actually like… so I will try to post more, but packing and moving is obviously priority.

Here are some pictures of cupcakes I made for my husband’s birthday. He wanted some for a dinner with friends – I made beef wellington, roasted potatoes and green beans, yum! – and some for people at the two places he works. I miscalculated the amount made and ended up with a lot more than planned. These aren’t from scratch, but I added to them. *Disclaimer – I never said I was going to bake everything on my blog from scratch – time constraints and funds are to blame. When I have the available time and funds, I will gladly make everything from scratch, well, almost from scratch. “If you want to make an apple pie from scratch, you must first create the universe,” -Carl Sagan.

Some people might cringe or criticize and say, “You used a box mix? You call yourself a baker?” To answer, yes I used a box mix. Duncan Hines “Devil’s Food”, “French Vanilla,” and “Yellow Cake, ” to be exact. They’re the best and only cake mixes I use. Even one of my professors in culinary school, who is an Executive Pastry Chef at a Hyatt hotel said he uses Duncan Hines at home, “because when you make things from scratch, the last thing you want to do is go home and make more cakes, and besides, it’s the best.”

I have actually always used Duncan Hines my entire life. So back to the actual cupcakes – I miscalculated because I normally get 25 cupcakes out of the box mixes, but the husband requested mini cupcakes, so people could try all the varieties and not have to eat whole, big ones. I was perfectly fine with that, except for the fact that instead of 2 mini cupcakes per one regular, it ended up being 3 mini cupcakes per regular, and with only 1 mini cupcake tin of 24 cups, it took a while. (I searched at a place I thought would have another tin, but they didn’t, and didn’t have enough time to actually find one).

So, 200 mini cupcakes later – and a few bigger cupcakes because I only had 200 mini wrappers – I had 3 different flavor cupcakes and was ready to decorate.

The Devil’s Food cupcake was made into a S’more cupcake. The first picture is what I originally did for the S’more cupcakes – crushed graham cracker crumbs on the bottom, followed by the Devil’s Food batter, then a mini marshmallow in the center. I had decided against hollowing the cupcake out and filling it with melted marshmallow, and experimented this way.

Needless to say, thank goodness for the experiment, because they did not turn out how I would have liked them.

The second time around I decided to ditch the graham crackers on the bottom – they got lost and you couldn’t taste them – and the marshmallows in the middle – they kind of melted into the batter and you couldn’t taste it either. Instead I melted the marshmallows with a little bit of milk, in a pot on the stove, and once cooled, mixed into the French Buttercream I had been planning on using. It turned out delicious, and I sprinkled graham cracker crumbs on top.

The next are the Boston Cream cupcakes. I hollowed out the center of the French Vanilla cupcakes and used Jell-O pudding – yes, Jell-O pudding. Like the aforementioned disclaimer said, no time to make pastry cream, especially when I had a whole dinner to put together as well. Then I topped it with the French Buttercream and chocolate sauce. As far as the chocolate sauce goes, I didn’t want to use it but had little time in between dinner and dessert to temper chocolate. I’ll leave the discussion about tempering chocolate for another day.

The last were the Key Lime cupcakes. I used the yellow cake cupcakes and hollowed them out as well. I used some vanilla Jell-O pudding mixed with a little bit of Nellie & Joe’s Key Lime Juice and lime zest for the filling. The French Buttercream also got some lime zest and was topped with lime slice jelly candy. The individual Key Lime cupcake picture didn’t turn out well, but you can still see them in the picture below. The Boston Cream cupcakes turned out to be the biggest hit.

French Buttercream (the “from scratch” element)
from About Professional Baking by Gail Sokol

200 grams Granulated Sugar
60 milliliters Light Corn Syrup (4 tablespoons or 1/4 cup)
60 milliliters Water (2 fluid ouces or 1/4 cup)
114 grams Egg Yolk
450 grams Unsalted Butter – very soft, but not melted
10 milliliters Vanilla Extract (2 teaspoons)

In saucepan, combine sugar, corn syrup and water and bring mixture to a rolling boil, stirring just until sugar dissolves.*

While sugar syrup is cooking, beat the egg yolks on high speed in the bowl of an electric mixer using the whip attachment, until the color lightens to a pale yellow.

On high speed, slowly add the hot syrup tot he egg yolks, pouring it down the sides of the mixing bowl and not directly onto the whip. Keep beating until the bowl feels cool to the touch.

Gradually add the softened butter**, a few tablespoons at a time, until it is all incorporated, blending in each addition of butter thoroughly. The buttercream may appear curdled until all the butter has been incorporated. Add the vanilla extract and blend well.

* cook to 250°F – firm ball stage
** Can use colder butter if sugar is slightly warmer – balances out temperature

Until next time,

Love & Confections!

Filed Under: Cakes & Frostings, Cupcakes, Uncategorized

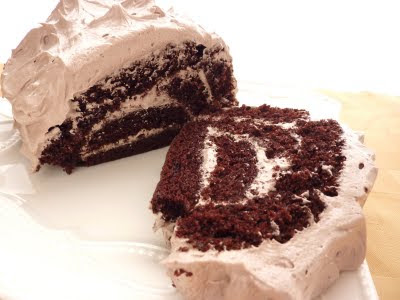
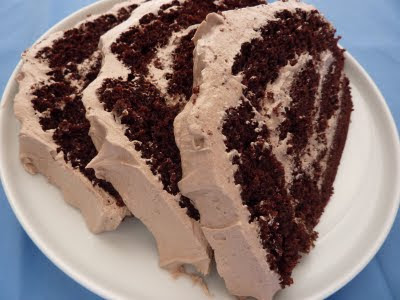
Mocha Roulade

March 3, 2010

Chocolate and coffee – what a combination! Coffee enhances the flavor of chocolate, so combining the two works great.

It feels like I have been going nonstop these past few days. I am prepping everything for surgery tomorrow. I will be having my 2nd Carpal Tunnel surgery – this time on my right hand. I needed to clean everything in the house, do laundry, many, many dishes, and everything else I won’t be able to do for a little while. Luckily, I have the greatest husband in the world, who is able to take care of me while I’m recovering. He cleans, He cooks – and most of the time he doesn’t burn anything – He is the best.

I’m not as nervous as I was before my first CT surgery, but I still have worries. No one ever likes going to the hospital, getting IVs and anesthesia, and the recovery period. I am worried for one major reason. This will be the surgery on my dominant hand – my right hand. With the last surgery – you can read about it here – I was able to function a good deal, because I could still use my right hand. I am hoping that everything will go as smooth as the last surgery and that my fears are not necessary. Well, we’ll find out.

I have been doing a lot of baking this past week and weekend, so I will be able to have blog posts while I’m recovering, and you won’t wonder if I’ve fallen off the face of the Earth. This recipe is always great for presentation, and it tastes pretty darn good too! It seems complicated, with the amount of ingredients and instructions, but it is pretty simple once you get started. This cake is a lot thicker than other roulades I have done. I might tweak it later in another recipe. Enjoy!

Here are a few secrets for the best buttercream:
– use room temperature eggs
– when the eggs/sugar are hot, wrap the mixer in foil. warm eggs whip better
– make sure you get stiff peaks from the meringue

Mocha Roulade
Buttercream adapted from Chef Steven Rujak at Sweet and Savory Seasons

Cake Ingredients Part 1:
– 80 grams Egg Yolks (about 4 egg yolks), room temperature
– 6 ounces granulated Sugar
– 6 ounces Vegetable Oil
– 4 ounces Water
– 1 teaspoon Vanilla Extract
– 1 tablespoon Espresso or Coffee

Cake Ingredients Part 2:
– 180 grams Egg Whites (about 6 egg whites), room temperature
– 6 ounces granulated Sugar

Cake Ingredients Part 3:
– 5 ounces All-Purpose Flour
– 3 ounces Cocoa Powder (I used Dutch-Processed Cocoa, but you can use whatever you have)
– 2 teaspoons Baking Powder
– 1 teaspoon Baking Soda

Cake Directions:
1. Preheat oven to 350F
2. Whip Egg Yolks with sugar until light in color (part 1)
3. Add Oil, Water, Vanilla and Espresso (part 1)
4. Sift all the dry ingredients together (part 3)
5. Add the sifted dry ingredients into the Egg Yolk mixture
6. Whip Egg Whites and Sugar in a separate bowl. Start with just the whites and once they become foamy, slowly add in all the sugar. Whip until stiff peaks form. (part 2)
7. Fold the whipped egg whites into the egg yolk/chocolate mixture. Mix the egg whites in 3rds. Start with 1/3 of the whites and mix to lighten the egg yolk/chocolate mixture. Take another 1/3 of the egg whites and gently fold into the batter. When the whites are almost all combined, add the last 1/3 of egg whites and fold into batter. Make sure you do not deflate the egg whites while folding them in the mixture.
8. Lightly grease a Half-Sheet Pan/Jelly-Roll Pan (9×16). Place a piece of parchment on the bottom and lightly grease that as well
9. Gently spread the batter into the pan. Level the mixture with an off-set spatula
10. Bake for 15-20 minutes, until the center springs back when touched and a toothpick comes out clean
11. Let it cool completely in the pan.

Buttercream Ingredients:
– 6 Egg Whites, room temperature
– 2 cups granulated Sugar
– 1 pound unsalted Butter, room temperature
– 15 ounces Powdered Sugar
– 1 ounce Cocoa Powder
– Vanilla Extract to taste
– Coffee Extract to taste

Buttercream Directions:
– For those of you familiar with types of buttercream, this is a Swiss Meringue recipe.
1. In a bowl of your stand mixer, add the Egg Whites and granulated Sugar
2. Whisk together and place over a pot of simmering water – while being careful the water does not touch the bottom of the bowl!
3. Continue to whisk until the egg and sugar mixture are warm, and the sugar is dissolved. You can use your fingers to tell the temperature and to see if the mixture is still gritty with sugar, while making sure you don’t cook the egg whites too much. It should be warmer than room temperature.
4. Place bowl on stand mixer, attach whip and whip it on high.
5. Place a piece of foil completely around the bowl and your mixer. The warmer the egg whites are, the better they whip. The foil keeps them warm.
6. Remove the foil after the whites reach room temperature (feel the bottom of the mixing bowl. If it is cool to the touch, then you are okay to proceed.
7. Add in the Butter and mix on high speed until incorporated
8. Add the Powdered Sugar and flavorings and mix on high for 3 minutes.
9. Transfer to a bowl and reserve until you are ready to use.

Until next time,
LOVE & CONFECTIONS!

Filed Under: Cakes & Frostings, Uncategorized

  • « Go to Previous Page
  • Page 1
  • Interim pages omitted …
  • Page 5
  • Page 6
  • Page 7

Primary Sidebar

Meet Terri
founder & pastry chef

Subscribe to Love and Confections

Popular Posts

Pumpkin Pecan Cupcakes with Cinnamon Cream Cheese Frosting
Pumpkin Spice Cinnamon Roll Cake
Oatmeal Cream Pie Layer Cake - oatmeal brown sugar layer cake, marshmallow frosting filling, and vanilla bean buttercream with oatmeal cream pie garnish
Easy Piña Colada Poke Cake - pineapple cake, coconut cream pudding, whipped topping, pineapple chunks and maraschino cherries
Mermaid layer cake
PIneapple cake with pineapple curd, teal frosting and tropical sprinkle mix
Irish Cream chocolate cupcakes topped with white and green buttercream piping and shamrock sprinkle mix

AMAZON AFFILIATE

Love and Confections is a participant in the Amazon Services LLC Associates Program, an affiliate advertising program designed to provide a means for sites to earn advertising fees by advertising and linking to amazon.com.

Copyright © 2018 Love and Confections · Log in