• Skip to primary navigation
  • Skip to main content
  • Skip to primary sidebar
  • Home
  • About
  • Work With Me
  • Media
  • Recipes

Cakes & Frostings

Chocolate Avocado Bundt Cake #BundtBakers

July 17, 2014

Chocolate Avocado Bundt Cake is incredibly moist and absolutely delicious! 
It’s even better when chocolate chips are added and topped with ganache!


Sometimes you get an idea into your head and you just go with it. That is definitely the case with this month’s bundt cake. Our theme this month is stone fruit. I love cherries, peaches, plums and nectarines, but a few other bloggers were already doing some of the ideas I had. I, instead, took a different route – avocado.

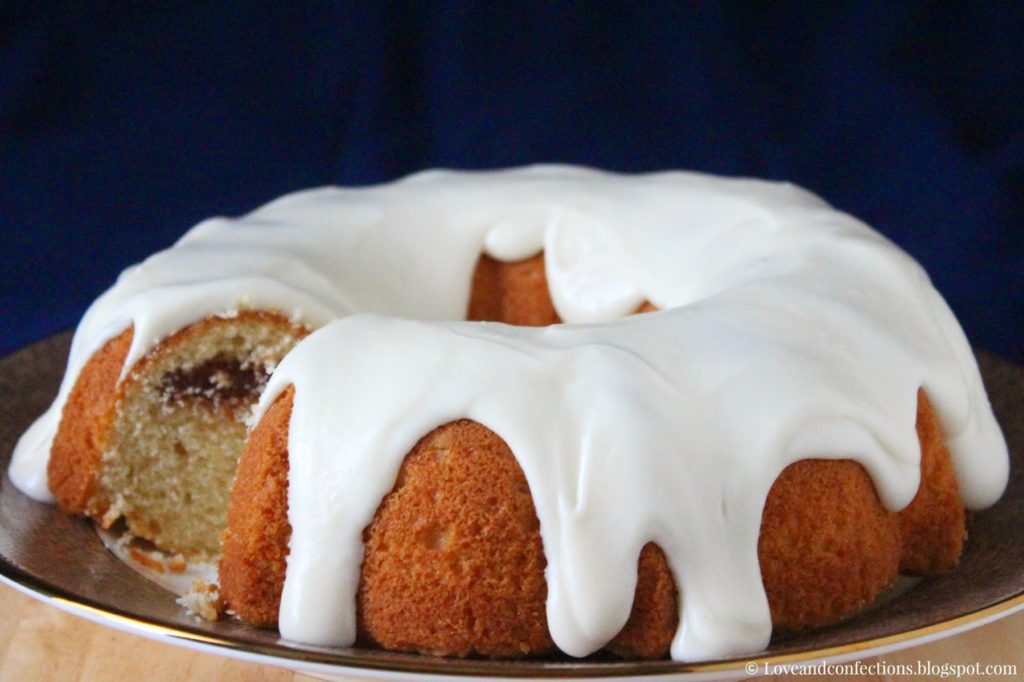
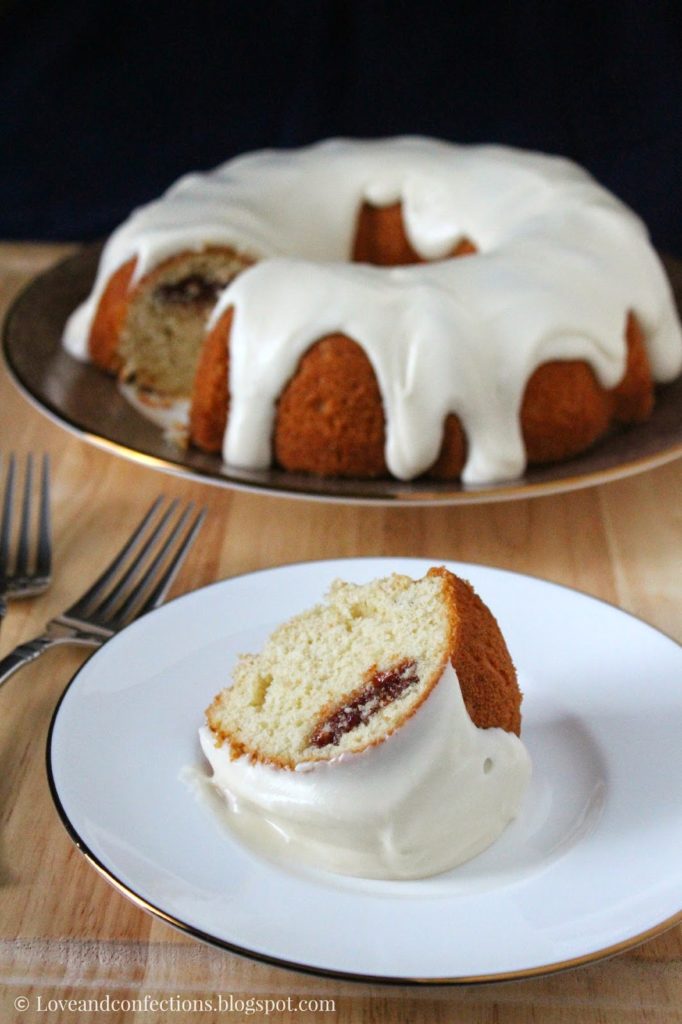
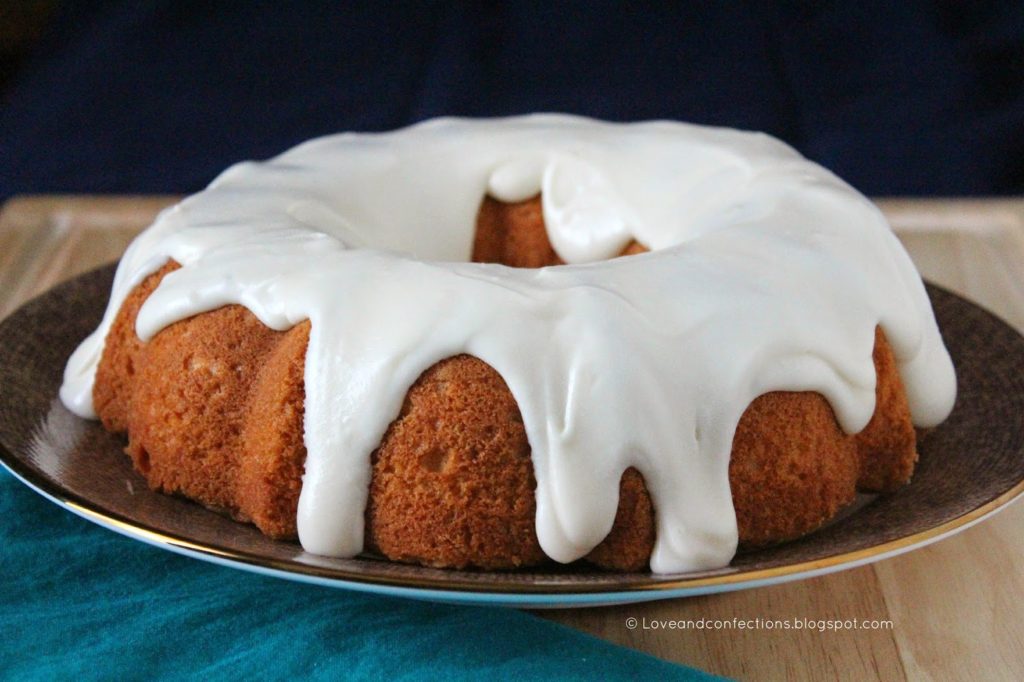
I have actually never baked with avocado, but I will definitely keep baking with it in the future! There are no eggs and butter in the cake, so it is easily adaptable for anyone on a specific diet/  The avocado acts like butter, being the fat in the cake. I was skeptical that the avocado flavor would be overly predominant and I actually did not taste it at all. Avocado also makes this cake incredibly moist! I was very surprised at how it turned out and definitely crossed my fingers praying I wouldn’t need to change my recipe and re-bake it the night before.

I made this cake the other night, after Baby L&C went to bed. I totally forgot that I needed the avocado to be extremely smooth and the food processor would have definitely woken her up. Instead I took my KitchenAid 5-Speed Hand Blender and pureed all the wet ingredients together. I was given this KitchenAid Hand Blender to review and I am in love with it. With 5 different speeds and 4 different options on how to blend/puree, this baby does the trick! It even has a whisk and chopper attachment, all in a nifty case. I am definitely grateful that I can put all the pieces away in one place, know where they are at all times, and not have to dig through my “baking drawer” to find something. I have made smoothies, purees, hollandaise and even mashed potatoes with it – the perfect kitchen tool!

Chocolate Avocado Bundt Cake
adapted from Joy the Baker
Click here for the printable recipe

Chocolate Avocado Bundt Cake Ingredients:
– 3 cups All-Purpose Flour
– 6 tablespoons Cocoa Powder
– 1/2 teaspoon Salt
– 2 teaspoons Baking Powder
– 2 teaspoons Baking Soda
– 1/4 cup Vegetable Oil
– 1 cup soft Avocado**
– 2 tablespoons White Vinegar
– 2 teaspoons Vanilla Extract
– 2 cups Water
– 2 cups Granulated Sugar
– 1 cup Semisweet Chocolate Chips
– Ganache or prepared Hot Fudge Sauce (optional)

Chocolate Avocado Bundt Cake Directions:
1. Heat oven to 350°F. Prepare large bundt pan with baking spray.
2. Sift together Flour, Cocoa Powder, Salt, Baking Powder and Baking Soda into a medium bowl.
3. In a food processor or another medium bowl and using a KitchenAid Hand Blender with S-blade attachment, mix together the Vegetable Oil, Avocado, White Vinegar and Vanilla Extract.
4. Add in the Water and Sugar and blend together. Pour the entire wet mixture into the dry mix and whisk until combined and smooth. Stir in the Chocolate Chips with a spatula or spoon
5. Pour the batter into the prepared bundt pan and bake for 40-50 minutes or until the cake springs back and a toothpick inserted into the center comes out clean.
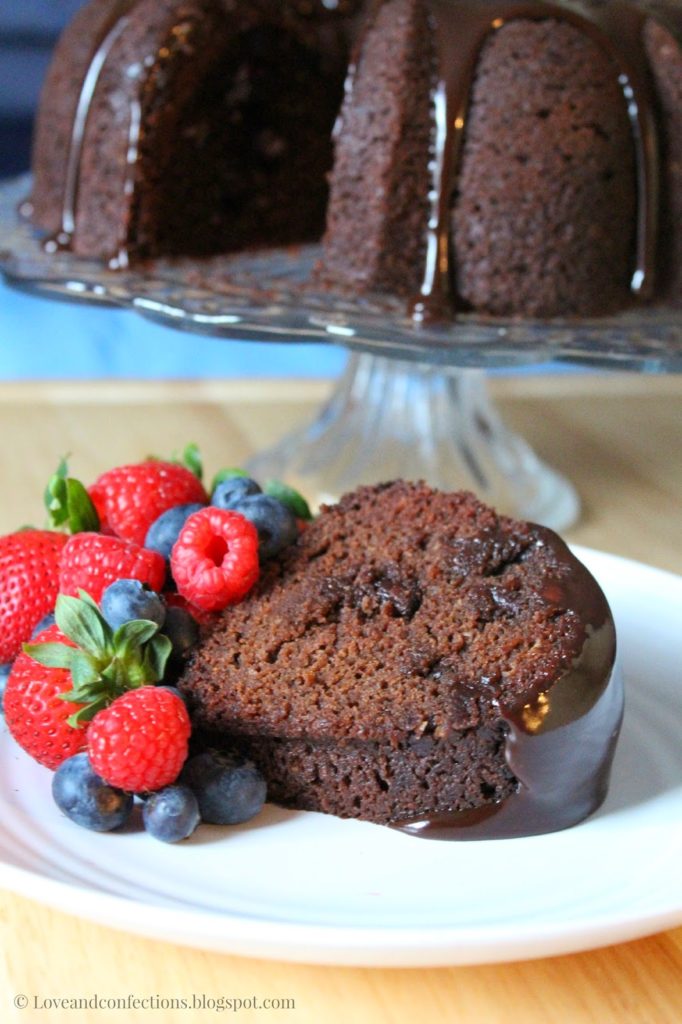
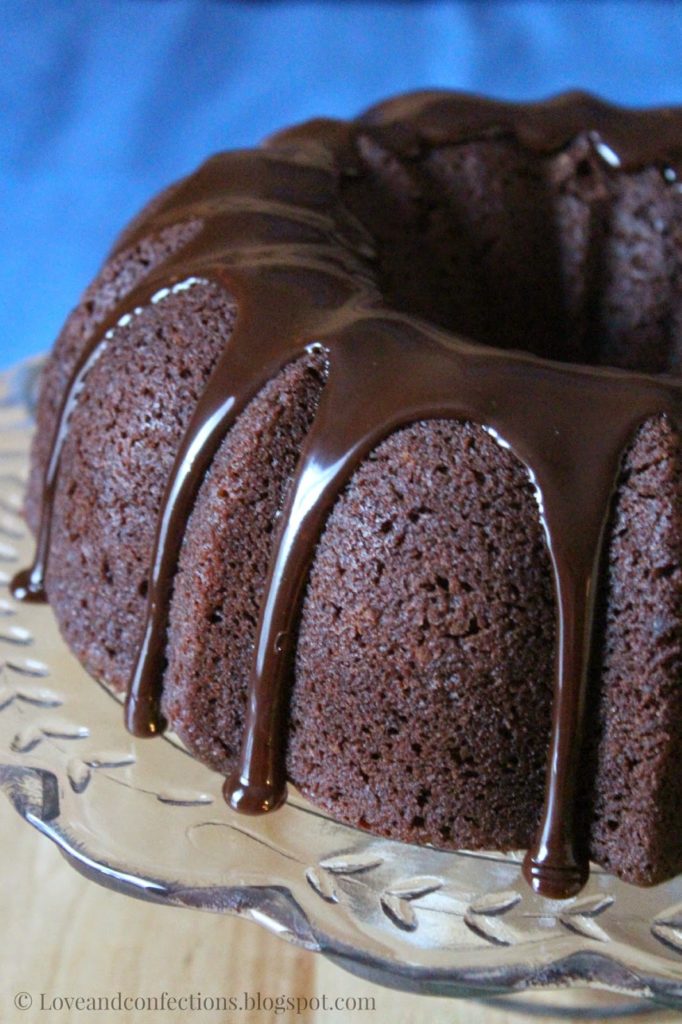
6. Cool in pan for 15 minutes, then turn out onto cake serving plate. This cake is very moist and will most likely stick to whatever surface you put it on and be hard to transfer once completely cool, so its serving plate is best.

**When picking out an avocado to use in this recipe, it needs to be very ripe. I used a Florida Avocado, because it was available to me. One trick to pick out a ripe Florida Avocado is to shake it. If you hear the seed, it is ripe.

Until next time,

LOVE & CONFECTIONS!


BundtBakers

Don’t forget to check out these other fabulous bundt cakes:

  • All-American Chocolate Cherry Pie Cake from Lauren at So You Think You Can Cook
  • Black Forest Bundt Cake with Cherry Ganache Topping from Teri at The Freshman Cook 
  • Cherry Almond Ginger Bundt from Jane at Jane’s Adventures in Dinner 
  • Cherry Carrot & Banana Bundt from Kelly at Passion Kneaded 
  • Cherry Chocolate Chip Bundt Cake from Renee at Magnolia Days 
  • Chocolate Avocado Bundt Cake from Terri at Love and Confections 
  • Cinnamon Peach Bundt Cake from Bea and Mara at I Love Bundts 
  • Peaches n Cream Melba Bundt Cake from Laura at Baking in Pyjamas 
  • Peachy Bundt from Margaret at Tea and Scones 
  • Plum, Chocolate and Orange Bundt Cake by Maria at Box of Stolen Socks 
  • Roasted Cherry Kugelhopf with Cherry Bourbon Glaze by Tux from Brooklyn Homemaker
  • Upside-down Apricot Butter Bundt from Stacy at Food Lust People Love

#BundtBakers is a group of Bundt loving bakers who get together once a month to bake Bundts with a common ingredient or theme.  Follow our Pinterest board right here. Links are also updated each month on the BundtBakers home page. We take turns hosting each month and choosing the theme/ingredient. If you are a food blogger and would like to join us, just send Stacy an email with your blog URL to foodlustpeoplelove@gmail.com.


* I was given the KitchenAid 5-Speed Hand Blender for reviewing purposes. All opinions are my own. I only work with companies I love. There are affiliate links in this post, which means that if you click on it and buy it, I will make a percentage from the sale.

Filed Under: Cakes & Frostings, Uncategorized

Guava and Cream Cheese Bundt Cake #BundtBakers

June 19, 2014

Guava Cake with Cream Cheese Frosting is a great treat for any day of the week!
  

This is my first #BundtBakers entry. I don’t know why I didn’t join earlier, because I really do love bundt cakes. Of course, when I told Mr L&C I was making a bundt cake, he immediately quoted the lines from “My Big Fat Greek Wedding” – “This cake has a whole in it”.

Growing up in Miami, guava pastelitos were everywhere and they were delicious! This cake reminds me of those treats, with the guava center and cream cheese frosting – a match made in heaven. This cake is a bit dense, like a pound cake, and I’m sure I will experiment more with this recipe in the future, but for now it satisfied my pastelito craving.

Guava and Cream Cheese Bundt Cake
adapted from “A Taste of South Florida” cookbook
Click here for printable recipe

Guava Bundt Cake Ingredients:
 – 1 stick Unsalted Butter, room temperature
 – 1 cup Granulated Sugar
 – 2 Eggs, room temperature
 – 2 teaspoons Baking Powder
 – 2 cups All-Purpose Flour
 – 2 teaspoons Vanilla Extract
 – 1/2 cup Heavy Cream
 – 1/2 package Guava Paste, thinly sliced


Guava Bundt Cake Directions:
1. Heat oven to 350°F. Thoroughly coat a bundt pan with baking spray.
2. In the bowl of a stand mixer, cream together the Butter and Sugar, until light and fluffy.
3. Add in Eggs, one at a time, then scrape down the sides of the bowl.
4. While on low, add the Flour, a half cup at a time, followed by the Baking Powder. Scrape the sides of the bowl.
4. Add in the Vanilla Extract and while on low, slowly drizzle in the Heavy Cream.
5. Pour half the batter into the bundt pan. Layer the sliced Guava Paste to cover the batter. Top with remaining batter.
6. Bake for 40-50 minutes, or until a toothpick comes out clean. Cool in the pan for 10 minutes, then turn out and continue to cool completely on a wire rack before frosing.

Cream Cheese Frosting Ingredients:
 – 4 ounces Cream Cheese, room temperature
 – 3 tablespoons Unsalted Butter, room temperature
 – pinch of Salt
 – 1 teaspoon Vanilla Extract
 – 2 cups Powdered Sugar
 – 3-4 tablespoons Heavy Cream

Cream Cheese Frosting Directions:
1. In the bowl of a stand mixer, or with a hand mixer, cream together the Cream Cheese, Butter and Salt. After every step, crape the sides of the bowl to make sure everything is incorporated.
2. Add in the Vanilla Extract and blend together.
3. With the mixer on low, add in the Powdered Sugar a half-cup at a time. Scrape down the sides of the bowl
4. Add in the Heavy Cream, one tablespoon at a time, mixing until desired consistency
5. Pour over cooled cake and enjoy!

Until next time
LOVE & CONFECTIONS!


BundtBakers


A big thanks to Lauren from From Gate to Plate for hosting this month. Check out all the Tropical Bundts below:

  • Guava and Cream Cheese Bundt Cake by Love and Confections
  • Guava and Pineapple Impossible Cake by Passion Kneaded
  • Pineapple Macadamia Nut Bundt Cake by Sew You Think You Can Cook
  • Passion-Orange-Guava Bundt Cake by All That’s Left are the Crumbs
  • Mini Spiced Upside Down Caramelized Pineapple Bundt Cakes by From Gate to Plate
  • Hibiscus Lime Bundt Cake by Brooklyn Homemaker
  • Mango Brown Sugar Glazed Bundt Cake by Noshing with the Nolands
  • Pineapple Pound Cake by Magnolia Days
  • Mango Ginger Bundt Cake by Food Lust People Love
  • Almost Pina Colada Bundt Cake by Tea and Scones
  • Mexican Mango Cake by My Catholic Kitchen
  • Mango Coconut Bundt by Jane’s Adventures in Dinner
  • Mini Pineapple Lime Mojito Bundt Cakes by Blahnik Baker
  • Tropical Pineapple Bundt Cake by Bizzy Bakes

Interested in learning more about us?? #BundtBakers is a group of Bundt loving bakers who get together once a month to bake Bundts with a common ingredient or theme.  Follow our Pinterest board right here. Links are also updated each month on the BundtBakers home page.

We take turns hosting each month and choosing the theme/ingredient.

If you are a food blogger and would like to join us, just send Stacy an email with your blog URL to foodlustpeoplelove@gmail.com.

You might also like:
Citrus Chiffon Bundt Cake

Coffee Chiffon Bundt Cake

Filed Under: Cakes & Frostings, Uncategorized

BABY L&C IS HERE and Pink Vanilla Bean Cupcakes

December 19, 2013

I am so excited to publish this post. Baby Grace has decided to make her appearance! Mr. L&C and I could not be happier with our little princess. If you follow my Instagram feed, there will be many more pictures to come! Thanks to everyone for all the well-wishes and following my progress through this experience. We are doing well and can’t wait to start this new journey with our little one.

To celebrate our new arrival I thought I’d share a go-to cake recipe of mine. Everything around here has been pink lately – even the cupcakes! This is a great recipe to whip up for any occasion. The cake flour makes it so light and I love the little flecks of vanilla seeds from the Vanilla Bean Paste.


Vanilla Bean Cupcakes
adapted from Swans Down Cake Flour

Vanilla Bean Cupcake Ingredients:
 – 2 sticks unsalted Butter, room temperature
 – 2 cups granulated Sugar
 – 2 teaspoons Vanilla Bean Paste*
 – 4 Eggs, room temperature
 – 3 cups Cake Flour
 – 1 tablespoon Baking Powder
 – 1/2 teaspoon Salt
 – 1 cup Milk

Vanilla Bean Cupcake Directions:
 – Heat oven to 350F. Line a cupcake tin with cupcake wrappers.
 – In the bowl of a stand mixer with the paddle attachment, cream together the Butter and Sugar. Scrape the sides of the bowl. Add in the Vanilla Bean Paste and mix to combine.
 – Add in Eggs, one at a time, mixing well after each addition. Scrape down sides before adding flour.
 – In a separate bowl, sift together the Cake Flour, Baking Powder and Salt. Add Flour mixture and Milk, alternating by starting and ending with the Flour. Be careful not to overmix. Only mix until just combined to prevent a dense, dry cake.
 – Using a cookie scoop, evenly distribute in the cupcake tin and bake for 10-12 minutes for mini cupcakes or 15-18 for standard size cupcakes, or until the cupcakes are just done and a cake tester or toothpick comes out clean.
 – Cool for a few minutes in the tin, then transfer to a wire rack to cool completely before frosting.

Whipped Vanilla Frosting from Sweetapolita – I tinted it light pink

*If you don’t have Vanilla Bean Paste, you can use Vanilla Extract instead.

Until next time,
LOVE & CONFECTIONS!

Filed Under: Cakes & Frostings, Cupcakes, Family & Festivities, Uncategorized

Coffee Chiffon Cake for #BrunchWeek

May 10, 2013

Don’t forget to visit my Food Blogger Brunch Week Post to see the AMAZING prizes for #BrunchWeek and enter to win these FABULOUS prizes below in the Rafflecopter (ARV $1800)! This week I have posted a great Blood Orange Mimosa recipe, a recipe for Tomato and Mozzarella Quiche, Almond Croissants, Crumb-Top Blueberry Muffins and Berry Parfaits! Happy Brunching!!!

BrunchWeek is almost over. Besides entering for the fabulous prizes below, there is still our PinChat Live happening this coming Saturday, May 11th from 2-3 pm EST. We’ll be announcing all our prize winners and there will be more prizes from Lodge Cast Iron drawn from participants in the chat.

I thought this cake would be a nice treat for Mother’s Day – what mom doesn’t like coffee? The cake and frosting make for a great dessert that could even be eaten at breakfast or tea time. I also love this frosting! It has such a great coffee flavor and I love how it kind of crusts as it dries – making it not all fall completely off the cake when glazing.

Coffee Chiffon Cake
Coffee Chiffon Cake adapted from About Professional Baking
Coffee Frosting is a Love & Confections original recipe

Coffee Chiffon Cake Ingredients:
 – 255 grams sifted Cake Flour
 – 50 grams Granulated Sugar #1
 – 12 grams Baking Powder
 – 3 grams Salt
 – 120 milliliters Canola Oil
 – 95 grams Egg Yolks, room temperature
– 75 grams Warm Coffee
 – 224 grams Egg Whites, room temperature
 – 1 gram Cream of Tartar
 – 255 grams Granulated Sugar #2

Coffee Frosting Ingredients:
– 6 Tablespoons Unsalted Butter, melted
– 100 grams Powdered Sugar
– 20 grams Warm Coffee
– 1/2 teaspoon Espresso Powder

Coffee Chiffon Cake Directions:
 – Make sure all your ingredients are at room temperature before starting. Preheat oven to 310F.  If using a false-bottom tube pan, do not grease – as per the original recipe instructions. If using a bundt pan I suggest greasing it and cutting the recipe down by 1/3.
 – Sift together Cake Flour, Granulated Sugar #1, Baking Powder and Salt into a medium mixing bowl.
 – Whisk in Oil and Egg Yolks and Coffee and blend until smooth.
 – Whip Egg Whites in an extremely clean bowl of your stand mixer until foamy. Add in Cream of Tartar and whip until soft peaks form. Gradually add in Granulated Sugar #2 and whip until stiff peaks form.
 – Whisk 1/3 of the whipped egg whites into the cake batter to “lighten”.
 – Gently fold in the remaining egg whites in two additions with a rubber spatula, being careful not to over-mix and deflate the whites.
 – Pour the batter into your chosen cake pan and bake for 30-45 minutes or until a cake tester comes out clean – time depends on the size of your pan and the amount of batter used
 – If using a tube pan with metal tabs, cool upside-down, if using a bundt pan, let it cool right-side-up – you can attempt to turn it upside-down if you dare.

Coffee Frosting Directions:
 – Melt Butter over medium-low heat.
 – While butter is melting, whisk together the Powdered Sugar, Coffee and Espresso Powder until combined.
 – While whisking, pour melted butter over the sugar coffee mixture. If you don’t use it immediately, the frosting starts to crust – just re-whisk to smooth it out.
 – Pour over Chiffon Cake and enjoy!

Today’s Brunch Recipes from participating #BrunchWeek Food Bloggers


Brunch Drink Recipes
Strawberry Sangrias by Kokocooks
Breads, Grains, Cereals and Pancake-type Yums
Souffle Pancakes with Bacon Flowers by Jane’s Adventures in Dinner
Mini Breakfast Pizzas by Sweet Remedy
Turkey, Brie and Raspberry Waffle Bites by Vanilla Lemonade
Glazed Doughnut Pancakes by The Domestic Mama & The Village Cook
Whole Wheat Blueberry and Sour Cream Pancakes by Sarcastic Cooking
Meat, Poultry, Fish and Legume Brunch Recipes
Thai Orchid Salmon Salad by Culinary Adventures with Camilla
Egg Recipes
Crouque Monsieur Strata by White Lights on Wednesday
American Girl Chip and Ham Scramble by The Vintage Cook
Sausage, Egg, & Veggie Casserole by Katie’s Cucina
Potato Recipes
Poutine Hash by The Girl In The Little Red Kitchen
Brunch Dessert Recipes
Vanilla Bean Cookie Bars by Rachel Cooks
Candied Bacon Brownies by {i love} my disorganized life
Turtles French Toast by Cravings of a Lunatic
Dark Chocolate-Orange & Walnut Banana Bread by The Kitchen Prep

a Rafflecopter giveaway

Until next time,
LOVE & CONFECTIONS!

Disclosure: I have not been given any monetary compensation for this post or any #BrunchWeek post involving the above sponsors and/or prizes. Samples and bits of promotional material have been given to me, not exceeding a value of $100 total.

Filed Under: #BrunchWeek, Cakes & Frostings, Uncategorized

Citrus Chiffon Cake with Citrus Frosting

March 28, 2013

 Sometimes things don’t always go your way. The promotion and/or raise doesn’t happen, something is broken and needs fixing at home, an opportunity passes by. Sometimes it gets you down. The same thing happens in the pastry world. A souffle falls, cracked and ‘footless’ macarons, mousse doesn’t set, cakes stick to the pan. This cake is my dilemma.

So what should I do when a delicious cake, that supposedly doesn’t need a greased pan, doesn’t come out properly? Cover it with frosting! Put on a happy face and cover up the mess. Sometimes that is the best solution – the only solution.

Nothing was wrong with the cake, other than the fact that it didn’t come out easily and the top looked ugly. It was devoured in a day by co-workers, but I am still disappointed. I know I shouldn’t be, but I am. So back to the drawing board. It’s tart and sweet at the same time. Some people might think it too heavy for a chiffon cake, but I kind of like it.

“Most of us are acutely aware of our own struggles and we are preoccupied with our own problems. We sympathize with ourselves because we see our own difficulties so clearly. Ian MacLaren noted, ‘Let us be kind to one another, for most of us are fighting a hard battle.'”


P.S. these ADORABLE Cake Platter and Cake Plates are from Rosanna Inc & were a recent gift from my sister, KB! You can find the Platter here and set of 4 Plates here. I absolutely love everything on her website and if I had unlimited income and space, would own it all!


Citrus Chiffon Cake
Citrus Chiffon Cake adapted from About Professional Baking
Citrus Frosting is a Love & Confections original recipe

Citrus Chiffon Cake Ingredients:
 – 255 grams sifted Cake Flour
 – 50 grams Granulated Sugar #1
 – 12 grams Baking Powder
 – 3 grams Salt
 – 120 milliliters Canola Oil
 – 95 grams Egg Yolks, room temperature
 – 120 milliliters cold, freshly squeezed Orange Juice
 – 30 milliliters freshly squeezed Lemon Juice
 – 30 milliliters freshly squeezed Lime Juice
 – 12 grams Orange Zest
 – 12 grams Lemon Zest
 – 12 grams Lime Zest
 – 224 grams Egg Whites, room temperature
 – 1 gram Cream of Tartar
 – 255 grams Granulated Sugar #2

Citrus Frosting Ingredients:
 – 113 grams unsalted Butter (1 stick)
 – 300 grams Powdered Sugar, sifted
 – 1 tablespoon Lime Juice
 – 2 tablespoons Lemon Juice
 – 3 tablespoons Orange Juice

Citrus Chiffon Cake Directions:
 – Make sure all your ingredients are at room temperature before starting. Preheat oven to 310F. Zest, then juice Oranges, Lemons and Limes. If using a false-bottom tube pan, do not grease – as per the original recipe instructions. I chose to use a bundt pan and neglected to grease it – hence the cake fail. If using a bundt pan, I suggest greasing it and cutting the recipe down by 1/3.
 – Sift together Cake Flour, Granulated Sugar #1, Baking Powder and Salt into a medium mixing bowl.
 – Whisk in Oil, Egg Yolks, Juices and Zest and blend until smooth.
 – Whip Egg Whites in an extremely clean bowl of your stand mixer until foamy. Add in Cream of Tartar and whip until soft peaks form. Gradually add in Granulated Sugar #2 and whip until stiff peaks form.
 – Whisk 1/3 of the whipped egg whites into the cake batter to “lighten”.
 – Gently fold in the remaining egg whites in two additions with a rubber spatula, being careful not to over-mix and deflate the whites.
 – Pour the batter into your chosen cake pan and bake for 30-45 minutes or until a cake tester comes out clean – time depends on the size of your pan and the amount of batter used
 – If using a tube pan with metal tabs, cool upside-down, if using a bundt pan, let it cool right-side-up – you can attempt to turn it upside-down if you dare.

Citrus Frosting Directions:
 – Melt Butter over medium-low heat.
 – While butter is melting, whisk together the Powdered Sugar and Lime, Lemon and Orange Juices until combined.
 – While whisking, pour melted butter over the sugar juice mixture. If you don’t use it immediately, the frosting starts to crust – just re-whisk to smooth it out.
 – Pour over Chiffon Cake and enjoy!

Until next time,
LOVE & CONFECTIONS!

Disclaimer: I was in no way compensated for this post in regards to the external links – I just happen to love the product. All opinions are my own.

Filed Under: Cakes & Frostings, Uncategorized

Almond Cupcakes for a Wedding

November 24, 2012

Last weekend, two very important events happened. The first is that one of my best friends, MC got engaged! We have a very long friendship – 23 years! The second important event was a friend’s wedding and the Bride and Groom asked me to be their Pastry Chef and make the wedding cake! Such an important job for a special day. I was so excited and couldn’t wait to help Charlotte & Sean celebrate their special day.

Charlotte was specific with what she wanted… cupcakes! She wanted a mixture of 150 white almond cupcakes and some sort of chocolate cupcake. We had a tasting and they chose a White Almond Cupcake with Vanilla Bean Buttercream and a Mocha Cupcake with an Espresso Frosting.

I had come up with a few ideas for a design and she said she trusted me with whatever I chose. We decided that bright Moroccan colors would be great, so I made about 100 fondant disks in all different colors. The disks dried for two days, so they would be sturdy enough to sit on top of the cupcakes.

After some time at the local craft store, I began making my own stencil with a stencil burning kit. I used Edible Gold Spray with the stencil and loved the way it turned out. I will definitely be making more of my own stencils for future projects!

The top tier was Almond Cake with Vanilla Bean Buttercream, covered in teal fondant and piped with royal icing. I painted gold luster dust, with a few drops of Vodka, onto the royal icing. Charlotte found a simple and perfect cake topper – a gold lamp. The day was beautiful and everyone enjoyed the cupcakes. Most people had one of each flavor!

Almond Cupcakes with Vanilla Bean Buttercream
Love & Confection original cupcake recipe
Buttercream Recipe adapted from Chef Steven Rujak at Sweet and Savory Seasons

Almond Cupcake Ingredients:
 – 175 grams Cake Flour (1 & 1/2 cups)
 – 1 & 1/2 teaspoons Baking Powder
 – 1/2 teaspoon Baking Soda
 – 1/2 teaspoon Salt
 – 113 grams Unsalted Butter, softened (1 stick)
 – 225 grams granulated Sugar (a little more than 1 cup)
 – 2 Eggs
 – 1/2 teaspoon Vanilla Extract
 – 1 tablespoon Almond Extract
 – 60 grams Sour Cream (about 1/4 cup)
 – 175 grams Milk (about 3/4 cup)

Almond Cupcake Directions:
 – Preheat oven to 350 degrees. Make sure your ingredients are room temperature.
 – Sift the Flour, Baking Powder, Baking Soda and Salt into a mixing bowl, or your stand mixer bowl.
 – Add the Butter and mix with the paddle attachment until combined. Scrape the sides and bottom of the bowl with a spatula to ensure everything is mixed properly
 – Add in the Sugar, and mix until combined. Scrape the sides and bottom.
 – Add in the Eggs and mix until combined. Scrape the sides and bottom.
 – Add in the Vanilla Extract, Almond Extract  and Sour Cream. Scrape down the sides and bottom of the mixing bowl.
 – Add in the Milk and mix to incorporate and create a smooth batter.
 – Portion into cupcake tins lined with cupcake wrappers. I use a 2 ounce ice cream scoop, to ensure that my cupcakes are even and uniform. Batter makes about 18 cupcakes
 – Bake for 15-18 minutes, or until light golden brown and a toothpick comes out clean when inserted into the middle of a cupcake.

Vanilla Bean Buttercream Ingredients:
 – 100 grams Egg Whites (about 3 egg whites)
 – 200 grams granulated Sugar
 – 226 grams Unsalted Butter (2 sticks)
 – 226 grams Powdered Sugar
 – 1-2 teaspoons Vanilla Bean Powder

Vanilla Bean Buttercream Directions:
 – Buttercream can be made a day in advance and kept in the refrigerator. I also keep mine in an airtight container on the counter if it will be used the next day. Make sure all the ingredients are at room temperature before starting.
 – Create a double boiler on the stove by warming a small pot of water on medium until little bubbles form.  Make sure the bottom of your stand mixing bowl cannot touch the water.
 – Place Eggs and granulated Sugar in the bowl of your stand mixer and put on top of the pot. Turn the temperature down to medium-low and whisk continuously until the sugar completely dissolves and the eggs are warm.
 – Once warm, immediately place the bowl on your stand mixer, fitted with the whisk attachment, and whip on high until white, glossy and doubled in size. (I place aluminum foil around my mixer to keep the heat in.
warm eggs whip better. Remove the foil once the eggs are ready.)
 – Continue whipping the eggs on medium-high until they are room temperature
 – Add the Butter into the whipped egg whites and whip until incorporated. Scrape the sides and bottom of the mixing bowl
 – While on low speed, gradually add in the Powdered Sugar. (not all at once, or both you and your kitchen will be covered in white!)
 – Add in Vanilla Bean Powder

Assembly:
 – Once the cupcakes are cool, frost using a piping bag and large star tip

Until next time,
LOVE & CONFECTIONS!

Filed Under: Cakes & Frostings, Cupcakes, Events & Travel, Family & Festivities, Uncategorized

Key Lime Confessions…

July 24, 2012

I L-O-V-E Key Lime Pie. I’m a Florida girl, what can I say? Growing up in Miami, it was always on restaurant dessert menus and with the Florida Keys – especially Key West – so close, who can’t help but to love this little, inconspicuous, intensely flavored lime! It goes without saying, that if I am ever out at a restaurant and decide to have dessert, if Key Lime Pie is on the menu, most probably my decision has already been made for me – with the exception of Chocolate Souffle… a great Chocolate Souffle trumps Key Lime Pie any day… mmm Chocolate Souffle… we’ll leave the souffle day-dreaming for another day and another post.

On to the Key Limes…

Key Limes are indigenous to the Florida Keys. They are smaller and rounder than standard limes and are more yellow than green, having a yellow rind and yellowish-green fruit. Key Limes have more seeds, a higher acidity, stronger aroma, a thinner rind and are much more tart than common Persian Limes.

I am lucky enough to have some great local blogging friends. Orlando Foodie (Lenore) gave me some Key Limes from her tree. Little did I know that I would get 20 glorious, green, tart beautiful Key Limes! I was so grateful. Now, what to make? What to make? Like I said, I love Key Lime Pie, but I wanted to do something a little different with these babies. Cupcakes! Curd! Buttercream! Lightbulb! And the little cartoon light bulb above my head lit up. What?! Doesn’t everyone have a little cartoon light bulb above their head?


Key Lime Cupcakes with Key Lime Buttercream
Love & Confection original cupcake recipe
Buttercream Recipe adapted from a culinary school recipe

Key Lime Cupcake Ingredients:
 – 175 grams Cake Flour (1 & 1/2 cups)
 – 1 & 1/2 teaspoons Baking Powder
 – 1/2 teaspoon Baking Soda
 – 1/2 teaspoon Salt
 – 113 grams Unsalted Butter, softened (1 stick)
 – 225 grams granulated Sugar (a little more than 1 cup)
 – 2 Eggs
 – 1/2 teaspoon Vanilla Extract
 – 1 teaspoon Key Lime Extract
 – 60 grams Sour Cream (about 1/4 cup)

 – 175 grams Milk (about 3/4 cup)
 – 1 tablespoon Key Lime Zest (or regular lime zest)

 – 1 cup prepared Key Lime Curd for filling
 – 1 batch Key Lime Buttercream (recipe follows)
 – 1 cup toasted Graham Cracker Crumbs for decoration
 – Green Sixlets or Sprinkles for decoration

Key Lime Cupcake Directions:
 – Preheat oven to 350 degrees. Make sure your ingredients are room temperature.
 – Sift the Flour, Baking Powder, Baking Soda and Salt into a mixing bowl, or your stand mixer bowl.
 – Add the Butter and mix with the paddle attachment until combined. Scrape the sides and bottom of the bowl with a spatula to ensure everything is mixed properly
 – Add in the Sugar, and mix until combined. Scrape the sides and bottom.
 – Add in the Eggs and mix until combined. Scrape the sides and bottom.
 – Add in the Vanilla Extract, Key Lime Extract, Zest and Sour Cream. Scrape down the sides and bottom of the mixing bowl.
 – Add in the Milk and mix to incorporate and create a smooth batter.
 – Portion into cupcake tins lined with cupcake wrappers. I use a 2 ounce ice cream scoop, to ensure that my cupcakes are even and uniform. Batter makes about 18 cupcakes
 – Bake for 15-18 minutes, or until light golden brown and a toothpick comes out clean when inserted into the middle of a cupcake.

Key Lime Buttercream Ingredients:
 – 100 grams Egg Whites (about 3 egg whites)
 – 200 grams granulated Sugar
 – 226 grams Unsalted Butter (2 sticks)
 – 226 grams Powdered Sugar
 – 1-2 teaspoons Key Lime Extract

Key Lime Buttercream Directions:
 – Buttercream can be made a day in advance and kept in the refrigerator. I also keep mine in an airtight container on the counter if it will be used the next day. Make sure all the ingredients are at room temperature before starting.
 – Create a double boiler on the stove by warming a small pot of water on medium until little bubbles form.  Make sure the bottom of your stand mixing bowl cannot touch the water.
 – Place Eggs and granulated Sugar in the bowl of your stand mixer and put on top of the pot. Turn the temperature down to medium-low and whisk continuously until the sugar completely dissolves and the eggs are warm.
 – Once warm, immediately place the bowl on your stand mixer, fitted with the whisk attachment, and whip on high until white, glossy and doubled in size. (I place aluminum foil around my mixer to keep the heat in.
warm eggs whip better. Remove the foil once the eggs are ready.)
 – Continue whipping the eggs on medium-high until they are room temperature
 – Add the Butter into the whipped egg whites and whip until incorporated. Scrape the sides and bottom of the mixing bowl
 – While on low speed, gradually add in the Powdered Sugar. (not all at once, or both you and your kitchen will be covered in white!)
 – Add the Key Lime Extract and mix to incorporate.

Assembly:
 – Once the cupcakes are cool, either with a paring knife or apple corer, take out the middle of the cupcakes.
 – Fill each hole by piping in the Key Lime Curd.
 – Using a piping tip (I used a star tip) and bag, pipe the Key Lime Buttercream onto the cupcakes.
 – Use the Graham Crackers for decoration and crunch along the sides of the buttercream and green candy of your choice. (I used green sixlets. You can use sprinkles or gummy lime slices also)

Until next time,
LOVE & CONFECTIONS!

var _gaq = _gaq || [];
_gaq.push([‘_setAccount’, ‘UA-33655660-1’]);
_gaq.push([‘_trackPageview’]);

(function() {
var ga = document.createElement(‘script’); ga.type = ‘text/javascript’; ga.async = true;
ga.src = (‘https:’ == document.location.protocol ? ‘https://ssl’ : ‘http://www’) + ‘.google-analytics.com/ga.js’;
var s = document.getElementsByTagName(‘script’)[0]; s.parentNode.insertBefore(ga, s);
})();

Filed Under: Cakes & Frostings, Cupcakes, Uncategorized

Meyer Lemon Whipping Cream Cake

January 9, 2012

Before a couple of months ago, I had never had a Meyer Lemon. I knew what they were, I just never had one. A lot of people don’t know what they are – go out and get some, if this is you! Meyer Lemons are citrus fruit that is thought to be a cross between a lemon and an orange, or mandarin orange.

Meyer Lemons are “chubbier” than regular lemons. They have a bright yellow-orange skin, and are sweeter (less acidic) than the lemons found in the grocery store. My Publix and Whole Foods don’t carry them, but I was lucky and found some great Meyer Lemons at The Fresh Market. I seriously want to get myself a Meyer Lemon tree – but living in an apartment with no patio kind of makes it difficult.

I decided to do a cake for my first batch of Meyer Lemons. This cake is Delicious, with a capital “D”! It is insanely moist from the whipping cream, and easy to make. I have been wanting to make this cake for a while, and I’m so glad I did. Everyone loved it.

Meyer Lemon Whipping Cream Cake
adapted from Swan’s Down Cake Flour

Meyer Lemon Whipping Cream Cake Ingredients:
– 3 sticks unsalted Butter, room temperature
– 3 cups of Sugar
– 6 Eggs
– 3 cups Cake Flour, sifted
– Pinch of Salt
– 1 cup Heavy Whipping Cream
– 2 Meyer Lemons, zested and juiced

Meyer Lemon Whipping Cream Cake Directions:
1. Preheat oven to 325F.
2. Butter and flour (or you can use your favorite baking spray) a 10 inch tube pan
3. Sift Cake Flour and reserve.
4. Cream Sugar and Butter together until light in color, in bowl of stand mixer or with hand mixer.
5. Add Eggs, one at a time, remembering to beat well after each addition.
6. Add in Lemon Zest and Juice.
7. Add in Flour and Whipping Cream, alternating both, and beginning and ending with the Flour.
8. Pour into prepared pan and bake for 75-90 minutes – depending on how your oven heats – until a tester inserted into the cake comes out clean.

Meyer Lemon Cake Glaze Ingredients:
– 1 Meyer Lemon, zested and juiced
– 2-3 cups Confectioner’s Sugar, sifted

Meyer Lemon Cake Glaze Directions:
1. Whisk Lemon Juice, Lemon Zest and Confectioner’s Sugar together
2. Pour over cooled cake
3. Enjoy!

Until next time,
LOVE & CONFECTIONS!

Filed Under: Cakes & Frostings, Uncategorized

Cinnamon Pecan Coffee Cake (FHC)

April 11, 2011

To say “it has been too long” is an understatement. Work had gotten the best of me, so much so that I had to have surgery to prevent further injury to my hands.

Like any procedure, there are worries and concerns before surgery, but the worst part came after the fact. My scar healed in the normal amount of time and the doctors said my hand looked good, but I had no strength. It wasn’t until I visited a physical therapist, 2 weeks after the surgery, that I was told my strength would not return for a minimum of 6-12 weeks. 3 months?! was all I heard. 3 months until I can function normally. 3 months until I can bake without pain.

I use my hands every day. As a baker, my hands are the best tools I have, and to not have use of them has thrown me for a loop. I am a month into my recovery, doing physical therapy exercises, and icing my hand daily, but I have a long way to go.

Today was the first day, in over a month, that I baked. What an accomplishment! It felt good – even though it hurt – it felt good. To be cliche, that whole saying, “you never know what you have until it’s gone,” is true. I do still have a long way to go, and I still need to have the surgery on the other hand. I am taking things slow, because I know my health is the most important thing, but I have missed baking.

I am going to work at it, like all things in life, and just take it one day at a time. I can see the improvements. I went from needing help for everything – getting dressed, food, etc., to being able to bake for the first time in a month.

I wanted to bake something delicious and comforting; something that would make me feel good and warm and home. A coffee cake sounded just right for the part, and I could cross off another Food Holiday Challenge. You are supposed to wait until the cake is cool to taste it, but I couldn’t wait to have a bite. It was heavenly – I’m not sure if it was just the cake, or that it was my first post-op creation. Either way, it was good. Enjoy!

Cinnamon Pecan Coffee Cake
adapted from Bon Appetit, Nov. ’93 via epicurious.com

Cinnamon Pecan Coffee Cake Ingredients:
Swirl Mix:
– 1 cup firmly packed Brown Sugar
– 1 cup chopped Pecans
– 1 & 1/2 teaspoons ground Cinnamon

Cake:
– 1 & 1/2 cups All-Purpose Flour
– 1 & 1/2 teaspoons Baking Powder
– 1/2 teaspoon Baking Soda
– 1/2 cup (1 stick) Unsalted Butter, room temperature
– 1 & 1/2 cups Sugar
– 3 large Eggs
– 1 cup Vanilla Yogurt
– 1 & 1/2 teaspoons Vanilla Extract

Cinnamon Pecan Coffee Cake Directions:
1. Preheat oven to 350F.
2. Grease a 10-inch tube pan, dust with flour, and tap out the rest.
3. Mix the swirl ingredients in a small bowl and set aside.

4. Sift Flour, Baking Powder and Baking Soda in a bowl and set aside

5. Using an electric mixer, beat Butter and Sugar in a large bowl, until fluffy
6. Add Eggs, 1 at a time, beating just until combined after each addition.
7. Mix in the Yogurt and Vanilla.
8. Add Flour mixture and stir until blended.
9. Spoon half of the batter into the prepared pan.
10. Sprinkle 2/3 of the Swirl Mixture over the batter and swirl gently into it, using a small knife.
11. Spoon the remaining batter into the pan.
12. Sprinkle the remaining Swirl Mixture on top

13. Bake cake 50-60 minutes, or until tester inserted near center comes out clean.
14. Cool cake in pan for 10 minutes, then cut around pan sides to loosen cake.
15. Turn out cake onto rack and cool completely

This cake can be prepared 1 day ahead and wrapped and stored at room temperature.

Until next time,
LOVE & CONFECTIONS!

Filed Under: Breakfast & Brunch, Cakes & Frostings, Uncategorized

German Chocolate Cake is not from Germany!

June 11, 2010

First and foremost – I am NOT a coconut girl! For some unexplained reason, I just don’t like the flavor or texture of coconut. Give me a Strawberry Daiquiri over a Piña Colada any day! Even though I do not like coconut, I refuse to make this recipe without the classic element. I suffer through it to enjoy to moist, delicious chocolate cake with creamy, gooey caramel frosting – and in the end, it is worth it!

Today is National German’s Chocolate Cake day. Yes, you read that right. There is an ” ‘s” in the title. The cake did not originate in Germany, like many believe. It is named after Englishman Samuel German, who created “Baker’s German’s Sweet Chocolate” in 1852 for the “Baker’s Chocolate” brand.

The first published recipe for German Chocolate Cake was submitted to a local newspaper by a Dallas, Texas homemaker in 1957. The cake became popular and “Baker’s Chocolate” sales increased. The possessive form – ‘s – was dropped in later publications of the recipe and the name still stands as we know today – German Chocolate Cake.

Now on to the good stuff…

German Chocolate Cake is a layered chocolate cake filled and topped with a coconut-pecan frosting. Sweet Baking Chocolate is traditionally used in the actual cake, although some recipes today do not call for it. The Coconut-Pecan topping is a caramel made with egg yolks and evaporated milk, with coconut and pecans stirred in.

I first made this cake in my “Basic and Classical Cakes and Pastries” class in culinary school, and fell in love! This recipe is one of my favorites and a definite go-to cake for any occasion.

German Chocolate Cake with Coconut-Pecan Frosting
adapted from a culinary school recipe

German Chocolate Cake Ingredients:
– 240 grams Sweet Baking Chocolate
– 120 milliliters Boiling Water
– 240 grams Unsalted Butter, softened
– 480 grams Granulated Sugar
– 80 grams Egg Yolks
– 5 milliliters Vanilla Extract
– 300 grams Cake Flour
– 4 grams Baking Soda
– 3 grams Salt
– 240 milliliters Buttermilk
– 120 grams Egg Whites

German Chocolate Cake Directions:
– Chop Chocolate and melt in a bain marie over Boiling Water
– In a mixing bowl or stand mixer, cream the Butter and Sugar
– Add Egg Yolks one at a time, then Vanilla and Chocolate
– Sift Flour, Baking Soda, and Salt and add alternating with Buttermilk
– In a separate bowl, whip Egg Whites to stiff peaks and then fold into the batter
– Divide into 3 9-inch round pans lined with parchment
– Bake at 350F for 30-40 minutes

Coconut-Pecan Frosting Ingredients:
– 240 milliliters Evaporated Milk
– 240 grams Granulated Sugar
– 60 grams Egg Yolks
– 120 grams Unsalted Butter
– 5 milliliters Vanilla Extract
– 120 grams Coconut, flaked
– 120 grams Pecans, Chopped

Coconut-Pecan Frosting Directions:
– Combine Milk, Sugar, Egg Yolks and Butter in saucepan on medium heat
– Cook until it thickens
– Remove from heat and add Vanilla Extract, Coconut and Pecans
– Beat in electric mixer until cool and spreadable

Assembly:
– Make sure cakes are level, after cooling
– Place 1/4 of the frosting in between each layer and stack
– Frost the top with 1/4 of the frosting
– Frosting the outside of the cake with the last 1/4 of frosting
– Buttercream, Coconut and Chocolate decorations are optional
– Enjoy!

Until next time,
LOVE & CONFECTIONS!

Filed Under: Cakes & Frostings, Uncategorized

  • « Go to Previous Page
  • Go to page 1
  • Interim pages omitted …
  • Go to page 4
  • Go to page 5
  • Go to page 6
  • Go to page 7
  • Go to Next Page »

Primary Sidebar

Meet Terri
founder & pastry chef

Subscribe to Love and Confections

Popular Posts

Pumpkin Pecan Cupcakes with Cinnamon Cream Cheese Frosting
Pumpkin Spice Cinnamon Roll Cake
Oatmeal Cream Pie Layer Cake - oatmeal brown sugar layer cake, marshmallow frosting filling, and vanilla bean buttercream with oatmeal cream pie garnish
Easy Piña Colada Poke Cake - pineapple cake, coconut cream pudding, whipped topping, pineapple chunks and maraschino cherries
Mermaid layer cake
PIneapple cake with pineapple curd, teal frosting and tropical sprinkle mix
Irish Cream chocolate cupcakes topped with white and green buttercream piping and shamrock sprinkle mix

AMAZON AFFILIATE

Love and Confections is a participant in the Amazon Services LLC Associates Program, an affiliate advertising program designed to provide a means for sites to earn advertising fees by advertising and linking to amazon.com.

Copyright © 2018 Love and Confections · Log in