• Skip to primary navigation
  • Skip to main content
  • Skip to primary sidebar
  • Home
  • About
  • Work With Me
  • Media
  • Recipes

Cakes & Frostings

Frozen Party and Royal Icing Snowflakes Tutorial

May 14, 2015

Royal Icing Snowflakes are an easy and beautiful decoration on cakes and cupcakes for any Frozen or Winter-themed party!

Frozen Party and Royal Icing Snowflakes from LoveandConfections.com


For the past year and a half, little girls all everywhere have been in love with Frozen. Clothes, toys, dolls, birthday parties, you name it, Frozen is everywhere. I like the movie and thought it was cute, but I am still a classic Disney girl at heart. I recently had an opportunity to help make a little girl’s Frozen-themed birthday party spectacular.

Frozen Party and Royal Icing Snowflakes from LoveandConfections.com

If you are a pastry chef or baker, then you most likely get asked to help make goodies for family and friends – holidays and birthday, being the most popular occasions. So, when one of my friends asked me to make her daughter’s Frozen birthday cake, I got right to work.

Frozen Party and Royal Icing Snowflakes from LoveandConfections.com

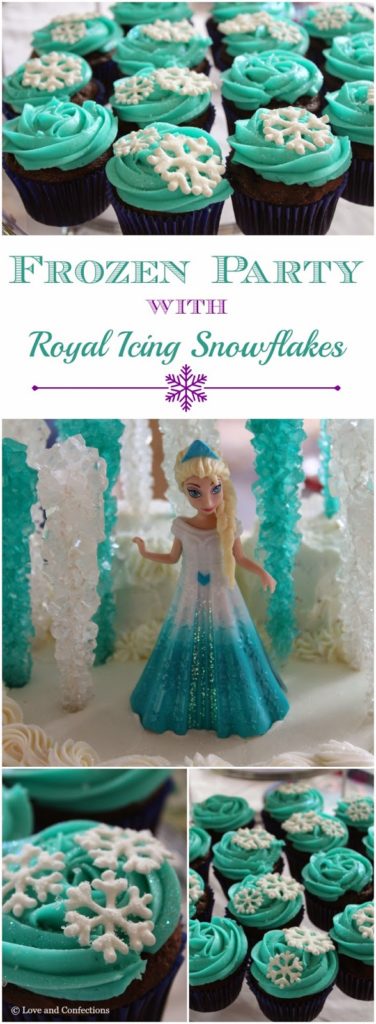
You can find anything and everything online nowadays and there are so many ideas for Frozen birthday parties. I combined a few of my favorite and added some of my own flair to come up with this adorable Frozen-themed cake and cupcakes.

Frozen Party and Royal Icing Snowflakes from LoveandConfections.com

There are so many different snowflake ideas out there. Most of them are fondant, gumpaste and white chocolate. I decided to make mine from royal icing because it’s very easy to make and dries hard.

Frozen Party and Royal Icing Snowflakes from LoveandConfections.com

A little sparkling sugar and luster dust made the cake and snowflakes pop. The color was spot on, and I used a little toy the birthday girl owned as a cake topper. I got the idea for rock candy from BuzzFeed. The cake turned out perfect and everyone had a great time at the party, especially the birthday girl!


Royal Icing Snowflakes
Recipe adapted from Wilton
Click here for printable snowflake template

Royal Icing Snowflake Ingredients:
– 1 & 1/2 tablespoons Meringue Powder
– 2 cups sifted Confectioners’ Sugar
– 3 tablespoons warm Water
– Piping Bags
– Piping Tips – size 2 & 3
– Cookie Sheets
– Wax Paper
– Sanding Sugar (optional)
– Luster/Disco Dust (optional)

Royal Icing Snowflake Directions:
1. Place templates onto a flat cookie sheet and tape down. Tape Wax Paper on top of the templates.
2. Make sure the bowl and whip from your stand mixer is completely clean and grease-free. If necessary, wipe down with a paper towel and lemon juice.
3. Place the Meringue Powder, Confectioners’ Sugar and Water in the bowl of your stand mixer and whip on low until incorporated. Raise the speed to medium-low for 7-10 minutes until stiff peaks form.
4. Scoop Royal Icing into a prepared piping bag with tips. Use size 3 for the large snowflakes and size 2 for small snowflakes.
5. Pipe snowflakes onto the wax paper. You can sprinkle Sanding Sugar or Luster Dust onto the snowflakes for a little sparkle. Let them air dry overnight. Gently remove from the wax paper using a small offset spatula or pairing knife. Store in an airtight container until use. Do not store in the refrigerator. Place onto the frosting just before serving.

Until next time
LOVE & CONFECTIONS!

Filed Under: Cakes & Frostings, Crafts & DIY, Cupcakes, Uncategorized

Chocolate Tres Leches #FWCon

April 16, 2015

Chocolate Tres Leches is a delicious spin on the classic dessert. Moist chocolate cake is soaked with three different milks, topped with whipped cream and garnished with chocolate curls – chocolate perfection!
Chocolate Tres Leches from LoveandConfections.com

While I do like cake, it isn’t always my first choice for desserts. I have made my fair share of all different types of desserts: tarts, bread puddings, ice creams, etc. I often make cake, but my weakness tends to be frozen sweets. This cake, on the other hand, is one that I gravitate toward. I love how moist it is and it’s the perfect amount of sweetness. This recipe is great as a large cake, or you can even make it into individual servings.

Chocolate Tres Leches from LoveandConfections.com

I put my own spin on the traditional tres leches and made a Chocolate Tres Leches for the Dixie Crystals Chocolate Dessert Recipe Contest for this year’s Food & Wine Conference. The Food & Wine Conference is a 3-day event at the beautiful Rosen Shingle Creek Resort and Spa, here in Orlando, Florida. Food Bloggers, Chefs, Business Owners, Brands and Media Professionals all gather for sessions, demonstrations, food, wine and fun.

I had an incredible time at last year’s Food & Wine Conference. I learned so much and am extremely excited about this year’s conference as well. We would love to have you join us, too! You can use the promotional code FWC15millt for a $50 discount off the full conference pass. Please be sure to follow and like the Food & Wine Conference on Facebook, Pinterest, Twitter, and Google+ to keep up-to-date on all conference happenings, announcements and updates.

Chocolate Tres Leches from LoveandConfections.com

Register for the Food & Wine Conference here and don’t forget to use FWC15millt for a $50 discount off the full conference pass.

Chocolate Tres Leches from LoveandConfections.com

Chocolate Tres Leches
A Love and Confections original recipe
Click here for a printable recipe

Chocolate Tres Leches Ingredients:
For the Cake:
– 1/2 cup Unsalted Butter, room temperature
– 1 & 1/2 cup Dixie Crystals Extra Fine Granulated Sugar
– 4 large Eggs, room temperature
– 1 cup Greek Yogurt
– 6 ounces Semisweet Chocolate, melted
– 2 teaspoons Madagascar Vanilla Extract
– 2 cups Unbleached All-Purpose Flour
– 1 tablespoon Baking Powder
– 1 teaspoon Baking Soda
– 3 tablespoons Cocoa Powder
– 1 teaspoon Espresso Powder
– 1/2 teaspoon Salt
– 1/2 cup Vegetable Oil

For the Milk Mixture:
– 12 ounces Evaporated Milk
– 14 ounces Sweetened Condensed Milk
– 8 ounces Half & Half

For the Topping:
– 1 & 1/2 cups Heavy Cream, very cold
– 2 cups Dixie Crystals Powdered Sugar, sifted
– 1 teaspoon Tahitian Vanilla Extract
– Chocolate Curls for garnish (optional)

Chocolate Tres Leches Directions:
1. Heat oven to 350F. Prepare a 9×13 pan with baking spray and set aside. If using individual ramekins, prepare those with baking spray and set aside on a sheet tray with sides.
2. In the bowl of your stand mixer, cream the Butter and Sugar until light and fluffy. While the mixer is on low, add the Eggs one at a time. Scrape down the sides of the bowl to insure everything is incorporated. Add in the Greek Yogurt, Melted Chocolate and Vanilla Extract and mix to combine.
3. In a medium bowl, whisk together the Flour, Baking Powder, Baking Soda, Cocoa Powder, Espresso Powder and Salt. Add it into the liquid mixture, while on low, alternating with the Vegetable Oil.
4. Pour batter into prepared pan or ramekins and bake for 30-35 minutes, or until a toothpick inserted into the center comes out clean. Make the Milk Mixture while the cake cools.
5. In a medium bowl, whisk the Evaporated Milk, Sweetened Condensed Milk and Half & Half together. With skewers, poke holes all over the cake, making sure you go all the way through to the bottom of the pan. With a ladle, spoon the milk mixture over the cake, trying to get as much as possible into the holes. It looks like a lot of milk, but the cake will absorb everything. Cover with plastic wrap and refrigerate a minimum of 6 hours, preferably overnight.
6. 30 minutes before making the topping, place the bowl and whisk attachment from your stand mixer into the freezer*. Whip the Heavy Cream on medium-high, until it starts to thicken and form soft peaks. Add in the Vanilla Extract and combine. Slowly add in the Powdered Sugar while the mixer is on low. Once it is incorporated, mix on high to whip until firm peaks.
7. Remove the cake from the refrigerator and spread the whipped topping on with an offset spatula.** Sprinkle the top with Chocolate Curls. Enjoy!

*Heavy Cream whips better when cold. To insure a good whip, it is best to chill the bowl and whip attachment before it is needed.
**The cake needs to remain refrigerated and covered because of the whipped topping. If necessary, use toothpicks on the cake so the plastic wrap does not touch the whipped topping. If not serving immediately, store in the refrigerator and do not put the Chocolate Curls on until right before serving.

Until next time,
LOVE & CONFECTIONS!

Disclaimer: I am an ambassador and on the planning committee for the Food & Wine Conference and will receive a commission if you use my discount code to purchase a ticket. This recipe was created as an entry for the Dixie Crystals Chocolate Dessert Recipe Contest. The Dixie Crystals Chocolate Dessert Recipe Contest runs from March 30, 2015-April 17, 2015. Contest entries are equal opportunity for all Food and Wine Conference participants, and I receive no advantage for being an ambassador or committee member.

Filed Under: Cakes & Frostings, Uncategorized

Malted Milk Ball Cupcakes for #BigHero6MovieNight

February 27, 2015

This shop has been compensated by Collective Bias, Inc. and its advertiser. All opinions are mine alone. #BigHero6MovieNight #CollectiveBias 

Malted Milk Ball Cupcakes are the perfect treat for a movie night at home – they taste just like the famous concession stand candy!

Malted Milk Ball Cupcakes for #BigHero6MovieNight @Target #ad


I love going to the movies and we always enjoy our favorite concession stand candy, drinks and popcorn before grabbing a seat for the show. These days, with a toddler, going to the movies doesn’t happen often. I usually have to wait for movies to come on DVD or Blu-ray. I wasn’t able to see Big Hero 6 while it was in theaters and have waited patiently for it to be released at our local Target for our own movie night at home.

Malted Milk Ball Cupcakes for #BigHero6MovieNight @Target #ad

I always joke that you can tell who parents of little kids are, by when they go shopping. If you happen to be at Target before 10am on a Saturday morning, you can bet that you will see tons of parents with small children in tow. I always go in with a list and it never fails that I come out with more than planned. It’s so much fun roaming around and picking up random things – especially from the seasonal candy and movie aisles!

Malted Milk Ball Cupcakes for #BigHero6MovieNight @Target #ad

Since we stay home to watch our movies, I wanted to create the same movie experience at home, but with a twist. I LOVE cupcakes and always have fun coming up with new flavors and ideas. My favorite concession stand candies are malted milk balls – so what better candy to make into a cupcake!

Malted Milk Ball Cupcakes for #BigHero6MovieNight @Target #ad

I have a chocolate cake recipe that I tweaked a bit and added Malted Milk Powder. I baked the cupcakes in wrappers and once they were completely cooled, gathered all my ingredients for the frosting.

Malted Milk Ball Cupcakes for #BigHero6MovieNight @Target #ad

The Malted Milk Pudding Frosting is my favorite part of this cupcake. It tastes just like a malted milk ball! Having a proper piping bag and piping tip make decorating the cupcake a breeze. My go-to tips are usually a large round or large star tip – they create a really pretty topping. Make sure you keep your heavy cream cold and in the refrigerator until you need it – heavy cream whips up better when it is extremely cold.

Malted Milk Ball Cupcakes for #BigHero6MovieNight @Target #ad

Top the frosting with a malted milk ball and pop them into the refrigerator until you are ready to serve.

Malted Milk Ball Cupcakes for #BigHero6MovieNight @Target #ad

Do you stay in or go out to the movies? What is your favorite concession stand treat? I hope you enjoy these cupcakes as much as I did!

Let’s connect! Follow me on {Pinterest} {Facebook} {Twitter} {Instagram}

Malted Milk Ball Cupcakes
A Love and Confection original recipe
Click here for a printable recipe
Yield 16-18 cupcakes

Malted Milk Ball Cupcake Ingredients:
– 1 cup Granulated Sugar
– 1 cup plus 2 tablespoons All-Purpose Flour
– 1/3 cup Cocoa Powder
– 1/3 cup Malted Milk Powder
– 1 teaspoon Baking Powder
– 3/4 teaspoon Baking Soda
– 1/2 teaspoon Salt
– 1/2 teaspoon Espresso Powder
– 2 Large Eggs
– 2 teaspoons Vanilla Extract
– 1/2 cup Whole Milk
– 2 tablespoons Vegetable Oil
– 1/2 cup Hot Water

Malted Milk Ball Cupcake Directions:
1. Heat oven to 350F. Line 2 cupcake tins with 16-18 wrappers.
2. In the bowl of your stand mixer, add Granulated Sugar, Flour, Cocoa Powder, Malted Milk Powder, Baking Powder, Baking Soda, Salt and Espresso Powder. Using the paddle attachment, mix until combined.
3. Add in the Eggs and Vanilla Extract and mix together. While the mixer is on, slowly add the Milk, Vegetable Oil and Hot Water.
4. Using a scoop or measuring spoon, fill the cupcake wrappers half full. The batter rises quite a bit. Bake for 18-22 minutes, or until the cupcakes spring back when touched or a toothpick inserted into the center comes out clean. Let them cool for 5 minutes in the tin, then place then on a rack to cool completely before frosting.

Malted Milk Pudding Frosting Ingredients:
– 2 & 1/4 cups Heavy Cream – keep cold and in the refrigerator until needed
– 1/2 cup Powdered Sugar
– 1 cup Malted Milk Powder
– 1 3.9 ounce Instant Chocolate Pudding Package
– 1 teaspoon Vanilla Extract
– Malted Milk Balls for decoration

Malted Milk Pudding Frosting Directions:
1. Measure the Heavy Cream and place it in the metal stand mixing bowl. Keep the mixing bowl and metal whip attachment in the refrigerator 20 minutes before making the frosting – cold cream whips up better.
2. Sift the Powdered Sugar, Malted Milk Powder and Instant Chocolate Pudding onto a sheet of wax or parchment paper, to easily pour into the whipped cream.
3. Whip the Heavy Cream, starting out slow and gradually increasing to high speed for 1-2 minutes until whipped and fluffy. Do not over-mix the cream.
4. With the mixer on low, add in the sifted dry ingredients, followed by the Vanilla Extract. Once it is combined, whip on high until smooth and fluffy. If not using the frosting immediately, store in the refrigerator for up to a few hours.
5. Fill a piping bag with the frosting and pipe onto your cupcakes. Place a Malted Milk Ball on each cupcake. Cupcakes are best eaten the day they are made, but can be store in an airtight container in the refrigerator overnight.

Until next time,
LOVE & CONFECTIONS!


Follow Love & Confections | Terri T. Miller’s board Cupcakes on Pinterest.

Filed Under: Cakes & Frostings, Cupcakes, Uncategorized

Meyer Lemon Cake with Meyer Lemon Glaze

January 21, 2015

Meyer Lemon Cake with Lemon Glaze is a lemon-lovers’ dream. 
Tart, sweet and the perfect flavorful bite!
Meyer Lemon Cake with Meyer Lemon Glaze from Love and Confections


I love Meyer Lemons. They aren’t as tart as regular lemons, and they have such a great vibrant color. I await this time of year, when Meyer Lemons come into season and the stores start to carry these golden beauties. I sometimes get so excited I buy a little more than I should. 24 beautiful Meyer Lemons came home with me last weekend and I have been baking and cooking with them almost every day.

Meyer Lemon Cake with Meyer Lemon Glaze from Love and Confections

Today’s Meyer Lemon Cake was the first baked goodie I made. I also created a Meyer Lemon Pound Cake and Meyer Lemon Breakfast Parfait which will be up on the blog soon. I have used the zest, juice and lemon slices in almost everything this past week! The tart and sweet combination from these lemons makes me wish their season never ended and that I could use them year-round.

Meyer Lemon Cake with Meyer Lemon Glaze from Love and Confections

I decided to try this cake from Averie Cooks. I followed her recipe and directions almost exactly how she wrote it – I used Meyer Lemons instead of regular ones and added some extra zest, just to see how it turned out when I made it. The cake turned out delicious, but I am not a fan of her procedure at all. I don’t like how she uses foil for the cake. The glaze also ran over the sides and basically pooled around he cake. Next time I make it, I will probably do a different method, make my glaze a bit thicker and pour it once the cake is on a plate or stand. Other than that it was a good cake with some great lemon flavor.

Meyer Lemon Cake with Meyer Lemon Glaze
Slightly adapted from Averie Cooks
Click here for a printable recipe

Meyer Lemon Cake Ingredients:
– 1/2 cup Lemon Milk
– 1 & 1/4 cups All Purpose Flour
– 3/4 cup Granulated Sugar
– 2 teaspoons Baking Powder
– 1/4 teaspoon Salt
– 2 tablespoons Meyer Lemon Zest
– 1 Large Egg
-1/3 cup Sour Cream
– 1/4 cup Meyer Lemon Juice plus 1 teaspoon for Lemon Milk
– 3 tablespoons Vegetable Oil
-1 teaspoon Vanilla Bean Paste

Meyer Lemon Cake Directions:
1. Heat oven to 350F and line an 8×8 baking pan with foil, then spray with baking spray.
2. In a measuring cup or small bowl, mix together 1/2 cup Milk and 1 teaspoon Meyer Lemon Juice and set aside.
3. In a medium bowl, whisk together the Flour, Sugar, Baking Powder and Salt. In a separate bowl, whisk together the Meyer Lemon Zest, Egg, Sour Cream, Meyer Lemon Juice, Vegetable Oil and Vanilla Bean Past. Add the we mixture into the dry mixture and combine with a spatula.
4. Pour into baking dish and bake for 25-30 minutes or until the cake springs back when slightly touched and a toothpick inserted into the center comes out clean.
5. Let the cake cook in its pan while making the glaze.

Lemon Glaze Ingredients:
– 2 cups Confectioners’ Sugar
– 1/3 cup Meyer Lemon Juice
– 2 tablespoons Meyer Lemon Zest

Lemon Glaze Directions:
1. In a medium bowl, combine the Confectioners’ Sugar, Lemon Juice and 1 tablespoon of the Meyer Lemon Zest. Pour glaze over cake and smooth with a spatula. Sprinkle the remaining Meyer Lemon Zest on top and let the cake cool completely before removing from the pan, minimum 2-8 hours.

Until next time,
LOVE & CONFECTIONS!

Filed Under: Cakes & Frostings, Uncategorized

Candy Bar Chocolate Coconut Bundt Cake for #BundtBakers

January 15, 2015

In my Candy Bar Chocolate Coconut Bundt Cake, moist and rich chocolate combines with sweet coconut that is reminiscent of a popular candy bar.

Chocolate Coconut Bundt Cake

 I am hosting this month’s Bundt Bakers. Coconut and I have a love-hate relationship. I have always been back and forth on coconut. Sometimes I will eat it when it’s fried on shrimp, sometimes not. So why choose coconut for the theme? Because there are so many ways to use it: shredded coconut, coconut milk, coconut sugar, coconut oil.

Chocolate Coconut Bundt Cake

Even though I don’t like it all the time, I have very fond memories with coconut. One of my first experiences I remember with coconut was at our house in Miami. We had some coconut palms and whenever one fell, my Dad would let us try and crack it open. Some of you might know how hard that can be, but a determined 10-year-old and her 6-year-old little sister thought they were no match for the coconuts. We would bang them and drop them on the driveway for hours – now that I think about it, he might have given it to preoccupy us at the time – makes sense now. Anyway, we would try and try and he eventually ended up cracking it open for us.

Chocolate Coconut Bundt Cake

We jumped with excitement as the shell cracked and little by little the coconut water started to leak out and the white flesh appeared. We tried some coconut because we had worked our little hearts out to break the thing open, but didn’t like it too much. Even now I sometimes like them prepared in certain ways and sometimes not, but either way, coconuts give me some great memories of my childhood at home or the beach, trying to break them open with my little Sister and Dad. It’s funny how food can do that. We associate so many memories with food.

Chocolate Coconut Bundt Cake

I hope you enjoy this cake. I made it for my Dad. It is a very easy, one-bowl recipe – if you’re not using the coconut streusel, but you really should. No coconuts were harmed in the making of this cake. 😉

Chocolate Coconut Bundt Cake


Candy Bar Chocolate Coconut Bundt Cake
Adapted from Food.com
Click here for a printable recipe

Candy Bar Chocolate Coconut Bundt Cake Ingredients:
– 2/3 cup Cocoa Powder, sifted
– 2 & 1/4 cups All Purpose Flour
– 2 cups Granulated Sugar
– 1 & 1/2 teaspoons Baking Powder
– 1 & 1/2 teaspoons Baking Soda
– 3/4 teaspoon Salt
– 1 & 1/2 teaspoon Espresso Powder
– 1 &1/2 cups warm Water
– 3 large Eggs
– 2 teaspoons Vanilla Extract
– 1 & 1/4 cups Vegetable Oil

Optional Streusel Ingredients:
– 1/2 cup Shredded Coconut
– 1/3 cup Brown Sugar
– 1 tablespoon Cocoa Powder

Candy Bar Chocolate Coconut Bundt Cake Directions:
1. Heat oven to 350F and generously grease a bundt pan with baking spray.
2. In the bowl of your stand mixer or with an electric hand mixer, mix all the cake ingredients on medium speed until well combined. Scrape down the sides as necessary.
3. Make the Streusel by mixing together the Coconut, Brown Sugar and Cocoa Powder in a small bowl with a spoon.
4. Pour 1/3 of the batter into the bundt pan, sprinkle the streusel over that, then cover with the rest of the batter.
5. Bake for 45-55 minutes, or until a cake tester inserted into the cake comes out clean. Let it cool a minimum 15 minutes in the pan before trying to turn out onto a cake plate. Garnish with Chocolate Ganache and Shredded Coconut. Enjoy!

Chocolate Ganache Ingredients:
– 2 ounces Heavy Cream
– 4 ounces Semi-Sweet Baking Chocolate, chopped into small pieces
– Shredded Coconut (optional garnish)
– Chocolate Sprinkles (optional garnish)

Chocolate Ganache Directions:
1. In a small pot, heat the Heavy Cream just until hot and tiny bubble begin to appear. You don’t want to boil it and please don’t ever leave when heavy cream is on the stove as it can boil over and create a mess in seconds.
2. Have the chopped Chocolate in a small bowl and pour the Heavy Cream over it. Let it sit for 5 minutes before touching it. After 5 minutes, whisk to create a creamy ganache.
3. Place chocolate in a piping bag and pipe onto the top of the cake. Garnish with shredded Coconut and Chocolate Sprinkles

Until next time,
LOVE & CONFECTIONS!

Here are today’s Coconut themed Bundt Bakers:
Almond Joy Bundtlettes from Sew You Think You Can Cook
Candy Bar Chocolate Coconut Bundt Cake from Love and Confections
Chocolate Italian Cake from Magnolia Days
Coconut & Banana Bundt Cake from Just One Bite Baking
Coconut Banana Bundt Cake from Basic N Delicious
Coconut Carrot Bundt Cake from Media Racion Doble, Por Favor
Coconut Cream Bundt Cake from Adventures in All Things Food
Coconut Hummingbird Bundt Cake from Patty’s Cake
Coconut Milk Bundt Cake from I Love Bundt Cakes
Coconut Milk Bundt Cake from Un Mordisco Un Pecado
Coconut Oil Pound Cake from The Spiced Life
Coconut Sugar Banana Cake from A Kingdom for a Cake
Cranberry and Coconut Bundt Cake from La Cocina de Aisha
Cranberry, Orange and Coconut Bundt Cake from Kids & Chic
German Chocolate Bundt Cake from The Freshman Cook
Glazed Chocolate Macaroon Bundt Cake from Food Lust People Love
Gluten-free Coconut Orange Bundt Cake with Coconut Whipped Cream from Cassie’s Kitchen
Gizzada Mini Bundts from Passion Kneaded
Key Lime and Chocolate Chip Bundt Cake from Eat, Drink and Be Mighty
Key Lime Coconut Cream Bundt from A Day in the Life on the Farm
Mini Samoa Bundt Cakes from Making Miracles
Orange & Coconut Bundt Cake from Living the Gourmet
Oreo Coconut Bundt Cake from Indian Curries/Stew
Pina Colada Bundt Cake from Jane’s Adventures in Dinner
Rhubarb n Rose Coconut Frosted Bundt Cake from Baking in Pyjamas
Rum Bundt Cake with Coconut and Lime from Bourbon and Brown Sugar
Toasted Coconut and Sweet Potato Bundt from Tea and Scones
Toasted Coconut Lime Bundt Cake with Chili Lime Glaze from Brooklyn Homemaker

#BundtBakers is a group of Bundt loving bakers who get together once a month to bake Bundts with a common ingredient or theme.  Follow our Pinterest board right here. Links are also updated each month on the BundtBakers home page.

We take turns hosting each month and choosing the theme/ingredient.

If you are a food blogger and would like to join us, just send Stacy an email with your blog URL to foodlustpeoplelove@gmail.com.

Filed Under: Cakes & Frostings, Uncategorized

Baba au Rhum #BundtBakers

November 20, 2014

Baba au Rhum is a delicious, rum-soaked yeast cake full of flavor (and booze!) and great for any occasion or holiday party!


Most people would think of yeast when it comes to cake. Hopefully this cake will change your mind. It is absolutely delicious, and you get a lot of rum! Baba au Rhums are usually made in individual servings, but I decided to make it as my bundt cake this month. Don’t forget to enter in my Red Star Yeast Bread-Baking Giveaway at the end of the post. There are some awesome goodies in the prize package!

Sometimes fruit is added, like currants or rum-soaked raisins. I decided to not add fruit, but instead add vanilla bean paste. Vanilla is one of my favorite flavors and I loved the addition of it in this cake. Seeing all the little flecks of vanilla seeds makes it extra special. Vanilla also pairs great with rum. I used the darkest rum I had, which I think makes all the difference.

When making the syrup, you might think it is too much, but believe me, the cake will soak it up. You can use less syrup if you want, because the rum in this cake definitely gives it a kick. It was quite fun making a yeast cake as opposed to a cake with regular leavening agents. After the first rise, the cake was about halfway up my pan. When I checked on it after the second rise I was so happy because the cake was all the way to the top. It really is fun working with yeast and watching it happen right before your eyes.

Baba au Rhum
Slightly adapted from Red Star Yeast
Click here for a printable recipe

Baba au Rhum Ingredients:
– 3 cups Unbleached Bread Flour
– 2 packets Active Dry Yeast, about 4 & 1/2 teaspoons
– 1/4 cup Water
– 1/2 cup Milk
– 3/4 cup Unsalted Butter, room temperature
– 1/4 cup Granulated Sugar
– 1/2 teaspoon Salt
– 4 large Eggs
– 1/2 teaspoon Almond Extract
– 1 teaspoon Vanilla Bean Paste

– 1 cup Dark Rum
– 1/2 cup Granulated Sugar
– 1 teaspoon Vanilla Extract

Baba au Rhum Directions:
1. In the bowl of your stand mixer fitted with the paddle attachment, add 1 & 3/4 cups of the Flour and all of the Yeast, and blend briefly to incorporate.
2. In a medium saucepan, heat the Water, Milk, Butter, first measure of Sugar and Salt, while continuously stirring, to 120F-130F. The temperature is important so as not to kill the yeast. Please make sure you have a working and calibrated thermometer.
3. Pour the liquid into the flour, then add the 4 Eggs. Mix on low for 30 seconds, scrape down the sides, then mix on high for 3 minutes. Add in the remaining flour and mix on low to combine.
4. Take out the paddle and cover the bowl with plastic wrap. Let it rise about 30-45 minutes or until it has doubled in volume.
5. Use baking spray to grease the insides of a bundt pan. Once the cake has doubled, pour it into the bundt pan, spreading it out evenly, and covering with plastic wrap that has been sprayed with baking spray. Let it rise a second time for about 30-45 minutes or until it has doubles once again in volume.
6. Near the end of the second rise, heat the oven to 350 degrees. One thing to note, make sure you use the lowest rack in your oven so the top of the cake does not burn. Bake the cake for 25-35 minutes or until it is golden brown and a cake tester comes out clean. If you need to, you can cover the top with foil after 20 minutes of baking if it starts to brown too much.
7. During the last few minutes of baking, make the rum simple syrup. In a small saucepan, heat the Rum and Sugar until the sugar completely dissolves, stirring frequently. Pour the syrup into a measuring cup with a spout then add the Vanilla Extract and stir.
8. Poke the bottom of the cake with a skewer, then turn the cake out onto a stand or plate and pike the entire top and sides of the cake also with a skewer. Very slowly, pour the rum syrup over the cake, making sure it soaks in. If the syrup pools, let the cake soak it up before serving.

Don’t forget to check out all of the wonderful Boozy Bundt Cakes this month!

  • Anisette and Orange Bundt Cake by Samantha at Un Mordisco Un Pecado 
  • Apple Bundt Cake with Whiskey Salted Caramel by Lauren at From Gate to Plate 
  • Baba au Rhum by Terri at Love and Confections 
  • Banana Bourbon Bundt Cake by Linda at Brunch with Joy 
  • Champagne Soaked Cranberry Bundt Cake by Teri at The Freshman Cook 
  • Chestnut and Rum Kugelhopf by Jelena at A Kingdom for A Cake 
  • Chocolate Baileys Bundt Cake by Bea and Mara at I Love Bundt Cakes 
  • Chocolate Chambord Mini Bundt Cakes by Tara at Noshing With The Nolands 
  • Chocolate Guinness Bundt by Veronica at My Catholic Kitchen 
  • Chocolate Kahlua Bundt Cake by Lauren at Sew You Think You Can Cook 
  • Chocolate Kahlua Bundt Cake with Kahlua Glaze by Tanya at DessertStalking Blog 
  • Coffee Baileys Bundt Cake by Kathya at Basic N Delicious 
  • Frangelico and Fig Bundt Cake by Victoria at Just One Bite Baking
  • Gin and Tonic Bundt by Jane at Jane’s Adventures in Dinner 
  • Gingerbread Rum Bundt Cake by Laura at Baking in Pyjamas 
  • Grand Marnier and Chocolate Chips Bundt Cake with Seville Orange Sauce by Anna at Media racion doble, Por Favor 
  • Grand Marnier and Tangerine Bundt Cake by Caro at En la Cocina de Caro 
  • Guinness Chocolate Bundt Cake by Patricia at Patty’s Cake 
  • Irish Coffee Bundt Cake by Laura at The Spiced Life 
  • Kentucky Bourbon Cake by Cassie at Cassie’s Kitchen 
  • Lemon Rum Bundt by Catherine at Living the Gourmet 
  • Limoncello Bundt Cake by Natalia at Principiando en la Cocina
  • London Porter Bundt with Lemon Glaze by Stacy at Food Lust People Love 
  • Peach Brandy Pound Cake by Renee at Magnolia Days 
  • Pomegranate and Chocolate with Rum Glaze by Rocio at Kidsandchic 
  • Pumpkin Spice Bundt Cake by Wendy at A Day in the Life on the Farm 
  • Rum Pudding Cake by Rebekah at Making Miracles 
  • Rum Raisin Apple Bundt by Maleka at La Luna en Dulce
  • Southern Sweet Potato, Bourbon, and Pecan Bundt by Margaret at Tea and Scones 
  • Spiced Apple Cider Bundt Cake with Bourbon Glaze by Tux at Brooklyn Homemaker 
  • Tangerine Screwdriver Mini Bundts by Kelly at Passion Kneaded
BundtBakers

Interested in learning more about us?? #BundtBakers is a group of Bundt loving bakers who get together once a month to bake Bundts with a common ingredient or theme. We take turns hosting each month and choosing the theme/ingredient. You can see all our of lovely Bundts by following our Pinterest board right here. Links are also updated after each event on the BundtBaker home page here.

 If you are a food blogger and would like to join us, just send an email with your blog URL to foodlustpeoplelove@gmail.com. If you are just a lover of Bundt baking, you can find all of our recipe links by clicking our badge above or on our group Pinterest board.

a Rafflecopter giveaway


Until next time,
LOVE & CONFECTIONS!

Filed Under: Cakes & Frostings, Uncategorized, Yeast Breads

Pumpkin Tres Leches for #PumpkinWeek

October 23, 2014

Pumpkin Tres Leches is everything great about the traditional tres leches but with a seasonal twist!


Welcome to day 4 of #PumpkinWeek. We are celebrating our love of the season with a whole week of pumpkin goodies, leading up to National Pumpkin Day. 17 Food Bloggers have come together to share over 65 recipes with you. In addition to homemade pumpkin puree, pie, and cookies, we are also sharing savory pumpkin dishes like hummus, chili and pumpkin corn chowder. Come back every day for #PumpkinWeek recipes. You can also find these great recipes and more on Love and Confections’ #PumpkinWeek Pinterest Board!

I hope you have enjoyed my #PumpkinWeek creations so far. The Pumpkin Loaf, Baked Pumpkin Donut Holes and Pumpkin Pie Cream Cheese Truffles are all delicious, but this Pumpkin Tres Leches is my favorite so far!

I grew up in Miami, where Cuban food was everywhere. Black beans and rice were a delicious side to amazing chicken, beef or pork dishes. Cuban coffee, Cafe con Leches or Cortaditos, were a morning staple and Tres Leches or Flan was the perfect ending to a meal. I decided to do a different take on the Tres Leches using flavors of the season.

Pumpkin Tres Leches is decadent, creamy and oh-so-good. The milk soaks into every nook and cranny of the warm pumpkin cake. It chills overnight, so every flavor can meld and the cake can really get soaked good. The cold, sweet whipped cream is the perfect topping on the rich cake and the hint of cinnamon dusted on top is perfection.


Pumpkin Tres Leches
a Love and Confections original recipe
Click here for a printable recipe

Pumpkin Tres Leches Ingredients:
For the Cake:
– 1/2 cup Unsalted Butter, room temperature
– 1 & 3/4 cups Granulated Sugar
– 4 Large Eggs, room temperature
– 1-15 ounce can of Pumpkin Puree
– 2 teaspoons Vanilla Extract
– 2 cups All-Purpose Flour
– 1 tablespoon Baking Powder
– 2 teaspoons Homemade Pumpkin Pie Spice
– 1/2 teaspoon Salt

For the Milk Mixture:
– 1-12 ounce can Evaporated Milk
– 1-14 ounce can Sweetened Condensed Milk
– 1 cup Half & Half

For the Topping:
– 1 & 1/2 cups Heavy Cream
– 2 cups Powdered Sugar
– 1 teaspoon Vanilla Extract
– Cinnamon to dust

Pumpkin Tres Leches Directions:
1. Heat oven to 350F. Prepare a 9×13 pan with baking spray and set aside.
2. In the bowl of your stand mixer, cream the Butter and Sugar until light and fluffy. While the mixer is on low, add in the Eggs one at a time. Scrape down the sides of the bowl to insure everything is incorporated. Add in the Pumpkin Puree and Vanilla Extract and mix to combine.
3. In a small bowl, whisk together the Flour, Baking Powder, Pumpkin Pie Spice and Salt. Add into the pumpkin mixture a little at a time and mix on medium to incorporate.
4. Pour batter into pan and bake for 30-35 minutes, or until a toothpick inserted into the center comes out clean. Make the Milk Mixture while it cools.
5. In a medium bowl, whisk the Evaporated Milk, Sweetened Condensed Milk and Half & Half together. with one or two skewers, poke holes all over the the cake, making sure you go all the way through to the bottom. With a ladle, spoon the milk mixture over the cake, trying to get as much as possible into the holes. It looks like a lot, but the cake will absorb everything. Cover with plastic wrap and refrigerate a minimum of 4 hours, preferably overnight.
6. 30 minutes before making the topping, place the bowl and whisk attachment from your stand mixer in the freezer.* Whip the Heavy Cream on medium until it starts to thicken and form soft peaks. Slowly add in the Powdered Sugar and Vanilla Extract, then turn the mixer up to high to whip until firm peaks.
7. Remove the cake from the refrigerator and spread the whipped topping on with an offset spatula. Dust the top with Cinnamon and enjoy! The cake needs to remain refrigerated and covered because of the whipped topping. If necessary, use toothpicks on the cake so the plastic wrap does not touch the whipped topping. Serve within 2 days.

* Heavy cream whips better when cold. To insure a good whip, it is best to chill the bowl and whip attachment before it is needed.

Until next time,
LOVE & CONFECTIONS!

Check out all the #PumpkinWeek Bloggers and their recipes:
Pumpkin Tres Leches by Love and Confections
Spiced Pumpkin Butter by Culinary Adventures with Camilla
Pumpkin Palmiers by That Skinny Chick Can Bake
Pumpkin Pecan Oatmeal by The Spiffy Cookie
Mini Healthy Pumpkin Pies by Happy Food Healthy Life
Easy Pumpkin Caramel Sauce by Lady Behind The Curtain
Savory Pumpkin Tart by The Not So Cheesy Kitchen
Pumpkin Custard Pie by A Day in the Life on the Farm
Pumpkin Chocolate Chip Cookies by Making Miracles

Filed Under: Cakes & Frostings, Uncategorized

Chocolate Pumpkin Spice Bundt Cake #BundtBakers

September 18, 2014

Moist and delicious, this Chocolate Pumpkin Spice Bundt Cake 
is sure to start the Fall baking season off right!

Chocolate Pumpkin Spice Bundt Cake by Love and Confections

Truth be told, this cake almost didn’t happen, for many, many reasons.  I am actually sitting at the computer well past midnight in order to get this post done. I like to schedule and get ahead, but as usual, life gets in the way. Baby L&C started crawling 2 weeks ago, while we were on our beach vacation, as well as cutting 2 teeth that same week. 
Chocolate Pumpkin Spice Bundt Cake by Love and Confections
Since learning to crawl, she has started to pull herself up on everything, including her crib. Every night, and now sometimes during the day for naps, she refuses to lay down and instead rolls over, sits up, and tries to stand up in her crib. I have done the stay there and repeatedly put her back down and rub her back or tummy, as well as the cry it out method. Sometimes one works, sometimes the other works, then there are nights like tonight. Her bedtime was 9pm, but she did not fall asleep until 12:50am. After much crying, patting and ‘Twinkle, Twinkle, Little Star’ rounds, I am officially spent after only having about 3 hours of sleep the night before. Oh, but wait, that isn’t everything.
Chocolate Pumpkin Spice Bundt Cake by Love and Confections
I have been sick for over a week now. I have a cold, and this cold is, pardon my language but for lack of better words, kicking my ass. Prescription cough meds along with expectorants, nasal sprays and vitamins have minimally helped. Taking care of yourself while sick is one thing; you can usually lay up on the couch with a box of tissues, hot tea and watch the original ‘Star Wars’ trilogy, hopelessly romantic comedies and catch up on your DVR. Well, when you’re sick and a Mom things are totally different, that of which I have now learned. I have a 9-month old to take care of and ‘Star Wars’ has to wait. 
Chocolate Pumpkin Spice Bundt Cake by Love and Confections
So back to the cake. It’s a bundt cake and for a bundt cake you need a bundt pan. Did I mention we are moving? This coming weekend actually. We found a rental house and are finally moving out of this horrible apartment and away from the family of elephants upstairs and the “I have to rev my motorcycle engine every time I drive it no matter what time of day it is” (including 3am and waking up the baby) neighbors. I am so glad we are moving. I am not glad that my kitchen is all boxed up. Luckily the bundt pan was one of the last things to get packed so I was able to bake this cake. 
Chocolate Pumpkin Spice Bundt Cake by Love and Confections
Do you know how hard it is to pick out sprinkles from a mix? Well I found out the other day. I decided to forego the chocolate chip topping in the original recipe and make it festive (read: usually more work for myself). Well, it happened to be one of those glorious days when Baby L&C actually went down for a nap without fighting. The Angels were singing and I was doing a happy dance, until I realized that the orange sprinkles I thought I had, turned out to be red sprinkles. Red sprinkles?!?! I can’t make a pumpkin cake with red sprinkles. I went to check on Baby and she was down for the count, so there was no way we could go to the store for sprinkles. I searched through my hoard of sprinkles, cupcake liners and other decorating paraphernalia to discover I had a quin Halloween mix of neon green, black and Angels singing again orange. In case you missed the lovely picture I posted the other day on Instagram of my sprinkle-picking adventure, here it is. 
Chocolate Pumpkin Spice Bundt Cake by Love and Confections
Sorry for the rant about everything, I just needed to let you know why this cake almost didn’t exist. You really should make this cake. The chocolate and pumpkin pair so well together and with the addition of my Homemade Pumpkin Pie Spice it is pure perfection. Even my dad who doesn’t like pumpkin and says I never make “normal cakes” ate it. He likes plain and simple flavored desserts, just chocolate, just vanilla, etc. But he still ate it and said it was good, so that’s a thumbs up in my book.
Triple Chocolate Pumpkin Spice Bundt Cake
adapted from A Dash of Sanity
Click here for a printable recipe
Triple Chocolate Pumpkin Spice Bundt Cake Ingredients:
– 2 cups Granulated Sugar
– 3/4 cup Vegetable Oil
– 3 large Eggs, room temperature
– 2 teaspoons Vanilla Extract
– 2 & 1/2 cups All-Purpose Flour
– 1 teaspoon Salt
– 1 & 1/2 teaspoons Baking Powder
– 1 & 1/2 teaspoons Baking Soda
-1/2 cup Cocoa Powder
– 1 tablespoon Homemade Pumpkin Pie Spice
– 1/4 cup Heavy Cream
– 1-15 ounce can Pumpkin Puree (make sure it is just puree and not pie filling)
– 3 tablespoons Unsalted Butter, room temperature
– 3/4 cup Chocolate Chips
-1 tablespoon Corn Syrup
– Mini Chocolate Chips or Sprinkles for topping (optional)
Triple Chocolate Pumpkin Spice Bundt Cake Directions:
1. Heat oven to 325°F. Spray bundt pan with nonstick baking spray and set aside. 
2. In a medium bowl, or the bowl of your stand mixer, combine the Sugar, Oil, Eggs and Vanilla Extract.
3. In a separate bowl, sift together the Flour, Salt, Baking Powder, Baking Soda, Cocoa Powder and Pumpkin Pie Spice. 
4. Slowly incorporate the flour mixture into the egg mixture, in three additions, alternating with the Heavy Cream. Add in the canned Pumpkin Puree and mix briefly, so as not to over-mix the cream. 
5. Pour into prepared bundt pan and bake for 50-60 minutes, or until a cake tester inserted into the center of the cake comes out clean. Cool in pan on cooling rack while preparing the glaze.
6. For the glaze, combine and heat the Butter, Chocolate Chips and Corn Syrup in a double boiler over medium heat until melted.
7. Turn out cake onto cake plate, pour glaze over it and decorate with sprinkles. Enjoy!
Until next time,
LOVE & CONFECTIONS!
Don’t forget to check out all the other amazing #BundtBakers and their Fall themed cakes:
  • Applesauce Cranberry Bundt Cake by Lauren at Sew You Think You Can Cook
  • Applesauce Spice Bundt Cake by Carola at En la Cocina de Caro
  • Applesauce Walnut Raisin Cake by Renee at Magnolia Days
  • Carrot Bundt Cake with Maple Cream Cheese Frosting by Cassie at Cassie’s Kitchen
  • Chocolate Caramel Apple Bundt Cake by Teri at The Freshman Cook
  • Chocolate Zucchini Bundt by Tara at Noshing with the Nolands
  • Fig and Caramelized Walnut Bundt Cake by Beatriz at I Love Bundt Cakes
  • Harvest Bundt Cake by Tammy at Living the Gourmet
  • Mini Apple Cobbler Bundt Cakes with Cinnamon Glaze from Lauren at From Gate to Plate
  • Old Fashioned Kushaw Bundt by Margaret at Tea and Scones
  • Pumpkin and Apple Bundt Cake by Kathya at Basic N Delicious
  • Pumpkin and Chocolate Bundt Cake by Aisha at La Cocina de Aisha
  • Pumpkin Cream Cheese Bundt Cake with Pomegranate Syrup by Patricia at Patty’s Cake
  • Pumpkin Espresso Bundt by Kelly at Passion Kneaded
  • Sherried Pumpkin Bundtlettes by Laura at The Spiced Life
  • Spiced Harvest Bundt Cake with Cream Cheese Glaze by Tux at Brooklyn Homemaker
  • Spiced Pumpkin Bundt Cake by Kaylin at Keep it Simple, Sweetie
  • Sweet Potato Brioche Bread by Jane at Jane’s Adventures in Dinner
  • Sweet Potato Pecan Spice Cake with Toasted Pecan Glaze by Stacy at Food Lust People Love
  • Triple Chocolate Pumpkin Spice Bundt Cake by Terri at Love and Confections
BundtBakers

Interested in learning more about us?? #BundtBakers is a group of Bundt loving bakers who get together once a month to bake Bundts with a common ingredient or theme. We take turns hosting each month and choosing the theme/ingredient. You can see all our of lovely Bundts by following our Pinterest board right here. Links are also updated after each event on the BundtBaker home page here.

 If you are a food blogger and would like to join us, just send an email with your blog URL to foodlustpeoplelove@gmail.com. If you are just a lover of Bundt baking, you can find all of our recipe links by clicking our badge above or on our group Pinterest board.

Filed Under: Cakes & Frostings, Uncategorized

Honey Almond Bundt Cake

August 21, 2014

Honey Almond Bundt Cake is perfect for an afternoon tea. The honey and almond flavors go well together and the cake is not too sweet.

Honey and I have a love-hate relationship. I love honey, but I hate bees. You need bees to make honey, so if I want honey, bees are a necessary evil. I don’t like any stinging insects really, but that is because I was stung as a child. Back to the cake…

This cake is so full of honey. It has both honey and honey powder inside the cake, as well as being soaked in a honey glaze. It isn’t too sweet or overpowering, in my opinion, and works really well with the almond extract and almond flour.

I bought a small packet of honey powder during a day trip to the west coast. I didn’t know what I was going to use it for, but it just drew me in – you really don’t see honey powder every day. I read that it is great in cakes, cookies and other baked goods, because you get that great honey taste without altering the moisture content of the product. Baking is a science, so measurements and ratios really do matter. The honey powder is not necessary for the cake and the original recipe does not use it, so it can be left out.

One trick I learned while in culinary school was about working with honey or any other sticky ingredient, like molasses. Use cooking spray to coat the liquid measuring cup, then measure out the amount you need. The sticky ingredient will slide out when poured.


Honey Almond Bundt Cake
adapted from Williams-Sonoma
Click here for a printable recipe

Honey Almond Bundt Cake Ingredients:
– 4 large Eggs
– 2 teaspoons Vanilla Extract
– 1 teaspoon Almond Extract
– 2 & 3/4 cups Cake Flour
– 1 & 1/4 teaspoon Baking Powder
– 1/4 teaspoon Salt
– 2 tablespoons Honey Powder
– 1 cup Unsalted Butter (2 sticks)
– 1/2 cup packed Light Brown Sugar
– 1/2 cup Granulated Sugar
– 1/2 cup Honey
– 1/3 cup Vegetable Oil
– 3/4 cup Water
– 3/4 cup Almond Meal or Almond Flour
– Powdered Sugar for dusting (optional)
– Honey for drizzling (optional)

Honey Almond Glaze Ingredients:
– 3 tablespoons packed Light Brown Sugar
– 2 tablespoons Water
– 1/4 cup Honey
– 1/2 teaspoon Vanilla Extract
– 1/2 teaspoon Almond Extract
– Pinch of Salt

Honey Almond Bundt Cake and Glaze Directions:
1. Heat oven to 325°F and prepare a bundt pan with either baking spray or shortening and flour.
2. In a small bowl, whisk together the Eggs, Vanilla Extract and Almond Extract and set aside. In a medium bowl, sift the Cake Flour, Baking Powder, Salt and Honey Powder and set aside.
3. In the bowl of a stand mixer, beat the Butter on medium-high until light and fluffy. Add in the Light Brown Sugar and Granulated Sugar and beat until fluffy and lighter in color, scraping down the sides of the bowl after. Add in the Honey and Vegetable Oil and beat until combined, scraping down the sides of the bowl after incorporating.
4. On medium-low, slowly add in the Egg mixture and mix until just combined.
5. While on low, add in the Flour mix and Water in 3 additions, alternating between the two and beginning and ending with the flour. Beat until incorporated and scrape down the sides of the bowl after mixing.
6. With a spatula, fold in the Almond Meal. Pour into prepared bundt pan. Tap the pan on the counter to release air bubbles, then bake for 55-60 minutes, or until a toothpick inserted into the center comes out clean. Poke holes is the bottom of the bundt with a toothpick and place on a wire rack while preparing the glaze.
7. In a small saucepan, combine the Light Brown Sugar, Water, Honey, Vanilla Extract, Almond Extract and Salt until the sugar and honey have dissolved or combined into a warm mixture. Slowly pour the glaze all over the cake (still in the pan) and let it sit until cool. Turn out onto a cake plate and dust with Powdered Sugar and drizzle with Honey. Enjoy!

Until next time,
LOVE & CONFECTIONS!

BundtBakers

#BundtBakers is a group of Bundt loving bakers who get together once a month to bake Bundts with a common ingredient or theme.  Follow our Pinterest board right here. Links are also updated each month on the BundtBakers home page.

We take turns hosting each month and choosing the theme/ingredient. Thank you Laura, from Baking in Pyjamas for hosting this month.

If you are a food blogger and would like to join us, just send Stacy an email with your blog URL to foodlustpeoplelove@gmail.com.

Don’t forget to check out the other amazing bundt cakes for this month’s #BundtBakers:

  • A Taste of Honey by Margaret at Tea and Scones 
  • Hipy Papy Bthuthdth Thuthda Bthuthdy Cake by Lauren at Sew You Think You Can Cook
  • Honey Almond Bundt Cake by Terri at Love and Confections
  • Honey Baba au Rhum by Kelly at Passion Kneaded
  • Honey Banana Bundt by Jane at Jane’s Adventures in Dinner
  • Honey Bundt Cake with Lemon Honey Glaze by Bea and Mara at I Love Bundt Cakes
  • Honey Bunny Bundt Cake by Teri at The Freshman Cook
  • Honey Caramel Apple Bundt Cake by Laura at Baking in Pyjamas
  • Honey Glazed Blackberry Cornmeal Bundt Cake by Tux at Brooklyn Homemaker
  • Honey Lemon Poppy Seed Bundt Cake by Lauren at From Gate to Plate
  • Honey Roasted Peanut Butter Pound Cake by Renee at Magnolia Days
  • Honey Whiskey Mini Bundt Cakes with Honey Whiskey Glaze by Stacy at Food Lust People Love
  • Orange Hazelnut Bundt Cake by Zainab at Blahnik Baker
  • Whole Wheat Honey Spiced Apple Breakfast Bundtlettes by Laura at The Spiced Life

Filed Under: Cakes & Frostings, Uncategorized

Hazelnut Macaron Cake for My 30th Birthday!

August 7, 2014

What better way to celebrate a birthday than with family, friends, and this decadent and delicious Hazelnut Cake with Hazelnut Macarons!


30 is a big deal. I honestly can’t believe I am now 30. So much has happened in the last decade – graduated with my bachelors and a culinary degree, got engaged, married and gave birth to our gorgeous baby girl. I am so lucky for everything I have and can’t wait to see what the future brings.

My Mom usually made my birthday cake every year. One of my most memorable birthday cakes was a marble cake with chocolate frosting and my younger sister decorated it with every kind of sprinkle imaginable. Recently, since I don’t live in even the same state as my Mom, I haven’t had cake for my birthdays. Sometimes it’s Dirt Cake (pudding), Doughnuts, or Ice Cream. This year I knew I wanted cake.

I got the inspiration for this cake from stuffing my face with eating Nutella. Good Lord, you can hand me a spoon and a jar of that stuff and I will be a happy girl. I have loved hazelnut since I can remember. Hazelnut and chocolate are a match made in Heaven, so those were the flavors I wanted for my birthday cake this year. I was also thinking about making something fancy or with a little flair – light bulb – macarons. Those little dainty bites are full of flavor and scream sophistication.

If you don’t like hazelnut, sorry, but this recipe is chock full of it. Hazelnut Genoise Cake, Hazelnut Simple Syrup, Hazelnut Chocolate Frosting, Hazelnut Macarons, Hazelnut Ganache and Hazelnut Chocolate Candies… yeah, that’s a lot of hazelnut. Trust me, this cake might seem hard, but anyone can make it as long as you can read directions. I made it in a 2 day time span during nap times – which is a feat in and of itself because Baby L&C has been on a 1-a-day nap streak.

Hazelnut Macaron Cake
Cake, Simple Syrup and Ganache are a Love and Confections original recipe
Macarons adapted from Martha Stewart
Hazelnut Chocolate Frosting adapted from Sweetapolita
Click here for printable recipe

Hazelnut Macaron Ingredients:
– 71 grams Hazelnut Flour
– 117 grams Powdered Sugar
– 2 large Egg Whites, room temperature
– 53 grams Granulated Sugar

Hazelnut Macaron Directions:
1. Sift Hazelnut Flour and Powdered Sugar twice. If necessary, grind any solids in a food processor or coffee grinder, leaving a maximum of 2 tablespoons not passable through the sieve. Set aside.
2. In the bowl of a stand mixer, or in a mixing bowl with a hand blender, whisk the Egg Whites and Granulated Sugar by hand until combined. With either the stand mixer whip or the hand blender beaters, whip the egg white mixture, increasing speed every 2 minutes (i.e. speed 2, 4, 6, 8, 10) until it has stiff, glossy peaks when you life the whip out of the bowl.
3. Add in the sifted Hazelnut Flour and Powdered Sugar and fold to combine. You do not want to deflate the egg whites completely, so be careful when folding. It should flow like lava and when lifting the spatula and a drop falls off, should be “re-absorbed” into the mix in roughly 3 seconds. I count my folds and usually do anywhere from 45-65, depending on how the batter is.
4. Line baking sheets with either parchment or silicone mats. Prepare a pastry bag with a medium-sized round tip, and fill with the macaron mixture. Pipe into 1/2 to 3/4 inch rounds, 1/2 in apart, being careful not to leave any tips on the macaron – it should fall back into itself if you folded it enough.
5. Tap the sheet trays on a counter, rotating so every edge gets tapped, to insure that there are no extra air bubbles.
6. Heat the oven to 350°F. Let the batter rest for 20-30 minutes, or until the top is firm to the touch. Bake one tray at a time, for 12-13 minutes. Once cool, remove them from the sheet tray and either fill or store, wrapped in a container and plastic wrap, in the freezer for up to a month.

Hazelnut Ganache Ingredients:
– 250 grams SemiSweet Chocolate Chips
– 100 grams Heavy Cream
– 10 grams Hazelnut Butter (I used Nutella)
– 50 grams Hazelnut Liqueur (I used Frangelico)

Hazelnut Ganache Directions:
1. Place Chocolate Chips in a small to medium bowl. In a small saucepan, heat the Heavy Cream and Nutella until it just starts to bubble around the edge, whisking a few times to make sure the Nutella gets incorporated.
2. Pour the cream mixture over the chocolate chips and let it sit for about a minute so they get warmed and melt. Whisk the mixture, make sure there are no lumps and that all the chips have melted.
3. Add in the Frangelico and whisk together. Let it firm up in the refrigerator for about 20 minutes. Reserve 330 grams for the Frosting.
4. With a piping bag fitted with a small, round tip, pipe a small amount onto half of the macaron halves, and sandwich them together. Let the macarons sit in the refrigerator until ready to use.

Hazelnut Genoise Cake Ingredients:
– 155 grams Cake Flour
– 45 grams Hazelnut Flour
– 350 grams Whole Eggs (about 7 large eggs)
– 240 grams Granulated Sugar
– 5 grams Vanilla Extract
– Chocolate Hazelnut Candy for garnish, optional (I used Ferrero Rocher)

Hazelnut Genoise Cake Directions: 
This cake can be made a day in advance and wrapped for freshness.
1. Heat oven to 350°F. Prepare 2-8″ cake pans with baking spray. Sift the Cake Flour and Hazelnut Flour together and set aside.
2. Crack the Eggs into a medium/large metal bowl and create a double boiler on the stove, insuring that the water in the pot does not touch the bottom of the metal bowl. Whisk the Granulated Sugar and Whole Eggs together until frothy, warm, and the sugar has completely dissolved. Using a sieve, strain it into the bowl of your stand mixer.
3. With the whip attachment, whip the eggs until 2-3 times their volume. One trick I learned from culinary school and use is to wrap the bowl opening with aluminum foil to keep the warm air in. Warm eggs whip better.
4. In 3-4 batches, slowly add the flours into the whipped eggs, gently folding and making sure it is mixed thoroughly while not deflating the batter. Make sure the flour does not sink to the bottom. Scrape the bottom if necessary.
5. Evenly distribute the batter into the two cake pans and bake for 20-25 minutes, or until the cake is set and the center springs back to the touch. Cool for about 15 minutes in the pan, then turn out onto a wire rack to cool completely.

Hazelnut Simple Syrup Ingredients:
– 100 grams Water
– 100 grams Sugar
– 75 grams Hazelnut Liqueur (I used Frangelico)

Hazelnut Simple Syrup Directions:
1. In a small saucepan, heat the Water and Sugar until the sugar has dissolved completely. Once off the heat, stir in the Frangelico.

Hazelnut Chocolate Frosting Ingredients:
– 550 grams Powdered Sugar
– 310 grams Unsalted Butter, room temperature
– 275 grams Hazelnut Butter (I used Nutella)
– 175 grams full-fat Sour Cream
– 330 grams Reserved Chocolate Ganache
– 15 grams Vanilla Extract
– pinch of Salt

Hazelnut Chocolate Frosting Directions:
1. Place all ingredients, in the order listed, in the bowl of your stand mixer, fitted with the paddle attachment. Beat until smooth and combined. The frosting will be very soft. Refrigerate for about half an hour until it is spreadable.

Hazelnut Macaron Cake Assembly:
1. Slice the two Hazelnut Genoise cakes each in half with a long serrated bread knife.
2. Place a spoonful of frosting on a cake round, and spread it with an offset spatula, so the cakes do not move around while frosting.
3. With the cut side up on each of the cakes, brush the Hazelnut Simple Syrup on with a pastry brush. Genoise cakes are a bit drier than others so the syrup really helps to moisten it.
4. Place one of the cakes on the cake round, cut side up. With an offset spatula, spread a few dollops of the frosting for the filling. Repeat with two more layers, making sure the cut side is up. For the last layer, place the cut side down, so you have a smooth top to frost. Refrigerate the cake for about 15-20 minutes, as well as the bowl of frosting, so it sets up a bit.
5. With an offset spatula, frost the entire cake with a thin layer of frosting, called a crumb coat, to seal the cake and prevent any crumbs from showing up on in the second layer of frosting. Chill for 30 minutes minimum, up to an hour.
6. Once chilled, apply another layer of frosting evenly around the cake, making sure to keep the top even and level as well.
7. With a piping bag fitted with a star tip, pipe 14 rosettes onto the top of the cake. Alternate the Macarons and Ferrero Rochers. Refrigerate for at least 30 minutes. Keep refrigerated until serving at room temperature.

Until next time,
LOVE & CONFECTIONS!

Join me and my other Food Blog Friends as we celebrate with dishes, drinks and desserts for my virtual Birthday Party!

  • Hazelnut Macaron Cake from Love and Confections 
  • German Chocolate Brownie Cupcakes from That Skinny Chick Can Bake 
  • Funfetti Milkshake from Our Life Tastes Good 
  • Blackberry Ginger Mojitos from Take A Bite Out of Boca
  • Powdered Donuts from Macaroni and Cheesecake
  • Prosecco Floats from Culinary Adventures with Camilla
  • Spicy Buffalo Chicken Dip from {i love} my disorganized life
Disclaimer: I was not compensated to use or mention the brands above. I only use brands that I love. All opinions are my own. There are affiliate links in this post. 

Filed Under: Cakes & Frostings, Cookies, Uncategorized

  • « Go to Previous Page
  • Go to page 1
  • Interim pages omitted …
  • Go to page 3
  • Go to page 4
  • Go to page 5
  • Go to page 6
  • Go to page 7
  • Go to Next Page »

Primary Sidebar

Meet Terri
founder & pastry chef

Subscribe to Love and Confections

Popular Posts

Pumpkin Pecan Cupcakes with Cinnamon Cream Cheese Frosting
Pumpkin Spice Cinnamon Roll Cake
Oatmeal Cream Pie Layer Cake - oatmeal brown sugar layer cake, marshmallow frosting filling, and vanilla bean buttercream with oatmeal cream pie garnish
Easy Piña Colada Poke Cake - pineapple cake, coconut cream pudding, whipped topping, pineapple chunks and maraschino cherries
Mermaid layer cake
PIneapple cake with pineapple curd, teal frosting and tropical sprinkle mix
Irish Cream chocolate cupcakes topped with white and green buttercream piping and shamrock sprinkle mix

AMAZON AFFILIATE

Love and Confections is a participant in the Amazon Services LLC Associates Program, an affiliate advertising program designed to provide a means for sites to earn advertising fees by advertising and linking to amazon.com.

Copyright © 2018 Love and Confections · Log in