• Skip to primary navigation
  • Skip to main content
  • Skip to primary sidebar
  • Home
  • About
  • Work With Me
  • Media
  • Recipes

Uncategorized

Banana Bread Pudding

February 27, 2013

A few weeks ago, I went to Boma, a restaurant in Disney’s Animal Kingdom Lodge, to celebrate a friend’s birthday. It is a buffet style meal, showcasing the flavors of Africa. The food was great! I didn’t really have any expectations because I had never had African cuisine before. They had Salads, Soups – I am totally going to recreate the seafood soup – Meat, Chicken, Vegetables, Rice and Curry; the list goes on and on.

Everyone’s favorite was the dessert buffet, of course. Bite-sized treats filled our plates, some were very boozy. There was also a Fruit Crisp and a Banana Bread Pudding. This bread pudding was pretty great. It also had a choice of Vanilla or Rum Sauce. As if there was really a choice? Most of us tried both.

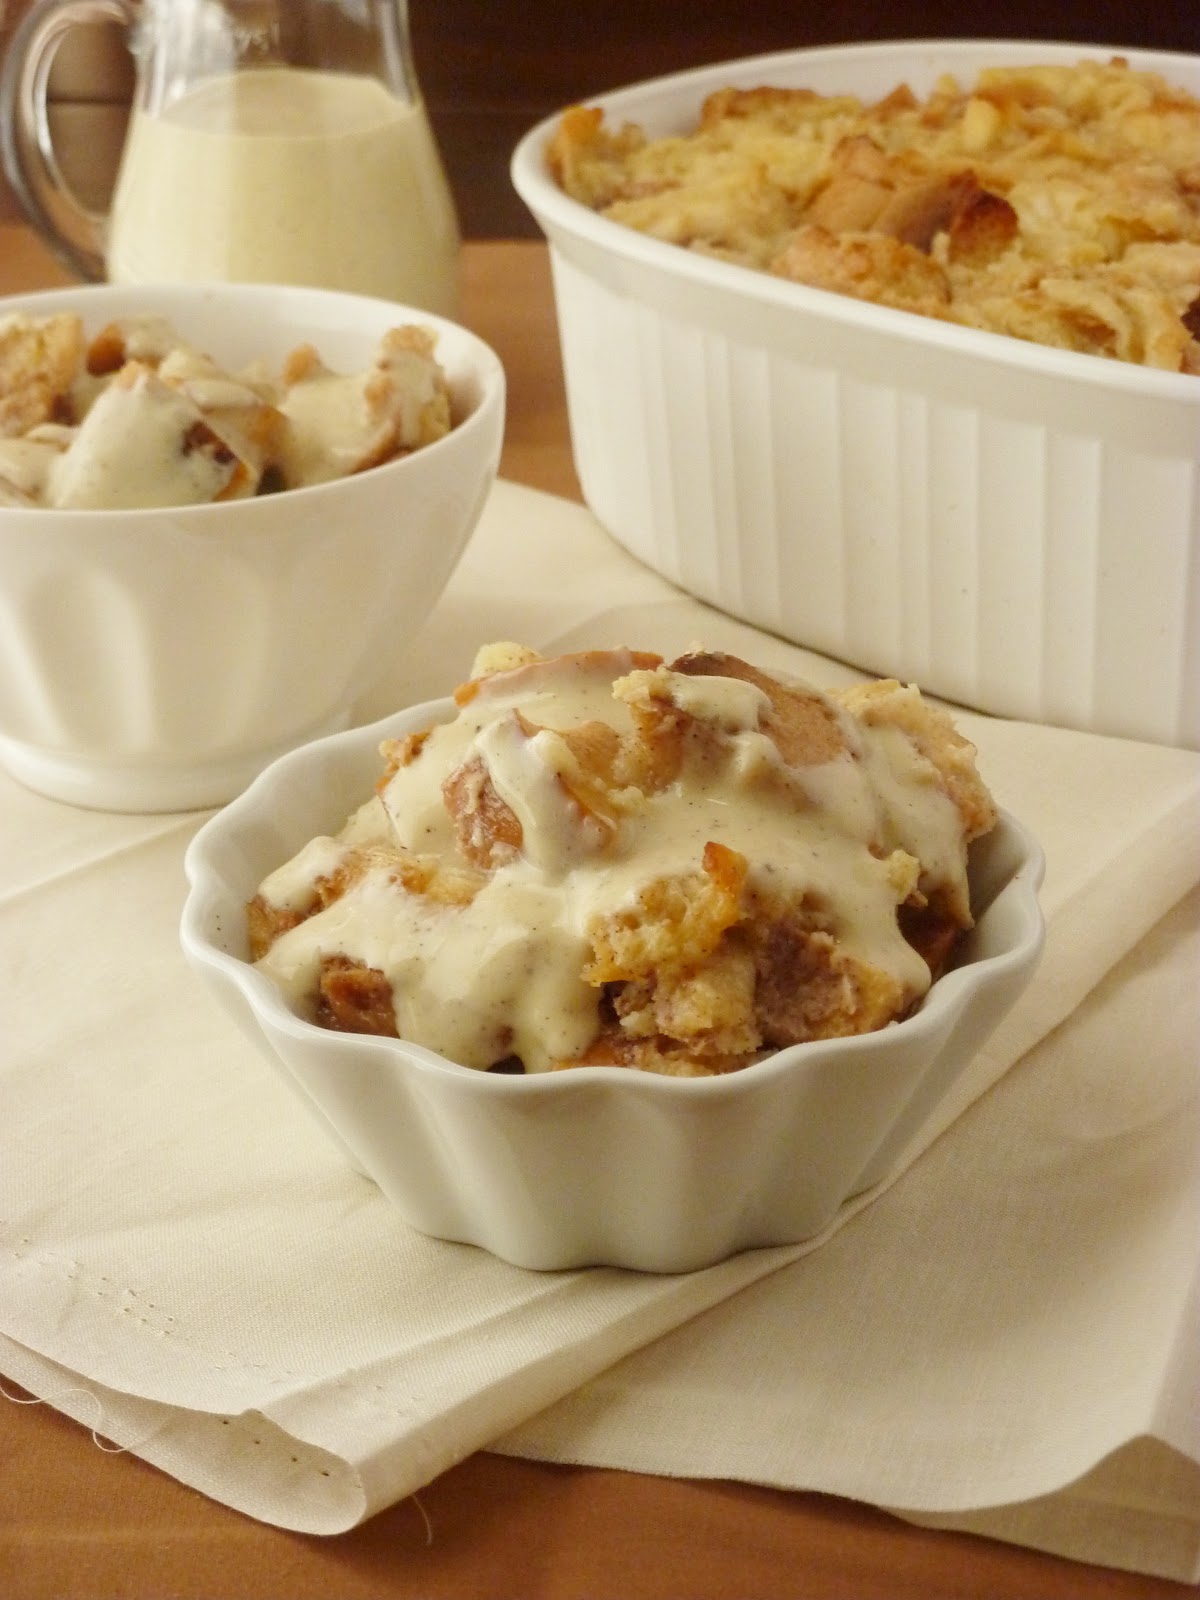
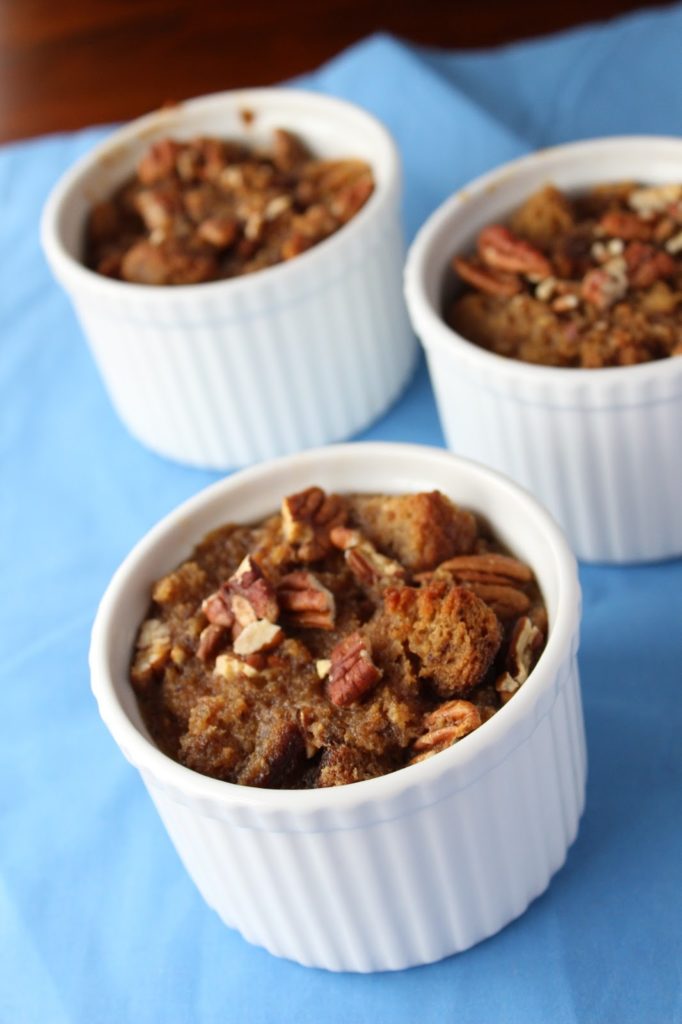
While we were finishing dessert, I decided to recreate this at home. I do have an affinity for Bread Pudding, and always love a moist and delicious Banana Bread – so why not put the two together? I also added some chopped Pecans for a little crunch. My Brown Sugar Butter Rum Sauce was the “icing on the cake” Come back tomorrow for the Brown Sugar Rum Sauce recipe! Warm Bread Pudding is, in my personal opinion, the best way to serve this dish.  Definitely one I will make again!


Banana Bread Pudding
a Love and Confections original recipe

Bread Pudding Ingredients:
 – 400 grams day-old Banana Bread, cubed
 – 300 grams Crusty Bread (Italian or Country), cubed
 – 500 grams Whole Milk
 – 5 medium to large Eggs
 – 200 grams Granulated Sugar
 – 2 very ripe Bananas
 – 50 grams chopped Pecans or Walnuts (optional)
 – 4 cups hot tap Water – for water bath

Bread Pudding Directions:
 – Cut the Banana Bread and Bread into inch-sized cubes and set aside.
 – In a medium saucepan, scald the Whole Milk but do not bring it to a boil. While the Milk is heating, crack the Eggs into a large bowl and whisk vigorously with the Granulated sugar. Add in Bananas and whisk or use immersion blender to mix thoroughly.
 – Once the Milk is warm, slowly pour into the Egg and Sugar mixture while whisking constantly (called Tempering, so the Eggs don’t curdle/scramble).
 – Place all the bread into the large bowl so it can soak up the mixture. You can toss it with a spoon and press down to make sure all the bread touches liquid. Leave it to “soak” for 30 minutes.
 – Heat the oven to 300F.
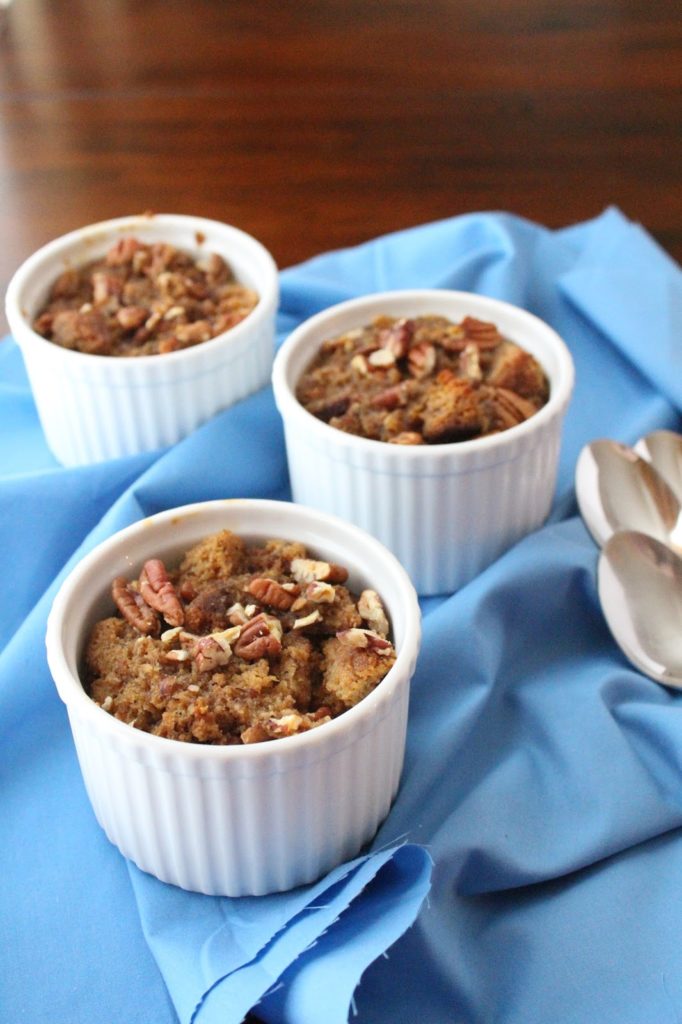
 – Add Nuts to the bread mixture after it has soaked, tossing to combine. Divide mixture evenly between 6 ramekins.
 – One of the most important steps when making bread pudding is to use a water bath, or Bain Marie. Place a large dish or pan (big enough to fit the ramekins and about 4 cups of water) on the rack in the middle of your oven. Place the ramekins inside and then add the water – this is the easiest way so you don’t create a big mess by moving the already full water bath into to oven.
 – Cook for 45-55 minutes. The top will look slightly crisp and the bread should be moist, but cake-like with no excess liquid around the edges. Very carefully, and if you can, take the bread pudding out of the water bath and let it cool slightly before eating. If you can’t grab the ramekins, take both containers out of the oven and let the water cool, until you can get the ramekins out of the water bath. Again, please be careful, because the water bath is extremely hot!
 – Best served warm with either vanilla ice cream or Brown Sugar Butter Rum Sauce.

Until next time,
LOVE & CONFECTIONS!

Filed Under: Crisps-Crumbles-Bread Puddings, Uncategorized

Brunch Mania

February 24, 2013

I have always been a fan of breakfast. Waking up on the weekends to Mom’s Pancakes or Dad’s French Toast was always a treat I savored.  Even though KB and I are grown, sometimes Mom still makes us Mickey Mouse shaped pancakes! I often still ask for mine with chocolate chips.

Toasting with Mimosas before wedding dress shopping with MC & her Family

After I posted a recent pic of some mimosas I made, one of my best friends, MC said that she “created a monster”. It’s true, I have brunched a lot with her, as we have been spending a lot more time together recently. She got engaged late last year and asked me to be a Bridesmaid! So exciting!

Brunch with MC at Big City Tavern in Ft. Lauderdale. Stuffed French Toast & Crab Cake Eggs Benedict

Over the past two months, I have either traveled to see her or she has come here for a visit – and we have had brunch every time. I love the idea of Brunch! A combination of breakfast and lunch, paired with coffee and mimosas, always hits the spot. I am fortunate to have weekends off with my current job – which is a rarity in the baking and pastry field. I can sleep in and enjoy a late meal.

Chicken & Waffles at Dexter’s in Thornton Park, Orlando 
Until next time,
LOVE & CONFECTIONS!

Filed Under: Family & Festivities, Uncategorized

My Friend, the Master Baker

February 15, 2013

I have had the pleasure of working alongside and becoming friends with Denny Gruendner, a German Master Baker.

 Denny has been a great mentor since the first day I started working with him. If you have visited either the Winter Garden Farmer’s Market (Saturdays 9-1) or the Lake Eola Farmer’s Market (Sundays 10-4) you would have seen him. He still works for a bakery I used to, and I can’t wait for him to own his own bakery someday soon!

Denny makes amazing breads and baked goods, and they are preservative free. In addition to the classic French Baguette, he makes a German Country Loaf, German Country with Swiss Cheese & Onions, Multi-Grain Bread and Ciabatta. He sometimes makes special items like Sourdough, Focaccia, Braided or Tomato & Mozzarella Loaf.

He also does Viennoisserie (baked goods made from a yeast-leavened dough or puff pastry, that has added ingredients to make it richer than regular bread). His variety of croissants can include Plain, Chocolate, Almond, Spinach & Cheese, Ham & Cheese, and Tomato & Mozzarella. He also has Cinnamon Twists, Raspberry Twists and Palmiers (Elephant Ears).

Some of Denny’s signature and authentic items are Pretzels and Strudel. The Pretzels come three ways:  traditional Pretzel, a Pretzel Roll and a Pretzel Roll with Swiss Cheese. The Pretzels are best enjoyed with a cold beer – which you can get from one of the Lake Eola Farmer’s Market vendors. The Apple Strudel is heavenly, especially served warm with some Vanilla Bean Ice Cream.

Denny is very knowledgeable and is more than willing to suggest a bread or pastry for your needs. If you stick around his table long enough, you’ll hear him go from speaking English with one customer straight into German with the next. If you happen to go to either of those markets, I highly encourage you to grab a croissant to eat while you walk around and a loaf of bread for later. Tell him Terri sent you.

Until next time,
LOVE & CONFECTIONS!

Filed Under: Events & Travel, Uncategorized

Apple Almond Tart for your Sweetheart!

February 5, 2013

It’s that time of year where everything is red and pink. Hearts, roses boxes full of assorted chocolates and over-sized teddy bears crowd store windows. I don’t really do anything too big for Valentine’s Day. Restaurants are too crowded and most are too pricey. I’d rather stay home, cook a nice dinner, have some wine and relax. Well, this year I will probably be exhausted and need more than just one glass.

Valentine’s Day is the busiest day of the year at my job. The bakery is in high gear, prepping for the day. My schedule next week has me starting at or before 8am through “?“. I literally have a question mark on the schedule – the entire week. It’s basically a work until you can’t work anymore, schedule.

Hopefully you will have time to prepare something nice for the holiday, if you celebrate it. If you don’t, this is still a great tart for any special occasion. Or just because – just because tarts are great too. If you don’t have a tart pan, you can use a pie pan, but it will not be the same shape and the measurements for everything will be different. I recommend a tart pan, though, because it looks so pretty with the fluted edge. Otherwise it’s just a pie. Believe me, nothing is wrong with just a pie, but an Apple Almond Tart makes it sound a little more special.

Apple Almond Tart

Love & Confections original recipe
Tart Dough Ingredients*:
– 560 grams All Purpose Flour
– 225 grams Butter, cold and cut in small cubes
– 225 grams Confectioner’s Sugar
– 5 grams Salt
– 158 grams Eggs (roughly 3 large eggs)
Tart Dough Directions:
– Combine first 4 ingredients into the bowl of a stand mixer. Using the paddle attachment, on a low speed, mix the ingredients until the Butter becomes pea-sized and the mixture feels somewhat like sand.
– Add the Eggs, half at a time, and mix until combined. This is a very sticky dough.
– Once mixed, enclose the dough on plastic wrap, shaping it into a rough circle, and let it rest in the refrigerator for at least 2 hours.
– After the dough has chilled and rested, roll the dough out on a floured work surface. Gently place the dough in the tart pan without stretching it. Press it to the bottom, in the corners, and up the sides. Dock the dough, line it with a piece of parchment on it and pie weights or beans, and par bake it for 10 minutes. Remove the parchment and beans and let cool. The tart shell can me made ahead and frozen.
Frangipane Ingredients*:
– 16 ounces Almond Paste
– 100 grams Sugar
– 195 grams Butter, room temperature
– 30 grams Almond Meal/Flour
– 250 grams Eggs (5 large eggs)
– 115 grams Flour, sifted
Frangipane Directions:
– This can be made while the dough is resting.
– Combine Almond Paste, Sugar, Butter and Almond Flour in the bowl of a stand mixer with the paddle attachment. Mix the ingredients on medium, stopping and scraping down the sides of the bowl every few minutes.
– While on low, add in the Eggs one at a time, making sure the Egg is thoroughly mixed in before adding the next. Scrape the sides of the bowl to ensure that everything is mixed properly
– Add in the Flour and mix on low until incorporated.
– Refrigerate mixture until ready to use, or divide into freezer bags as stated above.
Other Ingredients:
– 3 Granny Smith Apples
– Cinnamon Sugar (optional)
– 1/4-1/2 cup Apricot Jelly
Tart Assembly:
– Preheat oven to 350F.
– Measure 300 grams of the Frangipane into the tart shell. Using an offset spatula, spread and level the Frangipane. Peel and core the Granny Smith Apples. Slice them, either by hand or with a mandolin, thin enough so they are flexible and can be layer in a pattern on the frangipane.
– Bake for 40-50 minutes, until you stick a knife under the apples into the frangipane and it comes out clean (like a cake).
– Remove the tart from the pan and place on a cardboard cake round. Sprinkle with Cinnamon Sugar if desired.
– Warm the Apricot Jelly in a saucepan until liquid. You will need to add a few tablespoons of water, one at a time, to the jelly, so it doesn’t burn or darken too much.
– Using a pastry brush, brush the tops of the apples with the Apricot glaze. This is best done right before serving. Keep refrigerated if not serving immediately.
– Another option is to fully prepare the tart and freeze before baking. The baking time will be increased slightly, but all you need to do is pop it in the oven and bake!
– Enjoy!

*this recipe makes enough for 2 tarts

Until next time,
LOVE & CONFECTIONS!

Filed Under: Pies-Tarts-Crostatas, Uncategorized

Thelma & Louise and Buckeyes

December 3, 2012

 It’s that time of year when trees are trimmed, presents are wrapped and there are rarely any free parking spaces at the mall. Families and friends get together and celebrate the season while enjoying each other’s company and all the wonderful food. Some families have holiday traditions dating back to longer than they can remember, and some are fortunate enough to make new ones.

Just like the post title, my friend and I are kind of like the modern day Thelma & Louise – minus the shooting, running from the law and of course the last scene. This year, my friend “Thelma”, included me in her holiday tradition of making Buckeyes. The Buckeye is the state tree of Ohio, where Thelma grew up. Buckeyes are a popular peanut butter treat that is dipped in chocolate, leaving a circle of peanut butter exposed, to resemble the Buckeye Nut.

We made 3 full batches and the final count was 515; although we don’t know how many were eaten throughout the Buckeye process so that’s the number we are going with. Of course there were ones that didn’t look up to our standards and those disappeared instantly.

Everyone loves these little treats and between Thelma and her family, Me, work and the annual Christmas party, we are glad we made three batches. I only kept 60 and I think that number has already started to decrease. I will most probably be making another half batch before the end of the month.


Buckeye Candy (1/2 batch)
Wise Family recipe

Buckeye Ingredients:
 – 2 bags of Candy Coating Chocolates (we used Wilton)
 – 2 sticks Butter, melted
 – 1 cup Peanut Butter
 – 1 pound 8 ounces Powdered Sugar

Buckeye Directions:
1. Melt Candy Coating Chocolate using your preferred method or following the package directions (microwave or double boiler). Since we had so much chocolate we actually used my Crockpot on the low setting to melt it then kept it on the warm setting while dipping.
2. Melt Butter in a microwave safe container. Place Peanut Butter and Powdered Sugar in the bowl of a stand mixer with the paddle attachment.
4. Mix on the lowest setting for 30 seconds, then add in the melted Butter. Mix on speed 2 until combined.
5. Using a tablespoon size cookie scoop, portion out the peanut butter mixture, then hand roll into a ball shape. Place on a wax or parchment paper covered cookie sheet and harden in the refrigerator for 15-20 minutes.
6. Once the peanut butter balls have hardened it is time to start dipping. Using a toothpick, dip the balls into the melted chocolate, leaving the top exposed, so it resembles an actual Buckeye Nut. Place it back on the tray and chill in the refrigerator to harden the chocolate for 15-20 minutes.
7. Once the chocolate is hard, place in containers, with wax or parchment paper in between the layers. You can store them in either the refrigerator or freezer.

Until next time,
LOVE & CONFECTIONS!

Photos taken by Myself and Susan S.

Filed Under: Uncategorized

Almond Cupcakes for a Wedding

November 24, 2012

Last weekend, two very important events happened. The first is that one of my best friends, MC got engaged! We have a very long friendship – 23 years! The second important event was a friend’s wedding and the Bride and Groom asked me to be their Pastry Chef and make the wedding cake! Such an important job for a special day. I was so excited and couldn’t wait to help Charlotte & Sean celebrate their special day.

Charlotte was specific with what she wanted… cupcakes! She wanted a mixture of 150 white almond cupcakes and some sort of chocolate cupcake. We had a tasting and they chose a White Almond Cupcake with Vanilla Bean Buttercream and a Mocha Cupcake with an Espresso Frosting.

I had come up with a few ideas for a design and she said she trusted me with whatever I chose. We decided that bright Moroccan colors would be great, so I made about 100 fondant disks in all different colors. The disks dried for two days, so they would be sturdy enough to sit on top of the cupcakes.

After some time at the local craft store, I began making my own stencil with a stencil burning kit. I used Edible Gold Spray with the stencil and loved the way it turned out. I will definitely be making more of my own stencils for future projects!

The top tier was Almond Cake with Vanilla Bean Buttercream, covered in teal fondant and piped with royal icing. I painted gold luster dust, with a few drops of Vodka, onto the royal icing. Charlotte found a simple and perfect cake topper – a gold lamp. The day was beautiful and everyone enjoyed the cupcakes. Most people had one of each flavor!

Almond Cupcakes with Vanilla Bean Buttercream
Love & Confection original cupcake recipe
Buttercream Recipe adapted from Chef Steven Rujak at Sweet and Savory Seasons

Almond Cupcake Ingredients:
 – 175 grams Cake Flour (1 & 1/2 cups)
 – 1 & 1/2 teaspoons Baking Powder
 – 1/2 teaspoon Baking Soda
 – 1/2 teaspoon Salt
 – 113 grams Unsalted Butter, softened (1 stick)
 – 225 grams granulated Sugar (a little more than 1 cup)
 – 2 Eggs
 – 1/2 teaspoon Vanilla Extract
 – 1 tablespoon Almond Extract
 – 60 grams Sour Cream (about 1/4 cup)
 – 175 grams Milk (about 3/4 cup)

Almond Cupcake Directions:
 – Preheat oven to 350 degrees. Make sure your ingredients are room temperature.
 – Sift the Flour, Baking Powder, Baking Soda and Salt into a mixing bowl, or your stand mixer bowl.
 – Add the Butter and mix with the paddle attachment until combined. Scrape the sides and bottom of the bowl with a spatula to ensure everything is mixed properly
 – Add in the Sugar, and mix until combined. Scrape the sides and bottom.
 – Add in the Eggs and mix until combined. Scrape the sides and bottom.
 – Add in the Vanilla Extract, Almond Extract  and Sour Cream. Scrape down the sides and bottom of the mixing bowl.
 – Add in the Milk and mix to incorporate and create a smooth batter.
 – Portion into cupcake tins lined with cupcake wrappers. I use a 2 ounce ice cream scoop, to ensure that my cupcakes are even and uniform. Batter makes about 18 cupcakes
 – Bake for 15-18 minutes, or until light golden brown and a toothpick comes out clean when inserted into the middle of a cupcake.

Vanilla Bean Buttercream Ingredients:
 – 100 grams Egg Whites (about 3 egg whites)
 – 200 grams granulated Sugar
 – 226 grams Unsalted Butter (2 sticks)
 – 226 grams Powdered Sugar
 – 1-2 teaspoons Vanilla Bean Powder

Vanilla Bean Buttercream Directions:
 – Buttercream can be made a day in advance and kept in the refrigerator. I also keep mine in an airtight container on the counter if it will be used the next day. Make sure all the ingredients are at room temperature before starting.
 – Create a double boiler on the stove by warming a small pot of water on medium until little bubbles form.  Make sure the bottom of your stand mixing bowl cannot touch the water.
 – Place Eggs and granulated Sugar in the bowl of your stand mixer and put on top of the pot. Turn the temperature down to medium-low and whisk continuously until the sugar completely dissolves and the eggs are warm.
 – Once warm, immediately place the bowl on your stand mixer, fitted with the whisk attachment, and whip on high until white, glossy and doubled in size. (I place aluminum foil around my mixer to keep the heat in.
warm eggs whip better. Remove the foil once the eggs are ready.)
 – Continue whipping the eggs on medium-high until they are room temperature
 – Add the Butter into the whipped egg whites and whip until incorporated. Scrape the sides and bottom of the mixing bowl
 – While on low speed, gradually add in the Powdered Sugar. (not all at once, or both you and your kitchen will be covered in white!)
 – Add in Vanilla Bean Powder

Assembly:
 – Once the cupcakes are cool, frost using a piping bag and large star tip

Until next time,
LOVE & CONFECTIONS!

Filed Under: Cakes & Frostings, Cupcakes, Events & Travel, Family & Festivities, Uncategorized

Apple Pie Bread Pudding

October 22, 2012

Katie asked me to do a guest blog on Katie’s Cucina while she was on vacation in Italy! I decided that this recipe would be perfect to share with her readers.

For many food bloggers, the Fall season is packed with apple and pumpkin recipes. Pictures of red, orange and yellow leaves dot blog pages and Instagram feeds. We have 2 seasons here in Florida, “Hurricane Season” & “Not Hurricane Season“. I love the changing of the Seasons, live vicariously through those amazing photos and treasure the visits to my Parents’ house is North Carolina.

What is better than warm apple pie? I decided to do a twist on the classic. When I was a kid, I loved waiting in my Grandmother’s kitchen while she baked apple pie. “One apple slice for the pie… one apple slice for Terri“. I watched as she mixed the apples with the spices, delicately laid the crust on top and popped it into the oven. As an impatient child, I wandered off while it baked, but as soon as the smell of freshly-baked apple pie wafted through the house, I came running to the kitchen. Usually we had to wait until after dinner to eat the pie, but there was one or two occasions when she caved and let us has a before-dinner snack.

This recipe has the spices and warmth of freshly-baked apple pie with the all the appetizing qualities of a moist and rich bread pudding. I hope you enjoy!

Apple Pie Bread Pudding
a Love & Confections original recipe

Apple Pie Bread Pudding Ingredients:
 – 2 teaspoons Cinnamon
 – 3/4 teaspoon Nutmeg
 – 1/4 teaspoon Allspice
 – 2 cups Granulated Sugar, separated

 – 4 cups Whole Milk
 – 6 Eggs
 – 1 large loaf of crusty Bread (Italian or Country)
 – 5 small Apples, or 3 medium Apples
 – 1 tablespoon Lemon Juice
 – 4 cups hot tap water

Apple Pie Bread Pudding Directions:
 – Combine the Cinnamon, Nutmeg and Allspice and set aside. Cut the Bread into inch-sized cubes and set aside.
 – In a medium saucepan, scald the Whole Milk but do not bring it to a boil. While the Milk is heating, crack the Eggs into a large bowl and whisk vigorously with 1 & 1/2 cups of Granulated sugar.
 – Once the Milk is warm, slowly pour into the Egg and Sugar mixture while whisking constantly (called Tempering, so the Eggs don’t curdle/scramble). Once all the Milk is added, whisk in 1 & 1/2 teaspoons of the homemade apple pie Spice Mix.
 – Place all the bread into the large bowl so it can soak up the mixture. You can toss it with a spoon and press down to make sure all the bread touches liquid. Leave it to “soak” for 30 minutes.
 – Heat the oven to 300F. Wash and dice the Apples into 1/2 inch cubes. I prefer the skin on for an added texture, but you can peel them if you do not like the skin. Place the apples in a bowl and add the Lemon Juice, the rest of the Spice Mix, remaining sugar and stir until the apples are completely coated.
 – Using a 2.5 quart Corningware or deep casserole dish (or if you prefer, individual portioned dishes) layer the soaked Bread and the Apple Mixture in 5 layers, beginning and ending with the Bread.
 – One of the most important steps when making bread pudding is to use a water bath, or Bain Marie. Place a large dish or pan (big enough to fit the casserole dish and about 4 cups of water) on the rack in the middle of your oven. Place the casserole dish inside and then add the water – this is the easiest way so you don’t create a big mess by moving the already full water bath into to oven.
 – Cook for 45-55 minutes. The top will look slightly crisp and the bread should be moist, but cake-like with no excess liquid around the edges. Very carefully, and if you can, take the bread pudding out of the water bath and let it cool slightly before eating. If you can’t grab the casserole dish, take both containers out of the oven and let the water cool, until you can get the casserole out of the water bath. Again, please be careful, because the water bath is extremely hot!
 – Best served warm with either vanilla ice cream or homemade Creme Anglaise

Until next time,
LOVE & CONFECTIONS!

Filed Under: Crisps-Crumbles-Bread Puddings, Uncategorized

Guest Blogging on Katie’s Cucina!

October 10, 2012

Hey everyone! Check out the guest post I did over on Katie’s Cucina!
APPLE PIE BREAD PUDDING!

Until next time,
LOVE & CONFECTIONS!

Filed Under: Guest Post, Uncategorized

Honey-Nut Blackberry Peach Crisp

September 1, 2012

Is there such a thing as a farmer’s market shopaholic? I am infamous for wandering through farmers markets and buying fruits and vegetables without having a clue or plan what to make with them. Blackberries were at the farmer’s market a while ago and I just couldn’t pass them up.

I usually ask the couple who runs the produce stand if I can taste the fruit before buying  (cherries, blueberries, strawberries, etc.). In my rush to buy them, I forgot to taste them. They looked absolutely beautiful, but looks were deceiving. My friend, Jill, grabbed one and popped it straight into her mouth. Not a moment later she almost spit it out, saying it was way too tart.

I realized that my mistake of not tasting them, and impulse buying, added to the confusion of what to make with these tart beauties. I washed them and stuck them in the freezer, thinking that I would eventually come up with a plan.

A little while later, I had a few peaches on hand. There weren’t enough to make a full cobbler with, so out came the blackberries from the freezer and wonderfully delicious, tart and sweet crisps were created. As I pulled the crisps out of the oven, my mouth watered with the still slightly tart smell of the blackberries mingling with the sweet peaches. I barely let them cool before having a huge, hot spoonful.

Honey-Nut Blackberry Peach Crisp
a Love & Confection original recipe

Honey-Nut Blackberry Peach Crisp Ingredients:
 – 1/4 cup of your favorite Honey Nut Cereal (I used Cheerios)
 – 1 package Instant Oatmeal
 – 2 tablespoons Brown Sugar
 – 3 tablespoons Granulated Sugar, separated
 – 1/4 cup Pancake or Baking Mix (I used Bisquick)
 – 3 Peaches
 – 2 cups Blackberries
 – 1 tablespoon Corn Starch
 – 1 tablespoon Honey
 – 4 tablespoons Unsalted Butter, cold and cubed
 – Vanilla Ice Cream (optional)

Honey-Nut Blackberry Peach Crisp Directions:
 – Heat oven to 350 degrees F.
 – In a food processor, combine the Honey Nut Cereal, Oatmeal, Brown Sugar, 2 tablespoons of the Granulated Sugar and the Pancake/Baking Mix. Pulse until combined, and the cereal is in smaller pieces, and reserve.
 – Cut the Peaches in small wedges or cubes.
 – Combine the Peaches, Blackberries, Corn Starch, Honey and remaining 1 tablespoon Granulated Sugar in a bowl
 – Portion the fruit into individual ramekins or a small/medium baking dish prepared with non-stick cooking spray.
 – Divide the cereal mixture onto the individual ramekins, or if using one baking dish, spread evenly on top. Place the cubed butter evenly over the cereal mixture.
 – Bake on a sheet tray covered in foil, in case the fruit mixture bubbles over. Bake for 35-45 minutes, or until hot and bubbly.
 – Let it cool a few minutes before eating. It will be hotter than it looks. Best served warm with a big scoop of Vanilla Ice Cream!

Until next time,
LOVE & CONFECTIONS!

Filed Under: Crisps-Crumbles-Bread Puddings, Uncategorized

Key Lime Pie Ice Cream

August 27, 2012

Since the weather has been in the mid 90s here in Central Florida, I have been experimenting and enjoying making homemade ice cream over the past few weeks. To start off, this ice cream is awesome! I don’t mean to brag, but my light bulb idea turned out really well this time… you know when you have the “light bulb”, right?  Believe me when I say, you HAVE to make this. This ice cream is friends, family and local chef/food truck owner approved!

So my light bulb idea started when I made a huge batch of Key Lime Curd. It was delicious, and I put it in various things, including these amazing Key Lime Cupcakes. I had quite a bit left over and decided to combine it with one of my all-time favorite sweets – ice cream. Added some sweetened condensed milk and toasted graham crackers… and Key Lime Pie Ice Cream was born.

This Key Lime Ice Cream is a 2 day process – but so worth it! I love the taste and texture. It stays creamy and easy to scoop, even after days in the freezer. I don’t particularly like rock solid ice cream that is hard to scoop and goes from impossible to eat in one minute to melted in the next.

On a side note, thank you Chef Tony from Big Wheel Truck & Big Wheel Provisions and Lake Meadow Naturals for making farm-fresh eggs available to the public! If you are in the Orlando, FL area, you can pick up fresh eggs from Big Wheel, Monday nights at the Audubon Park Community Market, or directly from the LMN Farm Store. Please check the Lake Meadow Naturals website for store hours and information.

Key Lime Pie Ice Cream
a Love & Confections original recipe

Key Lime Pie Ice Cream Ingredients:
 – 350 grams Whole Milk
 – 120 grams Heavy Cream
 – 100 grams Egg Yolks
 – 140 grams Granulated Sugar
 – 200 grams prepared Key Lime Curd
 – 200 grams Sweetened Condensed Milk
 – 200 grams toasted & cooled Graham Cracker Crumbs

Key Lime Pie Ice Cream Directions:
Day 1 (Ice Cream Base)
 – Bring Milk and Heavy Cream to a slight simmer in a small sauce pan, careful not to boil it.
 – While Milk & Heavy Cream are heating, crack eggs into medium bowl (bowl needs to be big enough to contain the egg and milk/heavy cream mixture). Add Sugar and whisk together
 – Temper* the warm milk & cream into yolks
 – Return the whole mixture to the sauce pan and heat to around 105F or nappe**
 – Strain through a fine mesh sieve into a clean bowl and allow to cool to room temperature.
 – Once cooled, store in the fridge, with a lid, for up to 5 days.
 – Place ice cream attachment/bowl in the freezer at least 24 hours before churning

Day 2:
 – Whisk together the Ice Cream Base, Key Lime Curd and Sweetened Condensed Milk
 – Churn according to your ice cream maker manufacture instructions
 – Remove ice cream and fold in the toasted Graham Cracker Crumbs
 – Store in an airtight, freezer-safe container for no longer than a week (but I’m sure you will devour it before then)

* – Tempering (in this case with eggs) is increasing the temperature of a certain ingredient by gradually adding and constantly whisking a warm/hot item into it. Be careful not to add too much at one time and curdle/scramble the eggs.
** – Coat the back of a wooden spoon in the mixture and run a finger down the middle, if the mixture stays separated and doesn’t run, then you should be good. Be careful not to overcook it and curdle/scramble the eggs.

Until next time,
LOVE & CONFECTIONS!

Filed Under: Ice Cream & Frozen Treats, Trifles-Parfaits-Mousses-Curds, Uncategorized

  • « Go to Previous Page
  • Page 1
  • Interim pages omitted …
  • Page 40
  • Page 41
  • Page 42
  • Page 43
  • Page 44
  • Interim pages omitted …
  • Page 46
  • Go to Next Page »

Primary Sidebar

Meet Terri
founder & pastry chef

Subscribe to Love and Confections

Popular Posts

Pumpkin Pecan Cupcakes with Cinnamon Cream Cheese Frosting
Pumpkin Spice Cinnamon Roll Cake
Oatmeal Cream Pie Layer Cake - oatmeal brown sugar layer cake, marshmallow frosting filling, and vanilla bean buttercream with oatmeal cream pie garnish
Easy Piña Colada Poke Cake - pineapple cake, coconut cream pudding, whipped topping, pineapple chunks and maraschino cherries
Mermaid layer cake
PIneapple cake with pineapple curd, teal frosting and tropical sprinkle mix
Irish Cream chocolate cupcakes topped with white and green buttercream piping and shamrock sprinkle mix

AMAZON AFFILIATE

Love and Confections is a participant in the Amazon Services LLC Associates Program, an affiliate advertising program designed to provide a means for sites to earn advertising fees by advertising and linking to amazon.com.

Copyright © 2018 Love and Confections · Log in