• Skip to primary navigation
  • Skip to main content
  • Skip to primary sidebar
  • Home
  • About
  • Work With Me
  • Media
  • Recipes

Uncategorized

Pinata Apple Crisp

January 31, 2014

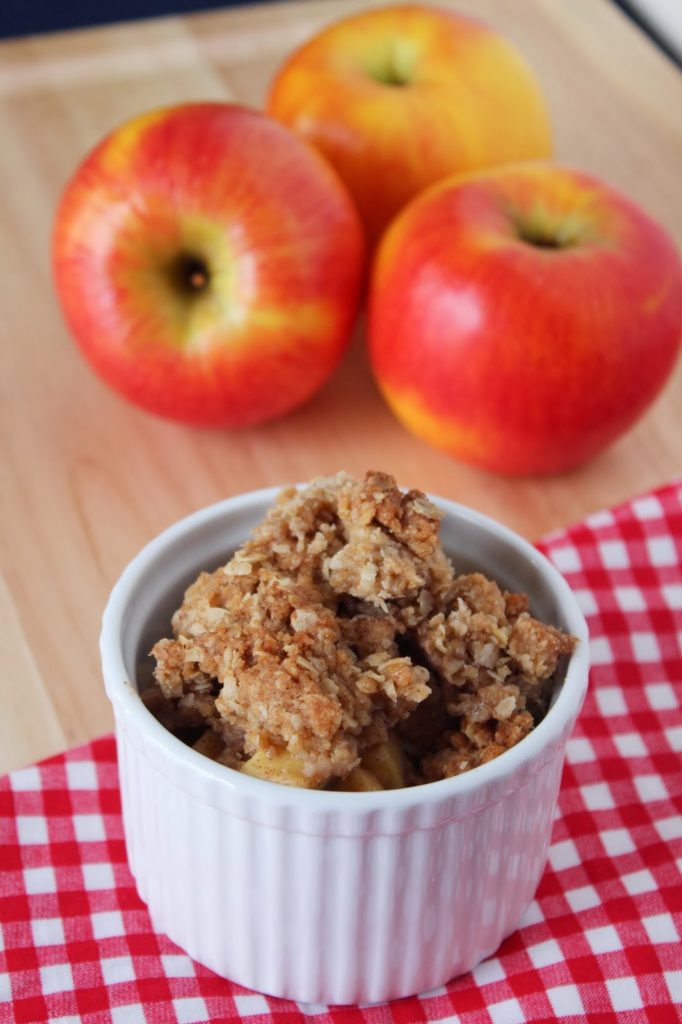
While most of the north has snow, ice or below freezing temperatures, it’s 65 outside here. If you need something to warm you up on a cold Winter day, try this Apple Crisp. It has just the right amount of spice and is perfect hot out of the oven with a scoop of vanilla bean ice cream. 
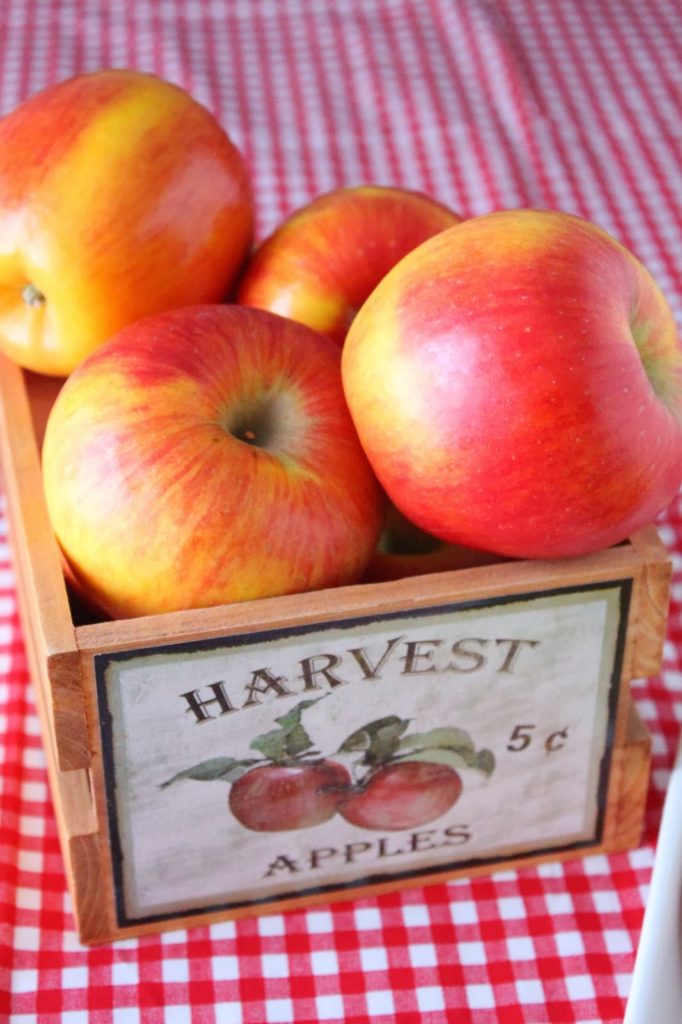
Stemilt growers was very kind and provided me with a dozen gorgeous Pinata Apples. “Pinata apples are crisp and juicy, equal parts sweet and tart, with a classic apple flavor that finishes with a tropical hint. They have the same thin skin as the Golden Delicious, which means they can be used for any culinary purpose. They hold their shape to cooking temperatures, making them a great choice for classic apple pie or roasted alongside pork tenderloin. And their pretty red-orange color and crisp texture make them the perfect apple for adding fruit flavor to a fresh green salad.”
To read more about the Pinata Apple, check out the Stemilt Blog. You can find these beautiful apples in stores from November through April. Give Stemilt some love by heading over to their website. You can also find them on Facebook, Twitter and Pinterest. In addition to apples, Stemilt also grows pears, cherries and Summer stone fruit.
Pinata Apple Crisp
a Love & Confections original recipe
Pinata Apple Crisp Ingredients:
 – 8 Pinata Apples, peeled, cored and diced
 – 1 tablespoon Lemon Juice
 – 3/4 cup Granulated Sugar
 – 1/4 cup Brown Sugar, lightly packed
 – 2 tablespoons All Purpose Flour
 – 2 teaspoons homemade Pumpkin Pie Spice
 – 1/2 teaspoon Salt
Pinata Apple Crisp Topping Ingredients:
 – 1 cup Old Fashioned Oats
 – 1 cup All Purpose Flour
 – 1 teaspoon ground Cinnamon
 – 1/4 teaspoon Salt
 – 1 cup Brown Sugar, lightly packed
 – 1 stick Unsalted Butter, melted and cooled
 – 2 teaspoons Vanilla Extract
Pinata Apple Crisp Directions:
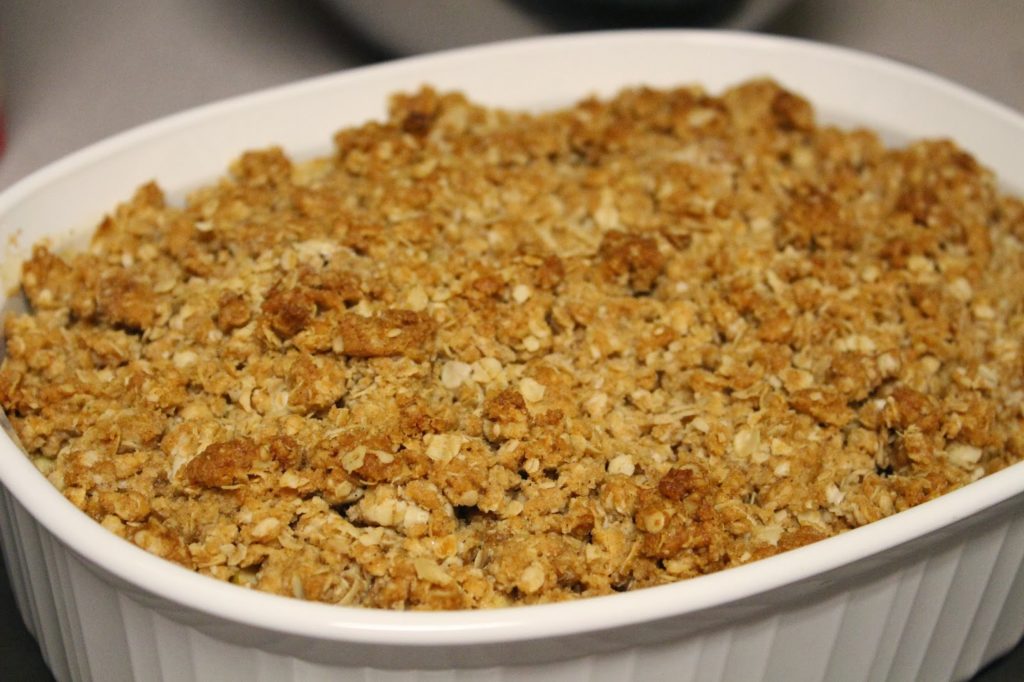
 – Heat oven to 350F and lightly grease a 9×13 baking dish or Corningware of equivalent size.
 – Combine Apples with Lemon Juice in a large mixing bowl. In a small bowl, combine the Granulated Sugar, Brown Sugar, Flour, Pumpkin Pie Spice and Salt. Sprinkle over the Apples and toss to coat. Pour Apples in the baking dish and make sure they are in an even layer.
 – In a small bowl, combine the Oats, Flour, Cinnamon and Salt. Add in the melted, cooled Butter and the Vanilla Extract. The easiest way to combine is using your hands.
 – Sprinkle oat mixture over apples and bake for 40-50 minutes, depending on your oven, until the oat mixture is golden brown and the apples are tender.
 – Best served warm and with a scoop of vanilla bean ice cream. Enjoy!
Until next time,
LOVE & CONFECTIONS!

Disclaimer: I received a dozen Pinata Apples from Stemilt to use for a recipe. All opinions are my own.

Filed Under: Crisps-Crumbles-Bread Puddings, Uncategorized

{Guest Post with Sweet Remedy} Pear and Cranberry Tarts

January 29, 2014

I am so excited to have Samantha from Sweet Remedy here today to share her Tarts with you. I have followed Sam’s blog for a while and love her recipes – she has such delicious food, sweets and drinks. She also takes the most gorgeous photos. I hope we can finally meet in real life soon. In addition to the Sweet Remedy Blog, you can find Samantha on Facebook, Pinterest and Twitter.

Hello Love and Confections Readers! I’m so excited to be posting here today. Before we talk about these Cranberry Pear Mini Tarts, I’d like to congratulate Mr. and Mrs. L&C on their new beautiful addition, Baby Grace! She is a complete little bundle of joy and I’ve loved seeing all the photos of their journey! Well wishes to your new little family!

To celebrate, I’ve made these mini tarts in the tiny tart pans that I love so much. Tiny tarts for a tiny baby girl! The tart cranberries compliment the sweet pear filling quite well in this dessert. The pop of red is also so pretty and festive for winter. Whenever I see cranberries in the store, I gravitate towards them and they end up going into the cart. After I get them home I start to dream up some new creative recipes, these tarts are exactly that.

If you have a large tart pan, feel free to use it in lieu of the mini pans. A mini tart pan set usually contains six little pans but in this recipe you will only have enough dough for four. I struggled not to eat all four tarts after they came out of the oven.


Pear Cranberry Mini Tarts
YIELD: 4 mini tarts or 1 large tart PREP TIME: 35 COOK TIME: 45 minutes TOTAL TIME: 1 hour and 20 minutes
Ingredients:

For the tart dough:1 1/2 cups all purpose flour

1/8 tsp salt

1/2 cup butter (1 stick)

1/4 cup sugar
1 egg
2 cups pears, peeled and chopped

3 Tbsp sugar

1/2 cup water

2 Tbsp cornstarch
For the Filling: Add the pears to a medium sized pot – turn heat to medium-high. Mix in the sugar & water, add the cornstarch and mix together leaving on medium-high for about 10 minutes, mixing often. Mash the pears while stirring. If the mixture is too watery, turn the heat down to low and let simmer for a few more minutes. Set aside until dough is complete.

For the filling:

Directions:
For the Dough:

Preheat oven to 350 degrees F. In a food processor, blend together the sugar and butter. Add the salt. Cut butter into quarters and add to dough. Mix thoroughly and remove from food processor. Form a ball shape and chill in the refrigerator for at least 30 minutes. Leave in overnight or freeze for longer storage. If freezing, remove and defrost an hour before use.

Spray tart pan with cooking oil or smear with butter. Press dough into tart pan (or mini tart pans) Poke holes into dough with fork. Place parchment paper on top of dough and add rice or beans as a pie weight. Cook for about 20-25 minutes or until tart shell is lightly browned.

Add the pear filling to the tart shell and add the cranberries to the top of the mixture. Bake until cranberries burst.

Alternatively, you can cook the cranberries with the pears in the original pot.

Filed Under: Guest Post, Uncategorized

{Guest Post with The Girl in the Little Red Kitchen} Meyer Lemon Donuts

January 24, 2014

Hi everyone! Today Susan from The Girl in the Little Red Kitchen is here to share her Meyer Lemon Donut recipe with you while I take time off with Baby Grace. I first worked with Susan when she participated in my #BrunchWeek last year and had a blast making all sorts of delicious cookies for the #CookieWeek she hosted this past November. Aside from her Blog, you can find The Girl in the Little Red Kitchen on Facebook, Instagram and Pinterest.

Hello Love and Confections readers and happy Friday! I’m Susan from The Girl In The Little Red Kitchen and I’m so happy to be here today helping Terri out while she takes some time off to enjoy her baby girl Grace.


I thought since the weekend is almost upon us, today would be a great day to share a simple but delicious baked donut recipe that you can bake up in no time. All it takes is an hour of your time and then you can sit down with these meyer lemon donuts with your coffee and Sunday paper (or Facebook, I won’t judge).


Meyer lemons are in season right now and I look for any opportunity to use them. If you aren’t familiar with the meyer lemon, it is simple a hybrid of lemons and mandarin oranges. The cross breeding with the orange produces a fruit that is not as tart as your regular lemon, extremely juicy and fragrant. Meyer lemons are perfect not only in baked goods but as a savory application as well.

Since our houses will be flooded with chocolate again next month due to Valentine’s Day, use this opportunity for a lovely lemony donut. You will need a donut pan to make these guys but they are inexpensive and in my personal opinion a worthy investment.

Ingredients:

For the donut:
1 cup unbleached all-purpose flour
1/2 cup granulated white sugar
1/2 teaspoon baking powder
1/4 teaspoon baking soda
1/4 teaspoon salt
zest from 1 meyer lemon
juice from 2 meyer lemons
1/2 cup greek yogurt
1 large egg

For the frosting:
1 cup confectioners sugar
4 tablespoons unsalted butter, room temperature
zest and juice from 1 meyer lemon

Directions:
Heat your oven to 350 degrees F. and grease a 6 capacity donut pan.
In a medium bowl, whisk together the flour, sugar, baking powder, baking soda, salt and zest.
In a small bowl, whisk together the meyer lemon juice, yogurt and egg.
Combine the wet ingredients into the dry and stir until incorporated throughout.
Carefully spoon the batter into the donut pans (I fill to the top) and bake for 10-12 minutes or until a toothpick inserted in the center of one of the donuts comes out clean.
Let cool slightly before removing to a rack to cool completely.
While the donuts are cooling, in your stand mixer fitted with the paddle attachment beat together the confectioners sugar, butter, zest and juice first on low and then up to high to form a smooth frosting.
Transfer to a piping bag and pipe the frosting on the cooled donuts.
The donuts are best served fresh the day they are made or can be kept in an airtight container for 1-2 additional days.

Makes 6 donuts.

Filed Under: Guest Post, Uncategorized

{Guest Post with Big Bear's Wife} Monster Chocolate Chunk M&M Cookies

January 14, 2014

I am so grateful that Angie is here to share a recipe with you all. Things have been crazy here at Love & Confections and I am definitely trying to get used to the lack of sleep and our fussy episodes. I love reading Angie’s blog – Big Bear’s Wife and am so glad I got to meet her this past year at the Food Blog Forum here in Orlando. You can also find Angie on Facebook, Pinterest and Instagram.

Hello!! I’m so glad to be a guest here on Love & Confections and excited to share these Monster Chocolate Chunk M&M cookies with you! I also want to shout out a huge “Congratulations” to Terri and her husband on the arrival of their sweet baby girl! Grace is so adorable and I’ve loved seeing her photos on Facebook!

Since Terri is taking time to be with her baby girl and family a few of her blogging friends have stepped in to guest post on her blog and I’m so happy that she asked me to stop by!

Today I’m sharing these Monster Chocolate Chunk M&M Cookies that my niece and I made for the first time back during the holidays! My niece’s name is Savannah Grace and I thought “that is just perfect! Cookie inspired by my Savannah Grace for Baby Grace!”

Hope you enjoy these as much as we do! They’re huge, soft and packed full of chocolate chunks and M&Ms!


Ingredients 
2 sticks unsalted butter, softened
1/2 cup sugar
2 cups brown sugar
3 eggs
3 teaspoons vanilla extract
3 cup all-purpose flour
1 1/2 teaspoon baking soda
1/2 teaspoon salt
3 Hershey Bars, roughly chopped
2 cups M&Ms
Directions:
Pre-heat oven to 350F.
Cream the softened butter in the bowl of a stand mixer. Add in the white sugar and brown sugar. Mix Well.
Add the eggs one at a time. Make sure each egg is incorporated before adding the next.
Add the vanilla. Mix well.
In a large bowl, whisk together the flour, baking soda, and salt.
With the mixer on low, slowly add the flour mixture to the batter. Mix until just combined.
Mix in the chocolate chunks and mix. Add in the M&Ms. Mix well.
Using a medium scoop, scoop 2 large scoops of dough for each cookie onto a sheet pan. I was able to bake 4 huge cookies at a time.
Bake at 350 F for 15 minutes. Remove and let cool.

Yields: 16 HUGE cookies or about 32 regular cookies

Thank you for having me Terri and Thank you for reading along Love & Confections friends!


 ~Angie Barrett

Filed Under: Guest Post, Uncategorized

{Guest Post with Cravings of a Lunatic} Peanut Butter and Chocolate Brownies

January 10, 2014

With a newborn, it’s sometimes a miracle that I am even able to brush my teeth every day. I am definitely still in the healing process and Baby and I are working on getting a routine and learning about each other. I am so glad that I have food blogging friends like Kim from Cravings of a Lunatic, who graciously said yes to do a guest post for me here on Love & Confections. Kim has such great recipes on her blog – both sweet and savory – and she is always ready to lend a hand. In addition to Cravings of a Lunatic blog, you can find her on Facebook, Pinterest and Twitter. Enjoy!

Hello Love and Confections readers. I am so happy to be here today. I met Terri last year while doing Brunch Week with her. She is such a nice gal and we bonded over bacon and french toast. Food bloggers are like that, we have this shared passion for cooking and food so when we meet someone else who is as passionate as we are it’s like finding a long-lost friend. Terri is one of those friends, and I’m lucky to know her.

 As you all know Terri and Mr L & C had a beautiful baby girl. Terri knew she would need some time off so she asked a few blogger friends to guest post for her while she did much more important things. I’m just hoping sleep is high on her list. My kids are older now, but I remember trying to grab sleep whenever I could when mine were young. It’s such a busy but exciting time. I’m so honoured Terri asked me to do this for her. It’s an absolute pleasure to be here so she can spend time with the family.

 For those who do not know me I am the lady behind the blog Cravings of a Lunatic. I also have a grill site called Kiss My Smoke. I’m an obsessive type of person so I spend a ton of time cooking and grilling. I spend so much time grilling that I’ve developed this territorial thing regarding it. Hubs is not allowed to touch it. I tend to be the same way in the kitchen as well. I love that the kitchen is my domain, so to speak. I crank up the music and just have a ball in there. For me cooking and baking is the time of the day where I just feel the stress leave my body and I’m in my element. All the other things on mind slip away and I just focus on the food.

 This is one of those recipes. I took my favourite brownie recipe and just played around with it. I wanted to make something that was just dripping with chocolate and peanut butter. We all know that combination is sheer perfection. So this recipe is the result of me playing with my food. I tend to do that far too often. But when the results turn out like this it’s totally worth it.

 Peanut Butter and Chocolate Brownies:

  • 8 tablespoons of butter
  • 2 ounces unsweetened chocolate
  • 1 cup sugar
  • 2 eggs, beaten
  • ½ teaspoon vanilla
  • ½ cup semi-sweet chocolate chips
  • ¼ cup flour
  • ¼ teaspoon salt
  • 1 cup of peanut butter chip
  • 1 cup of milk chocolate chips
  • 1/2 cup of mini chocolate chips
Instructions:
  1. Preheat oven to 325 degrees.
  2. Line your 8 x 8 inch pan with parchment paper. Spray with non-stick as well.
  3. Melt the butter and unsweetened chocolate together over low heat in a medium saucepan. Stir with a wooden spoon until it is melted and smooth.
  4. Remove from heat and quickly add the sugar. Stir well.
  5. Now add the eggs and vanilla, stir well until it’s smooth.
  6. Add semi-sweet chocolate chips, flour and salt. Stir until combined.
  7. Pour into lined and sprayed 8 x 8 inch pan.
  8. Top with the peanut butter chips, milk chocolate chips and mini chocolate chips. Tap the pan to get out any bubbles and then place it in the oven on the middle rack.
  9. Bake for 35-45 minutes. Normally I would tell you to watch for the top to start to crack but with all the chips on top you won’t be able to see that. You can use a toothpick but try to insert it around the edge so the toppings don’t mess with your dry toothpick results.
  10. Remove and cool on a rack.
  11. Cut into squares, or slice like a pizza.
  12. Serve with a big old peanut buttery and chocolatey smile.

Recipe is adapted from The Best Brownies in the World from Tasty Eats at Home. You can also find the recipe on my site as well, mine is minus the nuts, my daughter is not a nuts in brownie kind of gal.

 I really hope you get a chance to try this brownie recipe. A friend hooked me Alta’s brownie recipe years ago. It is by far the best fudgey, ooey, gooey brownie recipe I’ve ever had. It is my daughter’s favourite brownie recipe so I often tinker with it to put different spins on it. Alta adapted Katherine Hepburn’s Brownie Recipe which is a super famous brownie recipe. It’s incredibly simple but full of flavour. If you get a chance to try that one too you should. It’s a classic, much like Katherine Hepburn herself. The lady was class personified.

 Okay so now that I’ve rambled on, as I often do, I should wrap this up by thanking Terri for having me today. It’s an honour and pleasure to be here.

 Thanks to Terri’s readers for visiting with me today. If you get a chance you should swing by Cravings of a Lunatic and Kiss My Smoke to say hello. If you’re on pinterest I’m a huge pinterest addict so stop by there to follow me as well. I spend WAY too much time on there. It’s so much fun though. And heck, that’s what life is all about right.
Toodles and smoochies! xx

Filed Under: Guest Post, Uncategorized

BABY L&C IS HERE and Pink Vanilla Bean Cupcakes

December 19, 2013

I am so excited to publish this post. Baby Grace has decided to make her appearance! Mr. L&C and I could not be happier with our little princess. If you follow my Instagram feed, there will be many more pictures to come! Thanks to everyone for all the well-wishes and following my progress through this experience. We are doing well and can’t wait to start this new journey with our little one.

To celebrate our new arrival I thought I’d share a go-to cake recipe of mine. Everything around here has been pink lately – even the cupcakes! This is a great recipe to whip up for any occasion. The cake flour makes it so light and I love the little flecks of vanilla seeds from the Vanilla Bean Paste.


Vanilla Bean Cupcakes
adapted from Swans Down Cake Flour

Vanilla Bean Cupcake Ingredients:
 – 2 sticks unsalted Butter, room temperature
 – 2 cups granulated Sugar
 – 2 teaspoons Vanilla Bean Paste*
 – 4 Eggs, room temperature
 – 3 cups Cake Flour
 – 1 tablespoon Baking Powder
 – 1/2 teaspoon Salt
 – 1 cup Milk

Vanilla Bean Cupcake Directions:
 – Heat oven to 350F. Line a cupcake tin with cupcake wrappers.
 – In the bowl of a stand mixer with the paddle attachment, cream together the Butter and Sugar. Scrape the sides of the bowl. Add in the Vanilla Bean Paste and mix to combine.
 – Add in Eggs, one at a time, mixing well after each addition. Scrape down sides before adding flour.
 – In a separate bowl, sift together the Cake Flour, Baking Powder and Salt. Add Flour mixture and Milk, alternating by starting and ending with the Flour. Be careful not to overmix. Only mix until just combined to prevent a dense, dry cake.
 – Using a cookie scoop, evenly distribute in the cupcake tin and bake for 10-12 minutes for mini cupcakes or 15-18 for standard size cupcakes, or until the cupcakes are just done and a cake tester or toothpick comes out clean.
 – Cool for a few minutes in the tin, then transfer to a wire rack to cool completely before frosting.

Whipped Vanilla Frosting from Sweetapolita – I tinted it light pink

*If you don’t have Vanilla Bean Paste, you can use Vanilla Extract instead.

Until next time,
LOVE & CONFECTIONS!

Filed Under: Cakes & Frostings, Cupcakes, Family & Festivities, Uncategorized

Double Chocolate Peppermint Cookies

December 6, 2013

These Double Chocolate Peppermint Cookies are sure to become a family favorite. Great chocolate taste with some festive peppermint candies mixed in.

I love when you walk through the store and something catches your eye. For me, it happens more often than not, but who’s counting? I saw these Peppermint Baking Chips the other day and they called to me. What is more festive around the Christmas season than baking and candy canes?

As luck would have it, there was a great recipe for chocolate cookies on the back of the package and I knew I had to make them. Chocolate and peppermint go so well together, and really, who can resist chocolate cookies?

When I opened the oven after they were done baking, the peppermint and chocolate made the whole house smell like Christmas. These cookies are so dark, rich and delicious I had to remind myself to take photos before they got gobbled up. I made a half batch, because there is more peppermint goodness coming and I wanted to make sure I had enough baking chips left. Make sure these cookies are added to your holiday baking list!

Double Chocolate Peppermint Cookies
adapted from Andes/Tootsie Roll Industries
half recipe yields 16 cookies

Double Chocolate Peppermint Cookies Ingredients:
 – 1 stick unsalted Butter
 – 1 tablespoon Instant Espresso Powder
 – 1 cup All Purpose Flour
 – 1/2 cup Cocoa Powder
 – 1/4 teaspoon Baking Soda
 – 1/4 teaspoon Salt
 – 1/2 cup firmly packed Brown Sugar
 – 1/4 cup granulated Sugar
 – 1 teaspoon Vanilla Extract
 – 1 large Egg, room temperature
 – Half bag (5 ounces) Andes Peppermint Baking Chips
 – 2 ounces Semisweet Chocolate Chips

Double Chocolate Peppermint Cookies Directions:
 – Heat oven to 350F
 – Place Butter and Espresso Powder in a small saucepan and melt. Once melted, let cool to room temperature.
 – Sift together Flour, Cocoa Powder, Baking Soda and Salt. Reserve in a small bowl.
 – In the bowl of a stand mixer with the paddle attachment, mix room temperature Butter mixture, Brown Sugar, granulated Sugar and Vanilla Extract until combined.
 – Add in Egg and mix until combined. Gradually add in flour, a little at a time, while on low speed, just until incorporated.
 – Add in Peppermint Baking Chips and Chocolate Chips. Mix by hand with a spatula.
 – Cover with plastic wrap and refrigerate for 10 minutes.
 – Using a medium-sized cookie scoop, drop onto ungreased cookie sheets and press down slightly on each one. Bake for 10-12 minutes. Let cool for a few minutes on the cookie sheet, then move to a wire rack to cool completely. Enjoy!

Until next time,
LOVE & CONFECTIONS!

Disclaimer: I was not compensated or provided anything for this post. All opinions are my own.

Filed Under: Cookies, Uncategorized

Apple Cider Baked Doughnuts

December 3, 2013

I hope you all had a fabulous Thanksgiving holiday and long weekend! Now that it is December, I am counting down the days until Baby L&C makes her appearance. We are so excited (and scared – first-time Mom here) and ready to meet our little one. I have been doing some last minute baking to prep for baby down-time from the Blog. Hoping she holds out so I can get a few more recipes done. Speaking of recipes, here is one that I have wanted to try for a while…

I love doughnuts! Who doesn’t? I mean, when you decide to go to the local mom & pop donut shop to celebrate your birthday, it’s kind of a given. I love all kinds of doughnuts: baked, fried, filled, etc. There is no doughnut snobbery in this household.

I was given the opportunity to try out King Arthur Flour‘s Doughnut Pan recently. Aside from doughnuts, this pan is great for making Breakfast Sandwiches. King Arthur Flour also gave me a bottle of Boiled Cider to try out – man is this stuff good! There was no question when I decided to make Apple Cider Doughnuts for my first doughnut-making experience – I know, never made doughnuts. It’s crazy, especially since they are so easy to make.

This is a great doughnut pan. It bakes evenly and is a breeze to clean. The little handles make it easy to take out of the oven. I still use cooking spray, even though it is a non-stick surface – you can never be too careful. It is slightly bigger than my other doughnut pan by another baking company. I will probably adjust my recipes to make a fluffier doughnut because it is slightly bigger. There are no complaints on my end about it and I can’t wait to whip up another batch of delicious doughnuts!

Apple Cider Baked Doughnuts
adapted from King Arthur Flour
yield 18 doughnuts

Apple Cider Baked Doughnut Ingredients:
 – 1/3 cup Vegetable Oil
 – 3 large Eggs
 – 1 & 1/4 cups granulated Sugar
 – 1 cup Applesauce
 – 4 tablespoons Boiled Cider*
 – 1 & 1/2 teaspoon Vanilla Extract
 – 1 teaspoon ground Cinnamon
 – 1 & 1/2 teaspoon Salt
 – 1 & 1/2 teaspoon Baking Powder
 – 8 ounces All Purpose Flour

Apple Cider Baked Doughnut Directions:
 – Heat oven to 350F and lightly grease the doughnut pan with cooking spray.
 – In the bowl of your stand mixer with the paddle attachment, combine all the ingredients except the Flour. Add in the flour and mix until combined.
 – Using a 1/4 measuring scoop, fill the doughnut tray and bake for about 16-18 minutes or until a toothpick comes out clean.

Maple Glaze Ingredients:
 – 1 & 1/2 cups Powdered Sugar
 – 1 teaspoon Maple Flavoring, optional
 – 2 tablespoons Maple Syrup
 – 3-5 tablespoons Heavy Cream, depending on glaze consistency

Maple Glaze Directions:
 – Mix all the ingredients together in a small bowl and dip the doughnut tops to cover. Alternatively, spoon glaze over doughnuts. Let sit for a few minutes so the glaze sets. Enjoy!

Until next time,
LOVE & CONFECTIONS!

* The Boiled Cider has a very tangy and potent apple flavor. You can use anywhere from 2-4 tablespoons depending on the flavor profile you want.


Disclaimer: I received a Doughnut Pan and bottle of Boiled Cider for review purposes. All opinions are my own.

Filed Under: Breakfast & Brunch, Uncategorized

Ham, Egg and Cheese Mini Sandwiches

November 20, 2013

Depending on what day it is, I may be a morning person. I mean, if necessary, I will wake up and be ready to go. Other times, I don’t want to wake up until it’s afternoon. Waking up late is a problem when you love breakfast as much as I do. I guess that it the beauty of Brunch – you can have it anytime of the day.

Last month, my Dad got transferred here for his job and moved in with us. Mr. L&C, Dad and I are mostly adjusted to each other’s schedules – I haven’t lived with Family for 11 years. Dad wakes up for work earlier than we do, so he eats breakfast first. He asked if I could make these little egg “muffins” like my sister does up at home.

I didn’t have any recipe to follow, but I think they turned out pretty darn good. KB uses muffin tins, but I think they turn out a little too tall for sandwiches. Dad bought mini bagels to use for the egg sandwiches and that gave me the brilliant idea to use a doughnut pan!

I recently received a doughnut pan from King Arthur Flour to use. I love doughnuts – eating more than making, of course – and was wondering if I could use the pan for something other than just doughnuts (the donuts will be in an upcoming post). I like being able to use pans and utensils for more than just one task. This pan is perfect for not only doughnuts, but also for making these mini egg “doughnuts”. It bakes evenly and is a breeze to clean. The non-stick surface would have probably been fine just the way it is, but I used cooking spray just to make sure that the egg would come out perfect.

This recipe is easy to adjust for quantity and add your own spin on ingredients. I am going to make my next batch with spinach and swiss, possibly also a tomato and mozzarella version too.

Ham, Egg and Cheese Mini Sandwiches
a Love and Confections original recipe
yield 12 Ham, Egg and Cheese Sandwiches

Ham, Egg and Cheese “Doughnut” Ingredients:
 – 8 slices of Ham, I used regular deli slices, but you can use thicker cubed ham if you prefer
 – 1 cup shredded Cheddar Cheese
 – 1.25 cups Egg Beaters or about 8-10 Eggs
 – 1 teaspoon Salt
 – 1/2 teaspoon Pepper
 – Mini Bagel, toasted and buttered
 – Tomato Slices, optional

Ham, Egg and Cheese “Doughnut” Directions:
 – Heat oven to 350F. Spray pan with a little bit of non-stick cooking spray, just to make sure they come out perfect. You will have to work in 2 batches because there are only 6 cavities per regular doughnut pan
 – Cut the Ham into small pieces/cubes and equally distribute in the doughnut pan cavities.
 – Equally distribute and sprinkle Cheddar Cheese on top of the Ham.
 – Whisk Egg Beaters – or Eggs, if using – with Salt and Pepper, then pour over Ham and Cheese, leaving a little room at the top, because the eggs will bake and puff up slightly.
 – Bake for about 15 minutes, depending on how correct your oven temperature is, or until fully cooked and springs back to the touch.
 – Let it cool slightly before removing from doughnut pan. Repeat for second batch.
 – Cool completely before storing. I recommend storing in zip-top bags in the refrigerator for up to 4 days or in the freezer for up to 2 weeks.

 To assemble Sandwich:
 – Toast and Butter mini Bagel. Layer Ham, Egg and Cheese “doughnuts” with Tomato slices and enjoy!

Until next time,
LOVE & CONFECTIONS!

Disclaimer: I received a Doughnut Pan by King Arthur Flour for review purposes. All opinions expressed are my own. 

Filed Under: Breakfast & Brunch, Sandwiches-Paninis-Flatbreads-Pizzas, Uncategorized

Melt-In-Your-Mouth Pumpkin Cookies for #CookieWeek

November 16, 2013

These cookies are a must for your Fall baking. Moist and irresistible, these Melt-In-Your-Mouth Pumpkin Cookies are going to be a hit.


Welcome to #cookieweek! Susan of The Girl In The Little Red Kitchen and Kim of Cravings of a Lunatic have joined together this week with 23 of their blog friends to present to you a week of cookie treats! We have every type of cookie you can think of listed this week, including something for our furry friends! Now is the time to bookmark these recipes for the upcoming holidays and cookie swaps or simply visit our Pinterest board!  Make sure you enter the giveaway with some fabulous prizes fromKitchenAid, King Arthur Flour, OXO, Silpat and Zulka Pure Cane Sugar to help with your cookie making needs!


Living in Florida, we don’t get the changing of the leaves. I live vicariously through photos from Family and Friends. I always love the bright reds, oranges and yellows mixed in with the green trees. As far as Florida Fall goes, Autumn isn’t truly here unless you have pumpkin spice in your life. I love pumpkin pie spice – in coffee, cakes, cookies and so much more.

These cookies definitely melt in your mouth. They are so pillow-y soft and have just the right amount of pumpkin spice and sweetness. Our Thanksgiving dessert table will definitely hold a few of these delicious bites. I’m also going to freeze some for Christmas time, just in case we have unexpected guests popping by to see our newest addition to the family.

Melt-In-Your-Mouth Pumpkin Cookies
adapted from Better Homes and Gardens
yield 120 cookies – you can easily cut the recipe in half


Melt-In-Your-Mouth Pumpkin Cookies Ingredients:
 – 2 cups unsalted Butter, room temperature
 – 2 cups granulated Sugar
 – 2 teaspoons Baking Powder
 – 2 teaspoons Baking Soda
 – 1 teaspoon Salt
 – 2 teaspoons Homemade Pumpkin Pie Spice
 – 2 Eggs
 – 2 teaspoons Vanilla Extract
 – 1-15 ounce can pureed Pumpkin, not pumpkin pie filling
 – 4 cups All Purpose Flour

Melt-In-Your-Mouth Pumpkin Cookies Directions:
 – Heat oven to 350F. 
 – In bowl of your stand mixer, beat Butter for 30 seconds until light and fluffy. Add in Sugar, Baking Powder, Baking Soda, Salt and Pumpkin Pie Spice. Beat until combined and light and fluffy. Scrape down the sides of the bowl to make sure everything is incorporated.
 – Add in Eggs, Vanilla Extract and Pumpkin. The mixture will look slightly curdled but it is fine.
 – While the mixer is on low, slowly add in the Flour a 1/2 cup at a time and mix until just incorporated.
 – Using a small cookie scoop, drop dough 2 inches apart on an ungreased cookie sheet. Bake for 10-12 minutes, or until tops are set and just turning brown around the edges. Cool on a wire rack before frosting.

Pumpkin Cookie Frosting Ingredients:
 – 1/2 cup unsalted Butter
 – 1/2 cup packed Brown Sugar
 – 1/4 cup Milk
 – 1 teaspoon Vanilla Extract
 – 2 & 3/4 cups Powdered Sugar
 – Pumpkin Pie Spice for dusting, optional

Pumpkin Cookie Frosting Directions:
 – In a small saucepan, heat the Butter and Brown Sugar until melted and there are no lumps. 
 – Transfer Butter and Sugar mixture to a medium bowl and stir in Milk and Vanilla Extract. Stir in Powdered Sugar until smooth and there are no lumps.
 – Spread on cookies and dust with a little Pumpkin Pie Spice. Enjoy

We have an amazing  giveaway lined up this week thanks to our fabulous sponsors, KitchenAid, OXO, King Arthur Flour, Silpat and Zulka Pure Cane Sugar.  
Four lucky winners will win one of the following:
Prize #1: 1 (one) KitchenAid 9-Speed Hand Mixer plus 1 (one) 4lb bag of  Zulka Pure Cane Sugar
Prize #2: 1 (one) OXO gift set including the following:  1 (one) 3-in-1 Egg Separator, 1 (one) Cookie Press, 1(one) Autumn Cookie Disk Set, 1 (one) 3 piece Cookie Cutter Set, 1 (one) Bowl Scraper, 1 (one) 2 Cup Adjustable Measuring Cups
Prize #3: 1 (one) King Arthur Flour gift set including the following: 1 (one) King Arthur Unbleached All Purpose Flour -5lb bag, 1 (one) Snowflake Cookie Cutter Set, 1 (one) King Arthur Flour Pure Vanilla Extract, 1 (one) Sparkling Sugar Collection, 1(one) Semi-Sweet Chocolate Wafers – 16oz and 1(one) 4lb bag of Zulka Pure Cane Sugar
Prize #4: 1 (one) Silpat Halfsize Mat and 1 (one) 4lb bag Zulka Pure Cane Sugar
This giveaway is open to US residents from November 11, 2013 through November 16, 2013 11:59pm EST and will be picked from random draw.  The winners will be notified via email and have 72 hours to respond, if not their prize is forfeited and another winner will be chosen.

How to Enter:

  1. Mandatory Entry: Leave a comment with  your favorite cookie to bake during the holidays or for cookie swaps.
  2. Many more ways to enter in the rafflecopter widget!
a Rafflecopter giveaway

Disclaimer: KitchenAid, OXO, King Arthur Flour, Silpat and Zulka Pure Cane are providing the prizes free of charge.  All opinions stated are my own.

Also check out the other #Cookieweek posts for today!

  • Cinnamon-Sugar Crinkle Cookies by i heart eating
  • Ginger Lemon Snaps by Food Lust People Love
  • Melt-In-Your-Mouth Pumpkin Cookies by Love and Confections
  • Peanut Butter Filled Chocolate Cookies by That Skinny Chick Can Bake
  • Pumpkin Macarons by The Girl In The Little Red Kitchen
  • Pumpkin Snickerdoodles by 52 Kitchen Adventures
  • Until next time,
    LOVE & CONFECTIONS!

    Filed Under: Cookies, Uncategorized

    • « Go to Previous Page
    • Page 1
    • Interim pages omitted …
    • Page 36
    • Page 37
    • Page 38
    • Page 39
    • Page 40
    • Interim pages omitted …
    • Page 46
    • Go to Next Page »

    Primary Sidebar

    Meet Terri
    founder & pastry chef

    Subscribe to Love and Confections

    Popular Posts

    Pumpkin Pecan Cupcakes with Cinnamon Cream Cheese Frosting
    Pumpkin Spice Cinnamon Roll Cake
    Oatmeal Cream Pie Layer Cake - oatmeal brown sugar layer cake, marshmallow frosting filling, and vanilla bean buttercream with oatmeal cream pie garnish
    Easy Piña Colada Poke Cake - pineapple cake, coconut cream pudding, whipped topping, pineapple chunks and maraschino cherries
    Mermaid layer cake
    PIneapple cake with pineapple curd, teal frosting and tropical sprinkle mix
    Irish Cream chocolate cupcakes topped with white and green buttercream piping and shamrock sprinkle mix

    AMAZON AFFILIATE

    Love and Confections is a participant in the Amazon Services LLC Associates Program, an affiliate advertising program designed to provide a means for sites to earn advertising fees by advertising and linking to amazon.com.

    Copyright © 2018 Love and Confections · Log in