• Skip to primary navigation
  • Skip to main content
  • Skip to primary sidebar
  • Home
  • About
  • Work With Me
  • Media
  • Recipes

Uncategorized

Key Lime Confessions…

July 24, 2012

I L-O-V-E Key Lime Pie. I’m a Florida girl, what can I say? Growing up in Miami, it was always on restaurant dessert menus and with the Florida Keys – especially Key West – so close, who can’t help but to love this little, inconspicuous, intensely flavored lime! It goes without saying, that if I am ever out at a restaurant and decide to have dessert, if Key Lime Pie is on the menu, most probably my decision has already been made for me – with the exception of Chocolate Souffle… a great Chocolate Souffle trumps Key Lime Pie any day… mmm Chocolate Souffle… we’ll leave the souffle day-dreaming for another day and another post.

On to the Key Limes…

Key Limes are indigenous to the Florida Keys. They are smaller and rounder than standard limes and are more yellow than green, having a yellow rind and yellowish-green fruit. Key Limes have more seeds, a higher acidity, stronger aroma, a thinner rind and are much more tart than common Persian Limes.

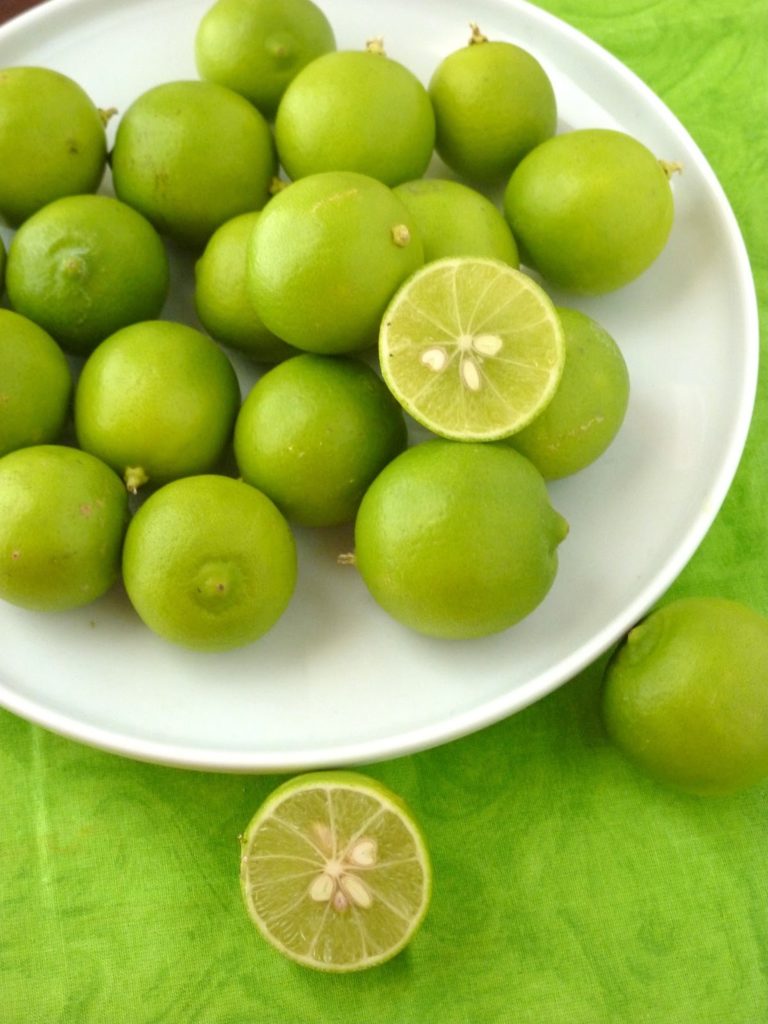
I am lucky enough to have some great local blogging friends. Orlando Foodie (Lenore) gave me some Key Limes from her tree. Little did I know that I would get 20 glorious, green, tart beautiful Key Limes! I was so grateful. Now, what to make? What to make? Like I said, I love Key Lime Pie, but I wanted to do something a little different with these babies. Cupcakes! Curd! Buttercream! Lightbulb! And the little cartoon light bulb above my head lit up. What?! Doesn’t everyone have a little cartoon light bulb above their head?


Key Lime Cupcakes with Key Lime Buttercream
Love & Confection original cupcake recipe
Buttercream Recipe adapted from a culinary school recipe

Key Lime Cupcake Ingredients:
 – 175 grams Cake Flour (1 & 1/2 cups)
 – 1 & 1/2 teaspoons Baking Powder
 – 1/2 teaspoon Baking Soda
 – 1/2 teaspoon Salt
 – 113 grams Unsalted Butter, softened (1 stick)
 – 225 grams granulated Sugar (a little more than 1 cup)
 – 2 Eggs
 – 1/2 teaspoon Vanilla Extract
 – 1 teaspoon Key Lime Extract
 – 60 grams Sour Cream (about 1/4 cup)

 – 175 grams Milk (about 3/4 cup)
 – 1 tablespoon Key Lime Zest (or regular lime zest)

 – 1 cup prepared Key Lime Curd for filling
 – 1 batch Key Lime Buttercream (recipe follows)
 – 1 cup toasted Graham Cracker Crumbs for decoration
 – Green Sixlets or Sprinkles for decoration

Key Lime Cupcake Directions:
 – Preheat oven to 350 degrees. Make sure your ingredients are room temperature.
 – Sift the Flour, Baking Powder, Baking Soda and Salt into a mixing bowl, or your stand mixer bowl.
 – Add the Butter and mix with the paddle attachment until combined. Scrape the sides and bottom of the bowl with a spatula to ensure everything is mixed properly
 – Add in the Sugar, and mix until combined. Scrape the sides and bottom.
 – Add in the Eggs and mix until combined. Scrape the sides and bottom.
 – Add in the Vanilla Extract, Key Lime Extract, Zest and Sour Cream. Scrape down the sides and bottom of the mixing bowl.
 – Add in the Milk and mix to incorporate and create a smooth batter.
 – Portion into cupcake tins lined with cupcake wrappers. I use a 2 ounce ice cream scoop, to ensure that my cupcakes are even and uniform. Batter makes about 18 cupcakes
 – Bake for 15-18 minutes, or until light golden brown and a toothpick comes out clean when inserted into the middle of a cupcake.

Key Lime Buttercream Ingredients:
 – 100 grams Egg Whites (about 3 egg whites)
 – 200 grams granulated Sugar
 – 226 grams Unsalted Butter (2 sticks)
 – 226 grams Powdered Sugar
 – 1-2 teaspoons Key Lime Extract

Key Lime Buttercream Directions:
 – Buttercream can be made a day in advance and kept in the refrigerator. I also keep mine in an airtight container on the counter if it will be used the next day. Make sure all the ingredients are at room temperature before starting.
 – Create a double boiler on the stove by warming a small pot of water on medium until little bubbles form.  Make sure the bottom of your stand mixing bowl cannot touch the water.
 – Place Eggs and granulated Sugar in the bowl of your stand mixer and put on top of the pot. Turn the temperature down to medium-low and whisk continuously until the sugar completely dissolves and the eggs are warm.
 – Once warm, immediately place the bowl on your stand mixer, fitted with the whisk attachment, and whip on high until white, glossy and doubled in size. (I place aluminum foil around my mixer to keep the heat in.
warm eggs whip better. Remove the foil once the eggs are ready.)
 – Continue whipping the eggs on medium-high until they are room temperature
 – Add the Butter into the whipped egg whites and whip until incorporated. Scrape the sides and bottom of the mixing bowl
 – While on low speed, gradually add in the Powdered Sugar. (not all at once, or both you and your kitchen will be covered in white!)
 – Add the Key Lime Extract and mix to incorporate.

Assembly:
 – Once the cupcakes are cool, either with a paring knife or apple corer, take out the middle of the cupcakes.
 – Fill each hole by piping in the Key Lime Curd.
 – Using a piping tip (I used a star tip) and bag, pipe the Key Lime Buttercream onto the cupcakes.
 – Use the Graham Crackers for decoration and crunch along the sides of the buttercream and green candy of your choice. (I used green sixlets. You can use sprinkles or gummy lime slices also)

Until next time,
LOVE & CONFECTIONS!

var _gaq = _gaq || [];
_gaq.push([‘_setAccount’, ‘UA-33655660-1’]);
_gaq.push([‘_trackPageview’]);

(function() {
var ga = document.createElement(‘script’); ga.type = ‘text/javascript’; ga.async = true;
ga.src = (‘https:’ == document.location.protocol ? ‘https://ssl’ : ‘http://www’) + ‘.google-analytics.com/ga.js’;
var s = document.getElementsByTagName(‘script’)[0]; s.parentNode.insertBefore(ga, s);
})();

Filed Under: Cakes & Frostings, Cupcakes, Uncategorized

Key Lime Crazy

July 18, 2012


I am lucky to have great local blogging friends. A while back, Lenore from Orlando Foodie told me she had a Key Lime tree outside her house. Me, being the helpful person that I am, offered to take any Key Limes she didn’t want. Lenore said she would give me some when they were ready to be picked. About two weeks ago I got tagged in one of her Instagram pics – 20 Key Limes for @lovenconfection! Woohoo, Key Limes!

Key Lime Curd instantly came to mind. I didn’t want to just make a Key Lime Pie – even though it is one of my all-time favorite desserts. By making the curd, I can incorporate it into a bunch of ideas I have… we’re going Key Lime Crazy on Love & Confections! … Also, don’t forget to check out my Key Lime Cupcakes filled with this Key Lime Curd and frosted with Key Lime Buttercream! Yum!

Key Lime Curd
Love & Confections original recipe

Key Lime Curd Ingredients:
 – 200 mL Key Lime Juice, fresh if available
 – 120 grams Sugar #1
 – 120 grams Butter (9 Tablespoons)
 – 300 grams Eggs (6 large eggs)
 – 120 grams Sugar #2

Key Lime Curd Directions:
 – Make sure the Eggs are at room temperature before starting, and that you have a fine mesh strainer and clean bowl waiting for the finished curd.
 –  Place Key Lime Juice, Sugar #1 and Butter in a medium-sized sauce pan on medium heat
 – While the Key Lime mixture is heating, whisk together the Eggs and Sugar #2 in a bowl.
 – Once the Key Lime mixture is just about to boil, slowly pour it into the Egg mixture while whisking the entire time – otherwise known as Tempering
 – Pour the whole mixture back into the pot and cook on medium-low heat, whisking constantly, until the mixture thickens. When a wooden spoon is dipped in the mixture and you can run your finger along the back, leaving a clear line, the curd is ready.
 – Pour the mixture into the sieve, over the clean bowl, to ensure no scrambled or over-cooked egg gets into your mixture. Immediately cover the surface with plastic wrap – to make sure a skin doesn’t form. Let it cool to room temperature on the counter, then place in the refrigerator to cool completely. Use within 1 week – if it lasts that long.

Until next time,
LOVE & CONFECTIONS!

Filed Under: Trifles-Parfaits-Mousses-Curds, Uncategorized

Food Blog Forum 2012 – Day 2

June 14, 2012

You can view my Food Blog Forum Day 1 post here.

Day 2

I was beyond excited to start day 2 of the Food Blog Forum. Our day started promptly at 8am. We had to take the monorail from the Polynesian resort, transfer at the Ticket & Transportation Center, and then another monorail to Epcot. Our Saturday seminar took place in the Odyssey Pavilion.

Since it was St. Patrick’s Day, a lot of attendees, including myself, were festive and wore green. We had a delicious breakfast and got settled for the seminar. The first presentation was Photography & Styling: Sharing  Your Food Story Through Your Creative Voice by Diane Cu and Todd Porter.

They presented on Focus, Balance, Texture, Color, Lines, Movement & Motion, Height, Moment and Story. Among the great advice Diane and Todd gave, were a few points that I felt were the most valuable.
 – Don’t compare your photographs to others
 – Authenticity is beautiful
 – Don’t be afraid of highlights and shadows
 – Mood, Feel, Voice, Message. Know what you want to say

Another presentation I thought was very valuable was David Leite’s How to Write Bigger, Better, More Badass Food Posts. David focused on twelve points in a “checklist” about how to write a better blog post. I could list them all here and discuss what he discussed, but I’m not going to. Instead, I am going to tell you something he told us, in fact, it is what stood out most from his entire presentation. “Write about life with honesty, authenticity and specificity.” I think that definitely sums up how I want to write and how I want to become a better writer.

Lunch at Epcot was an event in and of itself – Disney really does know how to throw a party!

This is just a sample of the amazing food offered to us…

Seared Tofu with Zucchini and Eggplant Ratatouille, Roasted Mushrooms, Lentils and Sun-dried Tomato Puree

Slow-roasted Bourbon-induced Black Pig Heritage Pork Tenderloin Slider with Local Hydro Grown Greens and Heirloom Tomato on Golden Spelt roll, Super Grain (Quinoa) Fries with Himalayan Sea Salt & House-made Ketchup

Soda Float with Rotovap Extracted CO2-infused Vanilla Lemonade with Nitro Whipped, No Sugar Pomegranate Ice

Stewed Lentils, Spicy Cauliflower, Onions, Tomatoes, and Mint served with Basmati Rice, Pappadam, and an assortment of Sanaa Signature Dips and Spreads

In addition to the desserts, the Disney Pastry Chefs also had cake and chocolate showpieces decorating the tables.

Clockwise from top left: Berry Gateau with Port Wine Foam, Mascarpone Cheesecake with Lavender-infused Florida Strawberries, Peruvian Chocolate Cylinder with St. Germain Glaze, Olive Oil-infused Chocolate Truffle Mousse with Sea Salted Caramel, and Chocolate Ravioli with Cognac

After lunch, we headed back to the Odyssey Pavilion for our Round Table discussions. I chose Blog Design with Lindsay Landis, Writing Bigger, Better, More Badass Food Posts with David Leite, Photography & Styling Live Demonstration with Diane Cu and Aran Goyoaga, and Recipe Development & Writing with Jennie Perillo and Kelly Senyei.

All the sessions were extremely helpful, but I wish they were more than just 30 minutes each. Lindsay did a question and answer type session and focused on specific blog design questions we had. David did basically the same thing, and went into more detail on helpful writing tips. Diane and Aran styled and shot a salad in front of us, and showed us a little of the process between a food stylist and food photographer. Jennie and Kelly talked to us about the different types of recipe categories for blogs and tips for writing and testing recipes. I’m glad I chose those four round tables, because they are what I am currently focusing on trying to improve at the moment.

Photography & Styling Live Demo – Diane Cu & Aran Goyoaga

The seminar ended around 4:30 and everyone went their separate ways until later in the evening. I went back to the Polynesian hotel to drop off my awesome swag bag, and check on M – he spent the day (his birthday) with a friend, “drinking around the world” in Epcot’s World Showcase. 
The After-party was later in the evening at Epcot’s World Showcase. I met up with Emily from Sage Recipes and headed back to Epcot. We had an Irish themed dessert buffet and great views of the IllumiNations firework show. 
I took the two photos on the left. Diane Cu took the photo on the right of Emily and Me watching the firework show. 

Thank you to everyone that was involved with the Food Blog Forum Orlando 2012. I cannot wait until next year!

Mentions:
Diane Cu & Todd Porter – White on Rice Couple
David Leite – Leite’s Culinaria
Lindsay Landis – Love and Olive Oil & Purr Design
Aran Goyoaga – Cannelle et Vanille
Jennie Perillo – In Jennie’s Kitchen
Kelly Senyei – Just A Taste
Emily Jacobs – Sage Recipes
Until next time, 
LOVE & CONFECTIONS!

Filed Under: Events & Travel, Uncategorized

Food Blog Forum 2012 – Day 1

June 1, 2012

Better late than never…

After almost three months of fighting with my computer, I caved and am finally posting from M’s computer. The daunting task of going through a lot of photos and transferring them to his computer has made this more difficult than it should be (besides dealing with the fact that my computer is out of commission for who-knows-what).

In mid-March, I attended the Food Blog Forum in Orlando, FL. After attending last year, I was beyond excited for all the wonderful festivities, speakers and panels that were planned – along with the amazing food, of course.

Julie Deily, of The Little Kitchen, and Dawn Viola had outdone themselves again. This past year, the Food Blog Forum partnered with the Walt Disney World Resort! It was a fabulous and fun-filled weekend for many food bloggers.

DAY 1

A Friday night welcome reception at the Grand Floridian Resort & Spa started the weekend off right.

Everyone mixed and mingled, chatting with old friends and making new ones, while enjoying the fabulous food Walt Disney World provided.
Antipasti Cones

Assortment of Shrimp

 Salad “Trees” – these were the coolest food sculptures I have ever seen. The martini glasses, filled with assorted salads, “floated” in these metal trees. I want one of my own 😉


Desserts: Mango Haupia Verrines (top right), Blood Orange Timbale (top left) & Cake Pops


The Welcome Reception was great. I headed back to the hotel to celebrate M’s birthday with my family and eagerly awaited the next day


Until next time,
LOVE & CONFECTIONS!

Filed Under: Events & Travel, Uncategorized

Peach Crostata for a Long Distance Birthday Wish

February 25, 2012


Tomorrow is one of my oldest friend’s birthday. We have known each other for 22 years!
MC and I went to the same elementary school and that is where we met. We became friends after I joined the Girl Scout troop her mom was the leader of. Twenty-two years is a long time. We have not only stayed friends, but have become like family.

When you call your friend’s grandparents by the nicknames she gave them, when building forts together on the patio and swimming in the pool are your number one priority, when you have summer sleepovers and can’t remember the last time you actually went home, when you have the absolute best stories from family vacations, when you make plans on how to scare your younger sisters’ troop while camping, when you help each other get ready for your proms and graduations, when, as adults, you and your friend make vacation plans together, when you hug each other after a grandparent has passed, when your friend helps you get ready on your wedding day… those are only a few of the memories from our friendship, the memories of twenty-two years, the memories of good friends.

One such memory:
Our families took an Easter trip to Georgia many years ago. We stayed on MC’s grandparents’ farm… with an orchard and a golf cart. Yes, the golf cart is very important. We could drive it, as long as we stayed on the property. That was a big thing to a little girl. We had such a blast – roamed the property, played outside, and drove the golf cart as fast as we could over all the little “hills and valleys”. One night, our families had a traditional fish-fry, right out of the back of a pick-up truck. The food was delicious and the company was great.
I remember waking up early one morning, before dawn, and looking out the window at the orchard. It was eerie and beautiful all at the same time. The fog enveloped the trees and I could tell the sun would rise soon. We just sat there and watched the fog for a while, before falling back asleep on Easter morning.
We don’t live in the same city and we don’t see each other often. I have countless more stories with MC, and will continue to make great memories, wherever life takes us. Hopefully we can see each other again soon! MC loves peaches, so I decided to make a Peach Crostata in honor of her birthday.

Happy Birthday MC! All my love!!!

Peach Crostata
Love & Confections original recipe
Peach Crostata Ingredients:
– 375-400 grams Sugar Dough
– 2 ripe Peaches
– 1 tablespoon Sugar, plus more for sprinkling
– 1 tablespoon Lemon Juice
– 1/4 cup Almond Meal/Flour
– 1 tablespoon Butter, cut in small cubes
– 1 Egg for egg wash
Peach Crostata Directions:
– Preheat oven to 375F.
– Keep dough cold until ready to use. Cut peaches in half, and each half in 6 pieces. Place Peach slices in a bowl and sprinkle with 1 tablespoon Sugar and 1 tablespoon Lemon Juice. Mix by hand, making sure each piece is coated.
– Roll out dough, on a floured surface, to about a 1/4 to 1/8 inch thick round.
– Sprinkle the middle of the dough with the Almond Meal, leaving about 2 inches around.
– Place the Peach slices on the Almond Meal. Place the cubed butter on the peaches. Brush the uncovered 2 inches of dough with the egg.
– Fold up the sides of the dough, making sure you press it together, so the dough sticks. It’s a rustic tart, so it doesn’t have to look perfect – and I am anything but perfect. Brush the top of the dough with more egg wash and sprinkle the top of the entire tart with sugar.
– Bake for 25 – 30 minutes, or until the dough is cooked and golden brown. I baked mine on stoneware, but if you don’t have any, you can use parchment on a baking sheet.
Until next time,
LOVE & CONFECTIONS!

Filed Under: Pies-Tarts-Crostatas, Uncategorized

Blueberry-Strawberry Tart for my 2nd Blogiversary

February 6, 2012

Happy Birthday to Love & Confections!

I can’t believe I started this blog 2 years ago. I started it on a whim, because I wanted to share recipes and techniques, was interested in food photography, and to continue learning, exploring, photographing and tasting all things baking and pastry. Over my two years of blogging, I have had ups and downs in life and in the blog world, but as Walt Disney said, “Keep moving forward,” and that is just what I have done.

I am trying to blog on a more regular basis and continually striving to improve my photography skills. I have been fortunate enough to have family and friends let me use their dslrs whenever they can, as opposed to my point-and-shoot that I use on a regular basis – thank you Aunt W & Susan! I am also experimenting in the kitchen more – hoping to bring you lots of original recipes in the coming year.

I thought a tart would be a nice blogiversary treat, instead of the normal birthday cake. Whatever dough and frangipane you do not use, can be frozen for later use. Just remember to wrap the dough very well. The frangipane can be put in a freezer ziploc. Let it freeze flat, then you can move it on its side, or wherever else you need to put it in the freezer. Remember to label them properly – name and date – so you always know what you have. Whenever you’re ready to use them again, just thaw for a day in the refrigerator.

Blueberry-Strawberry Tart
Love & Confections original recipe

Tart Dough Ingredients:
– 280 grams Pastry Flour
– 280 grams All Purpose Flour
– 225 grams Butter, cold and cut in small cubes
– 225 grams Confectioner’s Sugar
– 5 grams Salt
– 158 grams Eggs (roughly 3 large eggs)

Tart Dough Directions:
– Preheat oven to 350F
– Combine first 5 ingredients into the bowl of a stand mixer. Using the paddle attachment, on a low speed, mix the ingredients until the Butter becomes pea-sized and the mixture feels somewhat like sand.
– Add the Eggs, half at a time, and mix until combined. This is a very sticky dough.
– Once mixed, enclose the dough on plastic wrap, shaping it into a rough circle, and let it rest in the refrigerator for at least 2 hours.
– After the dough has chilled and rested, roll the dough out on a floured work surface. Gently place the dough in the tart pan without stretching it. Press it to the bottom, in the corners, and up the sides. Dock the dough, line it with a piece of parchment on it and pie weights or beans, and par bake it for 10 minutes. Remove the parchment and beans and let cool. The tart shell can me made ahead and frozen.

Frangipane Ingredients:
– 16 ounces Almond Paste
– 100 grams Sugar
– 195 grams Butter, room temperature
– 30 grams Almond Meal/Flour
– 250 grams Eggs (5 large eggs)
– 115 grams Flour, sifted

Frangipane Directions:
– This can be made while the dough is resting.
– Combine Almond Paste, Sugar, Butter and Almond Flour in the bowl of a stand mixer with the paddle attachment. Mix the ingredients on medium, stopping and scraping down the sides of the bowl every few minutes.
– While on low, add in the Eggs one at a time, making sure the Egg is thoroughly mixed in before adding the next. Scrape the sides of the bowl to ensure that everything is mixed properly
– Add in the Flour and mix on low until incorporated.
– Refrigerate mixture until ready to use, or divide into freezer bags as stated above.

Other Ingredients:
– 1 pint Strawberries, hulled and halved
– 6 ounces Blueberries
– Apricot Jelly

Tart Assembly:
– Measure 300 grams of the Frangipane into the tart shell. Using an offset spatula, spread and level the Frangipane. Bake for 25-30 minutes, or until the top is golden brown and springs back slightly when you tough it. Let it cool completely in the tart pan before going to the next step.
– Remove the tart from the pan and place on a cardboard cake round. Arrange the Strawberries around the edge of the tart. Place the Blueberries in the center of the tart.
– Warm the Apricot Jelly in a saucepan until liquid. You will need to add a few tablespoons of water, one at a time, to the jelly, so it doesn’t burn or darken too much.
– Using a pastry brush, brush the tops of the strawberries and blueberries with the Apricot glaze. This is best done right before serving. Keep refrigerated.
– Enjoy!

Until next time,
LOVE & CONFECTIONS!

Filed Under: Pies-Tarts-Crostatas, Uncategorized

Banana Nutella Bread

January 27, 2012

This isn’t an average banana bread. This banana bread contains the most delicious filling possible – Nutella!

Nutella® (pronounced “new-tell-uh”) is a spread made from roasted hazelnuts, skim milk and a hint of cocoa. It was created by a pastry maker, Pietro Ferraro, who founded the Ferraro Company in Italy. Nutella has no artificial colors or preservatives, is kosher, and gluten-free (does not contain any ingredients derived from gluten containing cereals: wheat, barley, rye, oats or triticale.) More information can be found at the Nutella website.

The banana bread recipe I used, is from a cookbook that is almost as old as I am. In 1988, my great-aunt, Anne, was the editor-in-chief volunteer for the A Taste of South Florida cookbook, in which the proceeds benefited the American Cancer Society. The forward says it best…

From the golden skyline of the Palm Beaches…the balmy breezes of Broward County… the magic of Miami… the tropical temptations and harvests of fresh produce of the Homestead/South Dade areas… through the dazzling Florida Keys where playful porpoises are on parade… this is the panorama of South Florida. Our cooking heritage has included the most intriguing combinations of traditions and the cosmopolitan. Our South Florida past with the scent of Spanish senoritas in mantillas… a trace of the Caribs… and spice from the Seminoles… make our cooking distinctive and different. The abundance of fresh fruits, vegetables, fish and game… the unusual flavor combinations… blending the old and the new… makes our South Florida cooking colorful and exciting.

The Nutella is smiling at me… live and learn – swirl next time.

This cookbook belonged to Booboop. I’m not sure our family has used any other banana bread recipe, since both she and my Mom each received this book, . The cover is fading, the pages are thumbed through and stained. The paper clip she used to bookmark the recipe is still in its place, after all these years. Her handwriting is in the margins, making notations about this recipe.

I was fortunate enough to inherit her copy of the book. The work my great-aunt put toward the cookbook, gathering and creating recipes to help the American Cancer Society, makes it even more special.

Nutella Banana Bread

adapted from A Taste of South Florida

Nutella Banana Bread Ingredients:
– 1/2 cup Shortening
– 1 & 1/4 cups Brown Sugar
– 2 Eggs
– 2 cups Flour
– 1 teaspoon Baking Soda
– 1/4 cup Buttermilk or Sour Milk*
– 1 teaspoon Vanilla Extract
– 3 extra ripe Bananas, mashed
– 1/3 cup Nutella

*to make Sour Milk, add 1/2 teaspoon lemon juice to regular milk, stir, and let sit for a few minutes

Nutella Banana Bread Directions:
1. Preheat oven to 350F. Grease and flour (or whichever method you prefer) 1 loaf pan or 4 individual-size loaf pans
2. Sift together Flour, and Baking Soda and set aside
3. Cream Shortening and Brown Sugar.
4. Add Eggs, one at a time, making sure it is fully incorporated before the next one is added. Scrape down the sides of the bowl to ensure everything is mixed properly.
5. Add sifted Flour to the mixture.
6. Add in Sour Milk, Bananas, and the Vanilla Extract. Scrape down the sides of the bowl to ensure everything is mixed properly.
7. Pour half of the batter into your loaf pan. Spoon the Nutella over the batter. You can leave the Nutella in the center, or with a knife, swirl the Nutella into the batter. My Nutella pretty much sank to the center, so I would recommend swirling it in… live and learn.
8. Pour the remaining batter into the loaf pan.
9. Bake for 1 hour, or until a tester inserted into the cake comes out clean (remembering that you have Nutella in the center)

Enjoy!

Until next time,
LOVE & CONFECTIONS!

Filed Under: Quick Breads-Muffins-Scones, Uncategorized

Meyer Lemon Whipping Cream Cake

January 9, 2012

Before a couple of months ago, I had never had a Meyer Lemon. I knew what they were, I just never had one. A lot of people don’t know what they are – go out and get some, if this is you! Meyer Lemons are citrus fruit that is thought to be a cross between a lemon and an orange, or mandarin orange.

Meyer Lemons are “chubbier” than regular lemons. They have a bright yellow-orange skin, and are sweeter (less acidic) than the lemons found in the grocery store. My Publix and Whole Foods don’t carry them, but I was lucky and found some great Meyer Lemons at The Fresh Market. I seriously want to get myself a Meyer Lemon tree – but living in an apartment with no patio kind of makes it difficult.

I decided to do a cake for my first batch of Meyer Lemons. This cake is Delicious, with a capital “D”! It is insanely moist from the whipping cream, and easy to make. I have been wanting to make this cake for a while, and I’m so glad I did. Everyone loved it.

Meyer Lemon Whipping Cream Cake
adapted from Swan’s Down Cake Flour

Meyer Lemon Whipping Cream Cake Ingredients:
– 3 sticks unsalted Butter, room temperature
– 3 cups of Sugar
– 6 Eggs
– 3 cups Cake Flour, sifted
– Pinch of Salt
– 1 cup Heavy Whipping Cream
– 2 Meyer Lemons, zested and juiced

Meyer Lemon Whipping Cream Cake Directions:
1. Preheat oven to 325F.
2. Butter and flour (or you can use your favorite baking spray) a 10 inch tube pan
3. Sift Cake Flour and reserve.
4. Cream Sugar and Butter together until light in color, in bowl of stand mixer or with hand mixer.
5. Add Eggs, one at a time, remembering to beat well after each addition.
6. Add in Lemon Zest and Juice.
7. Add in Flour and Whipping Cream, alternating both, and beginning and ending with the Flour.
8. Pour into prepared pan and bake for 75-90 minutes – depending on how your oven heats – until a tester inserted into the cake comes out clean.

Meyer Lemon Cake Glaze Ingredients:
– 1 Meyer Lemon, zested and juiced
– 2-3 cups Confectioner’s Sugar, sifted

Meyer Lemon Cake Glaze Directions:
1. Whisk Lemon Juice, Lemon Zest and Confectioner’s Sugar together
2. Pour over cooled cake
3. Enjoy!

Until next time,
LOVE & CONFECTIONS!

Filed Under: Cakes & Frostings, Uncategorized

The Great Food Blogger Cookie Swap 2011

December 13, 2011

The Great Food Blogger Cookie Swap 2011

I love cookies! Who doesn’t love cookies? When I heard about the opportunity to join a cookie swap, I was thrilled – especially since it was world-wide.


Lindsay from Love and Olive Oil and Julie from The Little Kitchen organized The Great Food Blogger Cookie Swap 2011. Over 620 Food Bloggers signed up, and over 22,000 cookies were baked and mailed – the post offices must have smelled delicious!

I bought little holly boxes to pack my cookies in, but didn’t want them moving around in the USPS box and breaking. The search continued and I luckily found the cutest snowman boxes that fit perfectly in the shipping box. They were too adorable!

The hardest part of this was deciding on what cookie to bake. It needed to be able to survive mailing – my matches were in Texax, Pennsylvania and Alaska! The cookies needed to arrive fresh and in one piece. A cookie with frosting was out of the question, so I searched through some family recipes and found the perfect one.


Booboop used to make cookies all the time, especially around the holidays. I loved the Split Seconds she used to make for our tea parties. She also made a variety at Christmas, including her Family recipe for Biscotti.

Now, this Biscotti is similar, but not the same to the usual long, hard, crunchy logs you see in coffee shops and cookie cases. It is moist, has a more tender crumb, and doesn’t get baked twice.
Shock! I know! But it turns out delicious, just the same. I tweaked the shape of them – hers were traditionally “S” shaped, and I also added some of my own variations instead of Booboop’s usual walnut and anise flavors.


If you would like to participate in next year’s cookie swap, you can sign up here to receive notifications.


Biscotti Bites
Original Family Recipe

Biscotti Bites Ingredients:
– 4 cups All-Purpose Flour
– 1 cup Sugar
– 1 tablespoon Baking Powder
– 1/4 teaspoon Salt
– 1 cup Shortening or Margarine
– 2 Eggs, slightly beaten
– 1/4 to 1/2 cup Milk

Biscotti Bites Directions:
– Preheat oven to 375F
– Sift together the Flour, Sugar, Baking Powder and Salt into your mixing bowl
– Cut in shortening with pastry blender, or use paddle for stand mixer, until small pea-size pieces are formed and mixture is somewhat crumbly in texture
– Add any mix-in ingredients
– Add in Eggs
– Add Milk, 1 tablespoon at a time, until a soft dough forms. Make sure everything is mixed thoroughly
– Use a teaspoon, or teaspoon-size cookie scoop, and place 20 cookies per silpat-lined sheetpan, leaving about an inch between them.
– Bake for 12 minutes, or until lightly browned,

Each recipe makes roughly 60-70 cookies.

Variations:

Espresso Chocolate Chip Biscotti Bites
– Add 1 tablespoon Espresso Powder into sifted dry ingredients
– Add 1 cup Semi-Sweet Chocolate Chips after Shortening is incorporated

Cinnamon Sugar Pecan Biscotti Bites
– Add 1 teaspoon Cinnamon into sifted dry ingredients
– Add 1 cup chopped Pecans after Shortening is incorporated
– Sprinkle tops of cookies with Cinnamon-Sugar mixture before baking


I want to thank Megan at Stetted for her Muddy Snowdrops and Jess at Pretty Physicist for her Snickerdoodles. They were delicious!

Until next time,
Love & Confections!

Filed Under: Cookies, Uncategorized

Chocolate Chip Angel Food Cupcakes

October 19, 2011


I decided to make these delicious Chocolate Chocolate Chip Angel Food Cupcakes. I love angel food cake. It’s so light and airy and pillowy. The crunchy sugar crusted top gives way to a tender cake center. It is perfect by itself – eating a piece of cake straight from your hand is one of the ways we enjoyed it as children – or add fresh whipped cream and berries – Heavenly! Must be why it is called Angel Food Cake.

This recipe adds some chocolate flavor the the already great angel food cake. Some people don’t like making angel food cake because it only uses egg whites, and you have a ton of yolks leftover. Don’t worry. You’ll get a recipe for those leftover yolks later. I like to use fresh egg whites for my angel food cake. The store-bought egg white only cartons are do-able in a pinch, but fresh egg whites are preferable.

This Chocolate Angel Food Cupcake recipe was easy to make and even easier to make them disappear. I hope you enjoy them. I doubled the recipe, but you can easily scale it down to the original measurements.

Chocolate Chocolate Chip Angel Food Cake
adapted from The Galley Gourmet

Angel Food Cake Ingredients:
– 1/2 cup plus 2 tablespoons Cake Flour
– 1/2 cup Dutch-Processed Cocoa Powder
– 1 teaspoon Espresso Powder
– 1 & 1/2 cups granulated Sugar, divided
– 12 large Egg Whites, at room temperature
– pinch of Salt
– 1 & 1/2 teaspoons Cream of Tartar
– 2 teaspoons Vanilla Extract
– Confectioners Sugar for dusting
– Mini Semi-Sweet Chocolate Chips for garnish

Angel Food Cake Directions:
1. Preheat the oven to 350F, spray the tops of 2 cupcake tins and trays with 16 liners (evenly spaced out because you will have empty spots).
2. Separate Egg Whites and Yolks. Be careful to not get any yolk in the whites, or the whites will not whip properly. The best way is to crack the egg over a separate small bowl and then transfer the white to your mixing bowl and the yolk to another bowl. It creates more dirty dishes, but prevents any yolks from getting into your whites.
3. Sift the Cake Flour, Cocoa Powder, Espresso Powder and 1/2 cup plus 4 tablespoons Sugar into a medium bowl and set aside.
4. In the bowl of your stand mixer, with the whip attachment, whip the Egg Whites, Salt, Cream of Tartar and Vanilla on high, until soft peaks form. While the mixer is still on high, gradually add in the remaining Sugar, a little at a time, and whip until stiff, glossy peaks form (2-3 minutes).
5. Gently fold the dry ingredients into the egg whites in three additions, making sure not to deflate the egg whites too much.
6. Fill each cupcake liner high with batter – two ice cream scoops full.
7. Dust each cupcake with Confectioners Sugar and sprinkle the tops with a few mini Chocolate Chips.
8. Bake for 20-30 minutes – depending on your oven – until the tops are puffed and dry.
9. Keep the cupcakes in the tin for an hour to cool and ensure they keep their shape. After one hour, gently remove the cupcakes and enjoy! They can be stored in an airtight container for up to 2 days – although I don’t think they will last that long, they are too delicious!

Until next time,
LOVE & CONFECTIONS!

Filed Under: Cupcakes, Uncategorized

  • « Go to Previous Page
  • Page 1
  • Interim pages omitted …
  • Page 41
  • Page 42
  • Page 43
  • Page 44
  • Page 45
  • Page 46
  • Go to Next Page »

Primary Sidebar

Meet Terri
founder & pastry chef

Subscribe to Love and Confections

Popular Posts

Pumpkin Pecan Cupcakes with Cinnamon Cream Cheese Frosting
Pumpkin Spice Cinnamon Roll Cake
Oatmeal Cream Pie Layer Cake - oatmeal brown sugar layer cake, marshmallow frosting filling, and vanilla bean buttercream with oatmeal cream pie garnish
Easy Piña Colada Poke Cake - pineapple cake, coconut cream pudding, whipped topping, pineapple chunks and maraschino cherries
Mermaid layer cake
PIneapple cake with pineapple curd, teal frosting and tropical sprinkle mix
Irish Cream chocolate cupcakes topped with white and green buttercream piping and shamrock sprinkle mix

AMAZON AFFILIATE

Love and Confections is a participant in the Amazon Services LLC Associates Program, an affiliate advertising program designed to provide a means for sites to earn advertising fees by advertising and linking to amazon.com.

Copyright © 2018 Love and Confections · Log in